Here's a small tutorial on how to take the optimal pictures for your car. These techniques are prime for having a signature made. Not only will following these steps and rules make your car look great, but it will also make it easiest on our Photoshop crew to make you a signature that you will enjoy. Plus, if you have pictures that look nice, your chances of someone telling you to retake pictures for whatever reason will be less likely
These tips also apply when you are just trying to take some pictures for your car for yourself, not just to be posted on here. You will notice that if you follow these tips, your photo taking will greatly improve and you will be much more impressed with your ability to take pictures.
Let's get started.
I am going to get this out of the way right off the bat. Please DO NOT post pictures that you took with a cell phone. No matter how clear they look on your phone, the clarity and distortion of the image is very noticable in a larger format, and is very hard to work with.
No matter how well your pictures come out, whether it be clarity or how you present your image, they will be virtually useless if you dont make them big enough. A good average size of an image to use is about (in pixels) 800 x 600. That size is a standard size for cameras and computer desktops so if you resize your images to that size you will not have any distortion or "smooshing". 800 x 600 is only an optimal size if your car is in most of the picture. If your car is only in the bottom corner of the picture, then a much bigger size will be needed because a small picture of the car is very hard to work with.
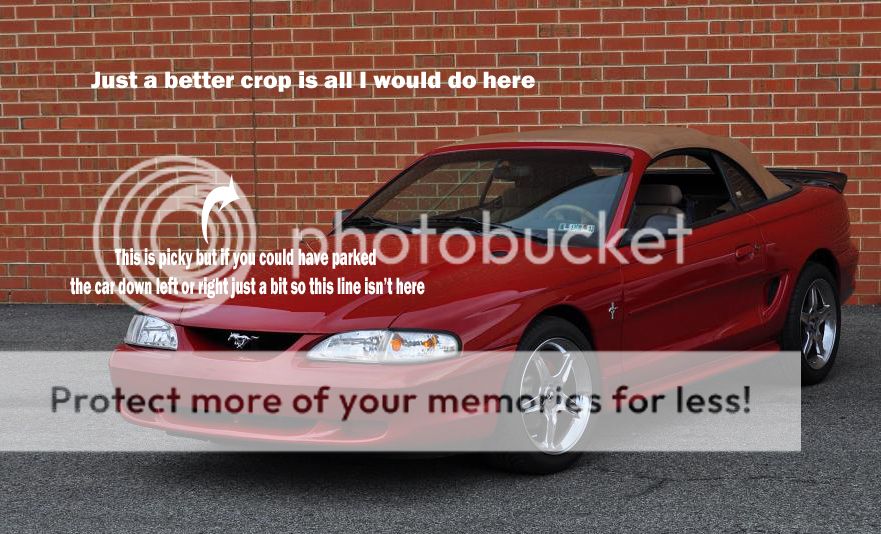
Next, the whole car MUST be in the picture. This is not true for EVERY image that you can post, but the majority of pictures should have the entire car with out the car hanging off the edge of the photo. Some "artistic" pictures may have only the emblem, or one part of the car at a very close angle, but DO NOT post ONLY close-up pictures.
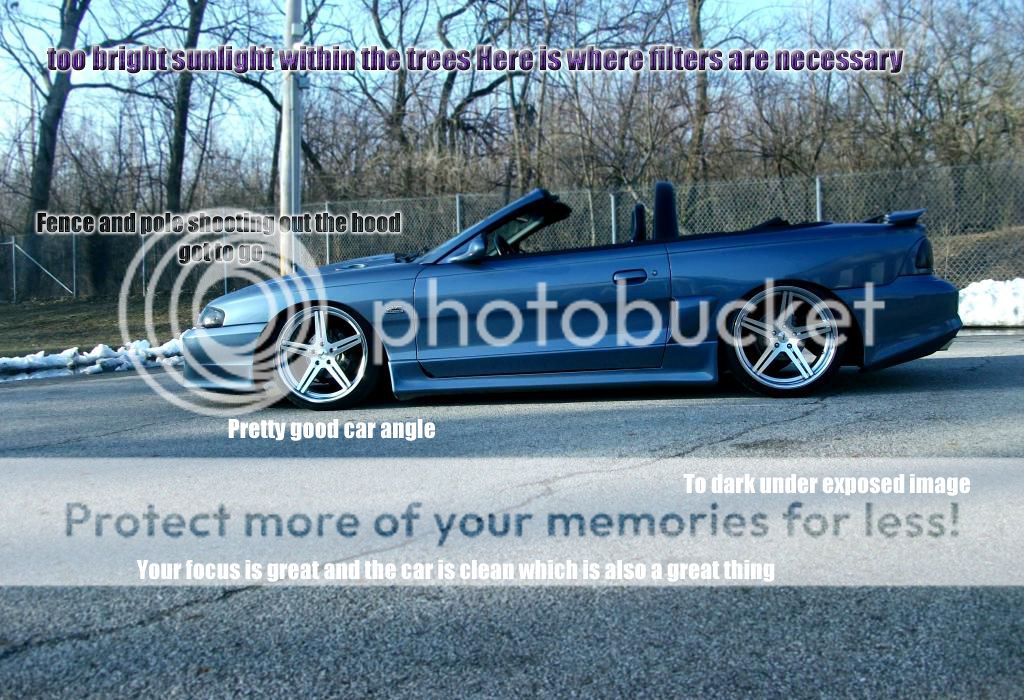
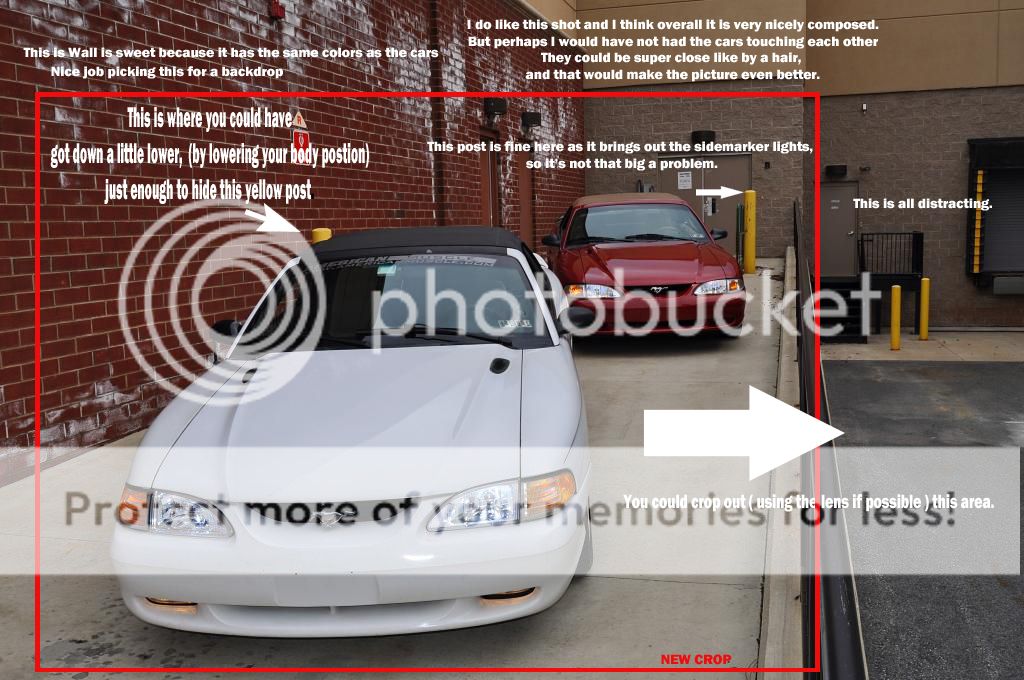
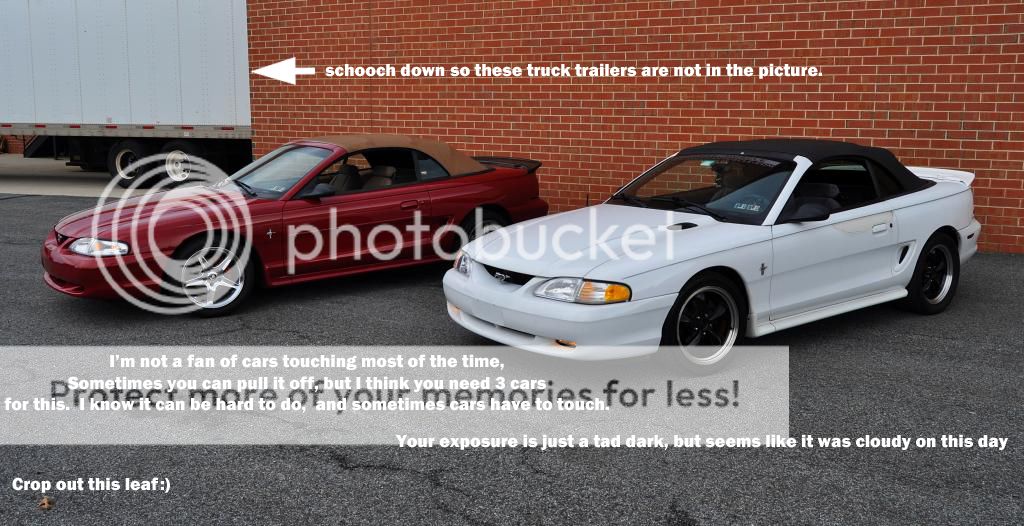
An important thing to remember is, you DO NOT want big sun glares on your car, or huge shadows that black out areas of your car. Big sun glares create "bleaching" which not only "bleaches" out the paint in your pictures, but also eliminates the defining shape of the car where the glare hits. The same goes with shadows, but as obviously you can tell, you end up with very dark spots and undefining areas of your car.
Shadows are not always bad though. If your car still has a defining shape and you can see most areas of the car, a shadow may not be a bad thing, and if harnessed correctly, it can make an image look just that much better.
Now onto where you should take pictures. Remember, you CAN take your car out of your driveway (well unless you dont have a drivers liscense or if the car is not running). For "Artistic Photography" pictures, a nice scenery is something that you would like to include in your picture. For a signature though, it all depends on what you would like. For someone that would just like their car chopped onto a custom created background, then scenery is not a priority, and clarity, size, and complexion of the car is the only objective. If you would rather have a "simple" signature, where most of the original picture (including background) is used, and maybe "optimized" to improve the image, then you would want to take the picture somewhere where you would have something nice in the background or a "themed" image.
The Types of Angles:
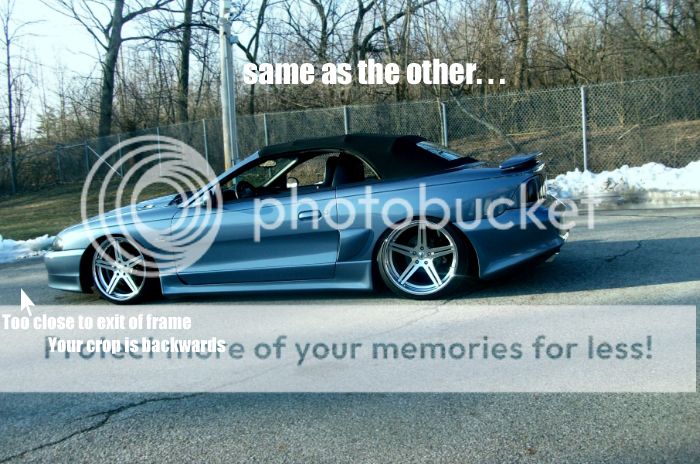
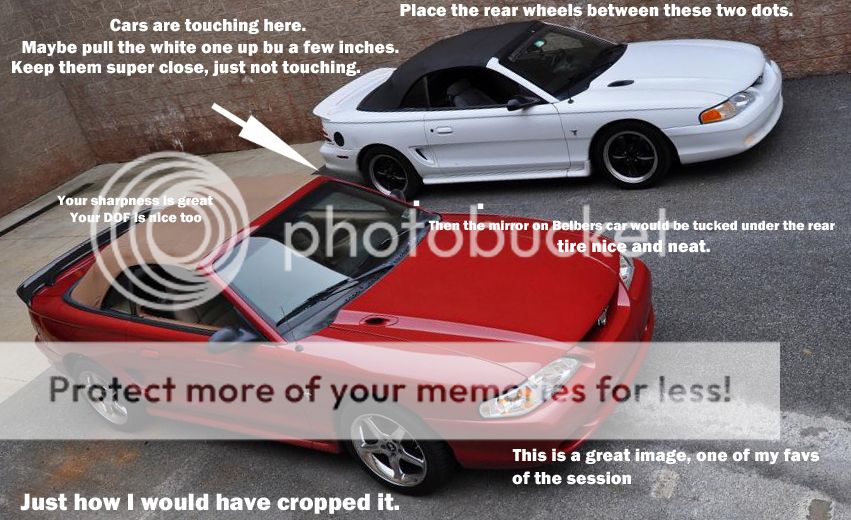
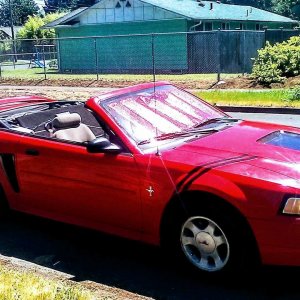
This is a crucial part of this tutorial. You dont want your car to look as if it is two-dimensional. You want your car to show some depth, you want people to see more of your car. Straight on side angles and front angles are something you want to avoid as a "primary" image. Side profiles and straight on front shots are good for a background angle, maybe used to be blended into the background of a signature, but as a main image, you would want something at a "3/4" angle, which is taken from one of the corners of your car.
As a rule of thumb, high angles are more than not something that you do not want to use. A good rule of thumb would be to hold the camera at about headlight height to take your pictures. That way you are reassuring yourself that your camera angle isn't too low or too high.
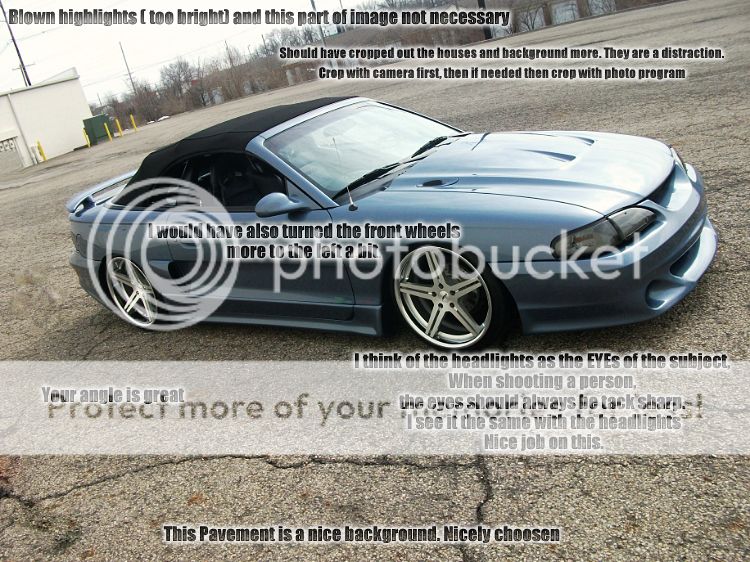
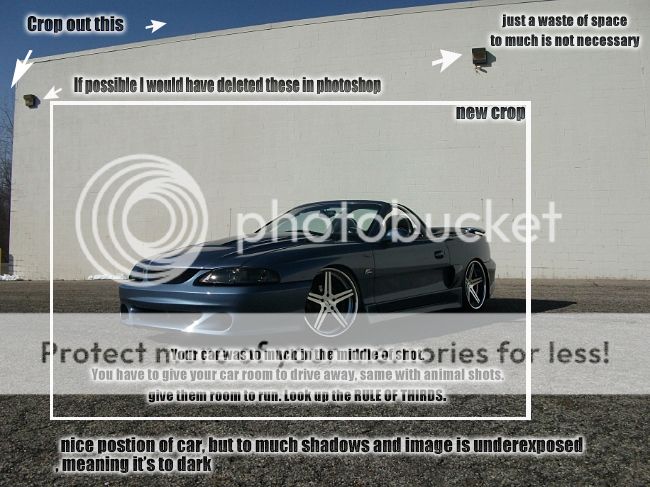
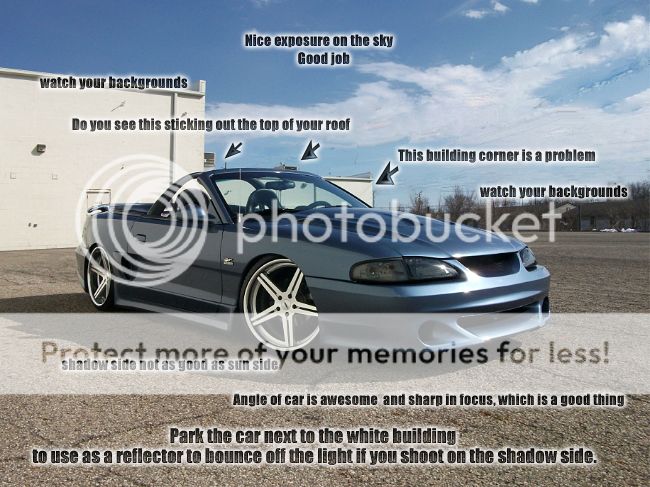
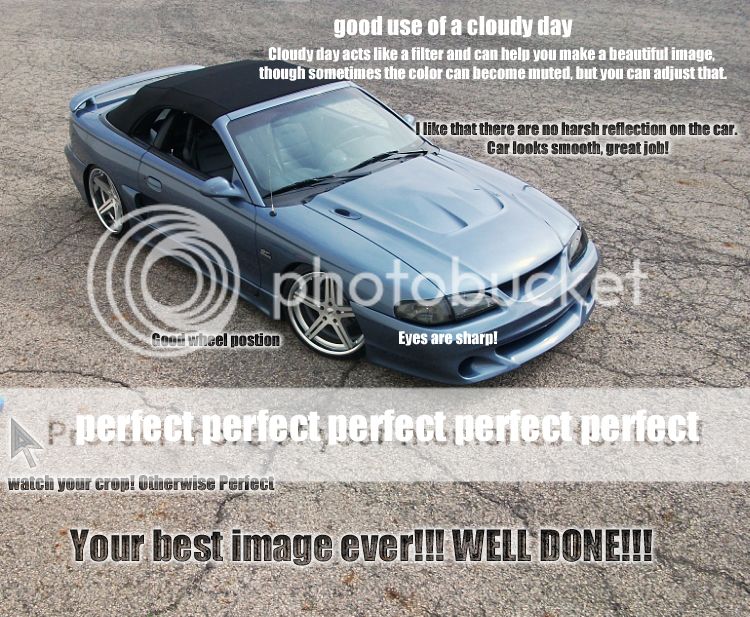
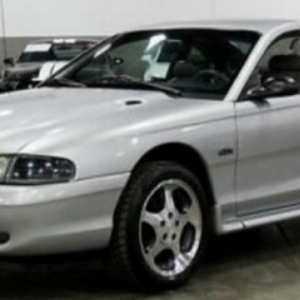
Here are some examples of GOOD photos to take:
Take notice of the distribution of light, the image size, and clarity.


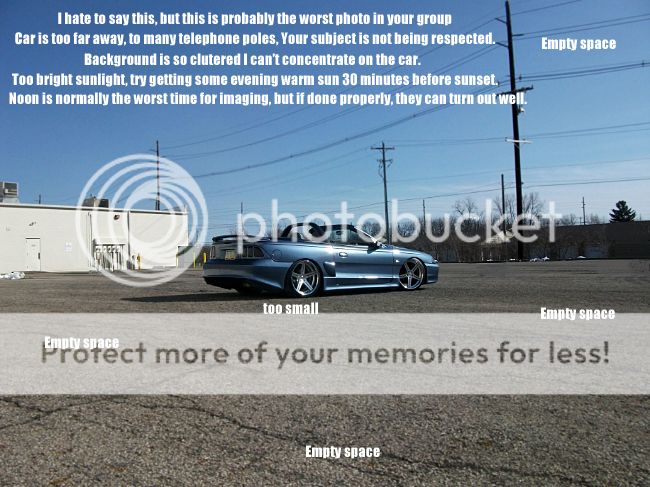
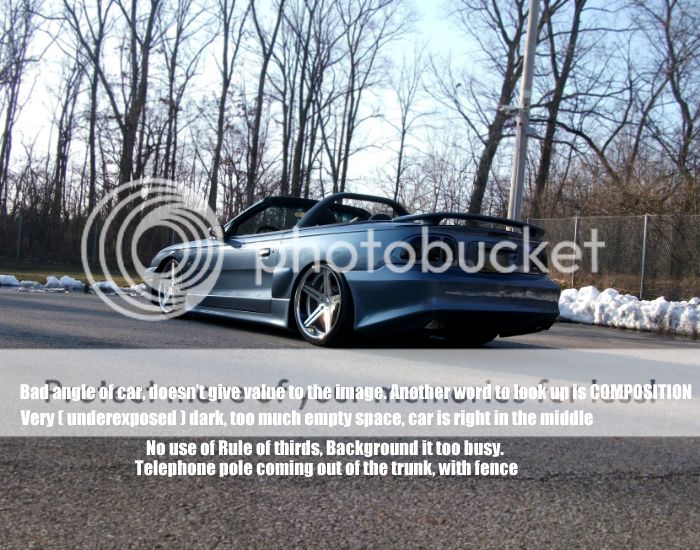
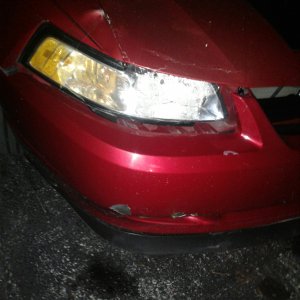
Now are some examples of pictures you should NOT post for requesting a signature. These images are either too small, distorted, blurry, cut off, or a combination of one of those. If you do post pictures like these, you WILL be asked to retake your pictures.


-Advanced Techniques-
If you feel you have a good grasp on taking good pictures of your car, you may be ready to move into more advanced techniques for specific situations and to take advantage of everything that you are offered.
YELLOW CAR ADVISORY: You cannot (repeat: CANNOT) shoot your yellow car out in midday sunlight. All you're likely to get is bleached-out top surfaces and murky/orangish lower areas. Wait until mid morning or late afternoon and move your car into clean shade of a building, prefferably white concrete and use your flash on every single shot.
Using the Flash
"My flash is always on" translates into "automatic flash", which means it's not engaging/not working for your outdoor photography. Disregard "always on" and set your camera to FORCED/FILL flash when you're out-of-doors.
-Mistakes-
Bright overhead sunlight. Not good. Harsh overhead sunlight (and worse, the corollary harsh shadows caused by overhead sunlight)
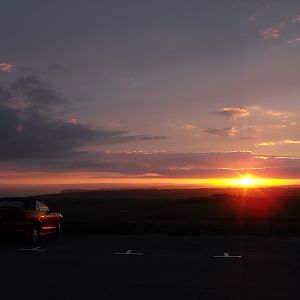
Solution: wait 'til near sunset and position (i.e., rotate) your car to take full advantage of that softer light.
Carefully position/rotate your car so that you've got evenly-distributed sunlight over ALL the surfaces of your car facing your camera (the grille, the "chin," the tires, the sides). The (dawn or dusk) sun should be directly behind you, warming your backside and illuminating ALL of the surfaces of your car facing the camera.
Critically important for you to grasp:
When you use your flash in the "traditional way" (i.e., to provide EXTRA/ ADDITIONAL light in, say, a darkened room or at dusk or after dark outside), you're actually providing MORE light to your film (or to your sensor array in your digital camera), since there isn't enough ambient light to for you to capture a well-illuminated photograph.
ON THE OTHER HAND, when you're outdoors in the bright sunlight where there's ample natural light, your goal is entirely different: you don't need MORE light, you need to RE-DISTRIBUTE the light. Using your camera's FORCED flash (lightning bolt icon) feature, you're merely RE-DISTRIBUTING the light, so that MORE LIGHT (your flash) illuminates those pesky dark shadow areas... while simultaneously LESS SUNLIGHT is captured that otherwise results in harsh glare on your windshield and color bleachout on the painted surfaces...
I apologize for this being somewhat incomplete. I made this about 3 years ago, and the site(s) this is hosted on, have gone through quite a few software and server upgrades, so bits and pieces have gotten lost over time.
These tips also apply when you are just trying to take some pictures for your car for yourself, not just to be posted on here. You will notice that if you follow these tips, your photo taking will greatly improve and you will be much more impressed with your ability to take pictures.
Let's get started.
I am going to get this out of the way right off the bat. Please DO NOT post pictures that you took with a cell phone. No matter how clear they look on your phone, the clarity and distortion of the image is very noticable in a larger format, and is very hard to work with.
No matter how well your pictures come out, whether it be clarity or how you present your image, they will be virtually useless if you dont make them big enough. A good average size of an image to use is about (in pixels) 800 x 600. That size is a standard size for cameras and computer desktops so if you resize your images to that size you will not have any distortion or "smooshing". 800 x 600 is only an optimal size if your car is in most of the picture. If your car is only in the bottom corner of the picture, then a much bigger size will be needed because a small picture of the car is very hard to work with.
Next, the whole car MUST be in the picture. This is not true for EVERY image that you can post, but the majority of pictures should have the entire car with out the car hanging off the edge of the photo. Some "artistic" pictures may have only the emblem, or one part of the car at a very close angle, but DO NOT post ONLY close-up pictures.
An important thing to remember is, you DO NOT want big sun glares on your car, or huge shadows that black out areas of your car. Big sun glares create "bleaching" which not only "bleaches" out the paint in your pictures, but also eliminates the defining shape of the car where the glare hits. The same goes with shadows, but as obviously you can tell, you end up with very dark spots and undefining areas of your car.
Shadows are not always bad though. If your car still has a defining shape and you can see most areas of the car, a shadow may not be a bad thing, and if harnessed correctly, it can make an image look just that much better.
Now onto where you should take pictures. Remember, you CAN take your car out of your driveway (well unless you dont have a drivers liscense or if the car is not running). For "Artistic Photography" pictures, a nice scenery is something that you would like to include in your picture. For a signature though, it all depends on what you would like. For someone that would just like their car chopped onto a custom created background, then scenery is not a priority, and clarity, size, and complexion of the car is the only objective. If you would rather have a "simple" signature, where most of the original picture (including background) is used, and maybe "optimized" to improve the image, then you would want to take the picture somewhere where you would have something nice in the background or a "themed" image.
The Types of Angles:
This is a crucial part of this tutorial. You dont want your car to look as if it is two-dimensional. You want your car to show some depth, you want people to see more of your car. Straight on side angles and front angles are something you want to avoid as a "primary" image. Side profiles and straight on front shots are good for a background angle, maybe used to be blended into the background of a signature, but as a main image, you would want something at a "3/4" angle, which is taken from one of the corners of your car.
As a rule of thumb, high angles are more than not something that you do not want to use. A good rule of thumb would be to hold the camera at about headlight height to take your pictures. That way you are reassuring yourself that your camera angle isn't too low or too high.
Here are some examples of GOOD photos to take:
Take notice of the distribution of light, the image size, and clarity.
Now are some examples of pictures you should NOT post for requesting a signature. These images are either too small, distorted, blurry, cut off, or a combination of one of those. If you do post pictures like these, you WILL be asked to retake your pictures.
-Advanced Techniques-
If you feel you have a good grasp on taking good pictures of your car, you may be ready to move into more advanced techniques for specific situations and to take advantage of everything that you are offered.
YELLOW CAR ADVISORY: You cannot (repeat: CANNOT) shoot your yellow car out in midday sunlight. All you're likely to get is bleached-out top surfaces and murky/orangish lower areas. Wait until mid morning or late afternoon and move your car into clean shade of a building, prefferably white concrete and use your flash on every single shot.
Using the Flash
"My flash is always on" translates into "automatic flash", which means it's not engaging/not working for your outdoor photography. Disregard "always on" and set your camera to FORCED/FILL flash when you're out-of-doors.
-Mistakes-
Bright overhead sunlight. Not good. Harsh overhead sunlight (and worse, the corollary harsh shadows caused by overhead sunlight)
Solution: wait 'til near sunset and position (i.e., rotate) your car to take full advantage of that softer light.
Carefully position/rotate your car so that you've got evenly-distributed sunlight over ALL the surfaces of your car facing your camera (the grille, the "chin," the tires, the sides). The (dawn or dusk) sun should be directly behind you, warming your backside and illuminating ALL of the surfaces of your car facing the camera.
Critically important for you to grasp:
When you use your flash in the "traditional way" (i.e., to provide EXTRA/ ADDITIONAL light in, say, a darkened room or at dusk or after dark outside), you're actually providing MORE light to your film (or to your sensor array in your digital camera), since there isn't enough ambient light to for you to capture a well-illuminated photograph.
ON THE OTHER HAND, when you're outdoors in the bright sunlight where there's ample natural light, your goal is entirely different: you don't need MORE light, you need to RE-DISTRIBUTE the light. Using your camera's FORCED flash (lightning bolt icon) feature, you're merely RE-DISTRIBUTING the light, so that MORE LIGHT (your flash) illuminates those pesky dark shadow areas... while simultaneously LESS SUNLIGHT is captured that otherwise results in harsh glare on your windshield and color bleachout on the painted surfaces...
I apologize for this being somewhat incomplete. I made this about 3 years ago, and the site(s) this is hosted on, have gone through quite a few software and server upgrades, so bits and pieces have gotten lost over time.