Well, [MENTION=19540]Rolltide1006[/MENTION] how did the weekend turn out for you?
You are using an out of date browser. It may not display this or other websites correctly.
You should upgrade or use an alternative browser.
You should upgrade or use an alternative browser.
4.6 supercharger build
- Thread starter Rolltide1006
- Start date
OP
OP
Rolltide1006
Member
- Joined
- Mar 22, 2014
- Messages
- 132
- Reaction score
- 3
Well, [MENTION=19540]Rolltide1006[/MENTION] how did the weekend turn out for you?
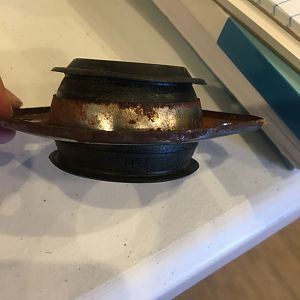
Hey Warrior, ya the folks at worldpac sent me two of the same motor mount lol (I work at a European shop lol worldpac is convenient). Got that problem solved yesterday. Now I am waiting on the new ARP flywheel and crank pulley bolts (I'm an idiot and didn't realize they were torque to yield until yesterday [emoji16]). I'm hoping to have an open bay after work tonight to at least drop the motor in and start throwing pumps back on and start the harness fun [emoji1303]
Sent from my iPhone using Tapatalk Pro
Get parts where you can! You should have just ordered some maximum motorsports solid engine mounts and called it a day!
Make sure to take pictures for us.
OP
OP
Rolltide1006
Member
- Joined
- Mar 22, 2014
- Messages
- 132
- Reaction score
- 3
Get parts where you can! You should have just ordered some maximum motorsports solid engine mounts and called it a day!
Make sure to take pictures for us.
lol I was thinking solid mounts, but thought that would be too much for a daily driver.
And will do!
Sent from my iPhone using Tapatalk Pro
lol I was thinking solid mounts, but thought that would be too much for a daily driver.
And will do!
Sent from my iPhone using Tapatalk Pro
solid mounts are no problem at all. I've got about 3k miles on mine. They feel great
OP
OP
Rolltide1006
Member
- Joined
- Mar 22, 2014
- Messages
- 132
- Reaction score
- 3
solid mounts are no problem at all. I've got about 3k miles on mine. They feel great
Lol should asked before hamd! Damn it, well I will replace these with those down the road.
Sent from my iPhone using Tapatalk Pro
OP
OP
Rolltide1006
Member
- Joined
- Mar 22, 2014
- Messages
- 132
- Reaction score
- 3


All in place! Will finish up next week
")
Sent from my iPhone using Tapatalk Pro
OP
OP
Rolltide1006
Member
- Joined
- Mar 22, 2014
- Messages
- 132
- Reaction score
- 3


Almost there! Now if the power steering pulley would cooperate going back on!
Sent from my iPhone using Tapatalk Pro
Cooperate?....goodluck with that!
Sent from my SM-G900P using Tapatalk
Sent from my SM-G900P using Tapatalk
OP
OP
Rolltide1006
Member
- Joined
- Mar 22, 2014
- Messages
- 132
- Reaction score
- 3
Cooperate?....goodluck with that!
Sent from my SM-G900P using Tapatalk
Lol ya I have the tool to uninstall and install the pulley. I used silicone lube (very light) to lube the inside of the pulley and then the shaft of the pump. As I was tightening down, the stud of the tool that screws into the PS shaft kept coming loose as I went along. I then noticed the PS pressure line that goes from the pump to the booster is leaking at the pump. The nut is tight but I believe it's worn out because it has never been changed. Waiting on the new line for tomorrow and try to reinstall the pulley again.
Sent from my iPhone using Tapatalk Pro
OP
OP
Rolltide1006
Member
- Joined
- Mar 22, 2014
- Messages
- 132
- Reaction score
- 3
She lives!!!! Idle is a little low, definitely needs that tune, but it idles pretty darn good for being a stock tune.
https://youtu.be/qSAZ6r_7w3U
Sent from my iPhone using Tapatalk Pro
https://youtu.be/qSAZ6r_7w3U
Sent from my iPhone using Tapatalk Pro
98snakehorse
Well-Known Member
She lives!!!! Idle is a little low, definitely needs that tune, but it idles pretty darn good for being a stock tune.
https://youtu.be/qSAZ6r_7w3U
Sent from my iPhone using Tapatalk Pro
Wow I'm glad you posted some good detailed shot of the process of installing these. I was a little confused with what to do with the rocker arms upon installation of the cams. I see some people that bolted the cams down on top of the rocker arms and some that installed the rocker arms after the cams were bolted on.
Also I lol'd at the end "My car look good @ night"
Put all your followers in place and bolt the cam down evenly on top of them. Its the easiest way.
98snakehorse
Well-Known Member
Ahh glad to here you say that lol I did it that way on my Supra a few years ago and it worked out fine.Put all your followers in place and bolt the cam down evenly on top of them. Its the easiest way.
Sent from my SM-G920R4 using Tapatalk
Ahh glad to here you say that lol I did it that way on my Supra a few years ago and it worked out fine.
Sent from my SM-G920R4 using Tapatalk
Thats how Ive always done mine lol. I did the screwdriver thing a couple times but if you dont squeeze all the oil out of the lash adjuster it is damn near impossible to get them to go in.
OP
OP
Rolltide1006
Member
- Joined
- Mar 22, 2014
- Messages
- 132
- Reaction score
- 3
Ahh glad to here you say that lol I did it that way on my Supra a few years ago and it worked out fine.
Sent from my SM-G920R4 using Tapatalk
Lol! Ya I learned the hard way. I first bolted the cams down and tried the screwdriver trick with installing the followers on the lash adjusters. No bueno with my setup haha. If it was all stock valves and cams it would have worked.
So I took the CMS cams back out, installed the lash adjusters and followers. Then bolted the cams down. Key was to make sure all pistons were below the deck and then just work the cam bolts down in sequence, little by little until bottomed out. Then torque to spec in the same sequence
Sent from my iPhone using Tapatalk Pro
98snakehorse
Well-Known Member
Great info! Crank Keyway at the 9oclock position = All the pistons below the ptv contact areaLol! Ya I learned the hard way. I first bolted the cams down and tried the screwdriver trick with installing the followers on the lash adjusters. No bueno with my setup haha. If it was all stock valves and cams it would have worked.
So I took the CMS cams back out, installed the lash adjusters and followers. Then bolted the cams down. Key was to make sure all pistons were below the deck and then just work the cam bolts down in sequence, little by little until bottomed out. Then torque to spec in the same sequence
Sent from my iPhone using Tapatalk Pro
Sent from my SM-G920R4 using Tapatalk
OP
OP
Rolltide1006
Member
- Joined
- Mar 22, 2014
- Messages
- 132
- Reaction score
- 3
Great info! Crank Keyway at the 9oclock position = All the pistons below the ptv contact area
Sent from my SM-G920R4 using Tapatalk
If memory serves me correctly yes. But to be sure, use a long 1/4 extension or something similar and insert in the empty spark plug hole of cylinder 1. Do this with piston #1 at TDC and watch the extension as you move the crank to the 9 o'clock position. Best way to know for sure where the piston is is the extension trick [emoji1303] also don't drop the extension in. No nicking the pistons lol
Sent from my iPhone using Tapatalk Pro
98snakehorse
Well-Known Member
I'd like to open the discussion regarding the timing chain tension again for just a second. Last night before I put my timing cover back on I turned the motor over a few times just to double check everything is in working order. I did notice however that every once in awhile while turning the crank "Clockwise" that the passenger side chain on the guide side would get some slight slack for just a second similar to the way Rolltie's photos showed and would then go tight again. I tried holding the cam and extending the ratchet out on the tensioner and it worked however it seem way too tight at that point. I would really just like some assurance here but I ended up releasing the ratchet so that it was back the way it was originally. My thoughts are that the chain had a loose spot for just a second because the tensioners are not yet primed of oil. Please tell me I'm right cause the entire motor is back together lol.
I would have put the ratchets out very close to the tensioner arms just to make sure they never get slack. Your chains will have some slack because the tensioners are free of oil and relying only on the springs.
Similar threads
- Replies
- 6
- Views
- 401
- Replies
- 57
- Views
- 5K