Battery Relocation Kit

the5.ohh

Legend
Joined
Oct 15, 2012
Messages
9,561
Reaction score
129
Location
Shaolin, NY
Looking to relocate my battery to the trunk. My buddy told me to get a Flaming River Push Pull Kit, link is below and I believe that is what I need. I still need to get a box and whatnot. I already googled so hush up, didn't like what I found. Optimal place for the push pull? I really don't want it sticking out to Guam so someone can mess with it.
https://m.summitracing.com/parts/fla-fr1003-2
 
OP
OP
the5.ohh

the5.ohh

Legend
Joined
Oct 15, 2012
Messages
9,561
Reaction score
129
Location
Shaolin, NY
And what relocation kit would be the best to get? Don't want to skimp here. I prefer a metal box.
 
OP
OP
the5.ohh

the5.ohh

Legend
Joined
Oct 15, 2012
Messages
9,561
Reaction score
129
Location
Shaolin, NY
Actually nvm about the box, just grabbed it locally brand new, Taylor kit, for 75 bucks. Same one is 200 or 230 on summit. Score
 

lswht

New Member
Joined
Jul 25, 2016
Messages
23
Reaction score
0
Go to a battery store and buy the cable the cable in the kits is way to small

Sent from my SM-G900P using Tapatalk
 

lswht

New Member
Joined
Jul 25, 2016
Messages
23
Reaction score
0
i ran 0 ott with a good breaker

Sent from my SM-G900P using Tapatalk
 

lswht

New Member
Joined
Jul 25, 2016
Messages
23
Reaction score
0
I pick up the breaker at parts store wire i picked up from a battery store.

Sent from my SM-G900P using Tapatalk
 

mcglsr2

Well-Known Member
SN95 Supporter
Joined
Jul 4, 2011
Messages
3,410
Reaction score
40
Location
Orlando
You should be fine with 1 AWG if it is a quality cable. A lot of aftermarkets aren't true AWG though.

If if you are looking for cable, I recommend welding cable. I used the 1/0 from this place here, the Class M premium cable with the orange jacket. Good cable and certainly pliable enough.

I also used a 250 amp ANL fuse with a Rockford Fosgate fuse holder - look on Amazon or any car audio store. You can also use a resettable circuit breaker, but at that amperage it will cost quite a bit.
 
OP
OP
the5.ohh

the5.ohh

Legend
Joined
Oct 15, 2012
Messages
9,561
Reaction score
129
Location
Shaolin, NY
Joey I expect a full in depth step by step with pictures install...you know...for personal reasons...


Hahahaha I'll do what I can, my buddy is the electrical whiz, I'll just be "helping" aka ordering food and getting cold beer haha.
 
OP
OP
the5.ohh

the5.ohh

Legend
Joined
Oct 15, 2012
Messages
9,561
Reaction score
129
Location
Shaolin, NY
You should be fine with 1 AWG if it is a quality cable. A lot of aftermarkets aren't true AWG though.

If if you are looking for cable, I recommend welding cable. I used the 1/0 from this place here, the Class M premium cable with the orange jacket. Good cable and certainly pliable enough.

I also used a 250 amp ANL fuse with a Rockford Fosgate fuse holder - look on Amazon or any car audio store. You can also use a resettable circuit breaker, but at that amperage it will cost quite a bit.


Okay I have the class M wire bookmarked, the 1/0, how many feet would I need? The kit I have has probably around 20 feet, and it has the positive and negative terminals on the end. As far as the fuse holder, its just a normal 250 amp fuse holder correct? I'm not too electrical savvy so this stuff is decently ancient hieroglyphics to me.
 

ttocs

Post Whore
Joined
Oct 9, 2009
Messages
32,640
Reaction score
5,659
Location
Evansville Indiana
FYI those fuse holders are nice, until you ever have to replace a fuse. You have to leave enough extra wire to feed it back through the plastic to pull it out on the other side and it always ends up being a PIA if it needs it. Now then again with a 250 amp fuse you should only need to replace it if it does start to weld itself to the frame.
 

caldeio

New Member
Joined
Jul 25, 2016
Messages
42
Reaction score
0
Wanting to do this as well! I was already looking at welding cable, but didn't know what else I needed!
 

mcglsr2

Well-Known Member
SN95 Supporter
Joined
Jul 4, 2011
Messages
3,410
Reaction score
40
Location
Orlando
Okay I have the class M wire bookmarked, the 1/0, how many feet would I need? The kit I have has probably around 20 feet, and it has the positive and negative terminals on the end. As far as the fuse holder, its just a normal 250 amp fuse holder correct? I'm not too electrical savvy so this stuff is decently ancient hieroglyphics to me.

And I'm sure this is the anl fuse and fuse holder you mentioned.
https://www.amazon.com/gp/aw/d/B00D...use+holder&dpPl=1&dpID=41wDjZjvH2L&ref=plSrch


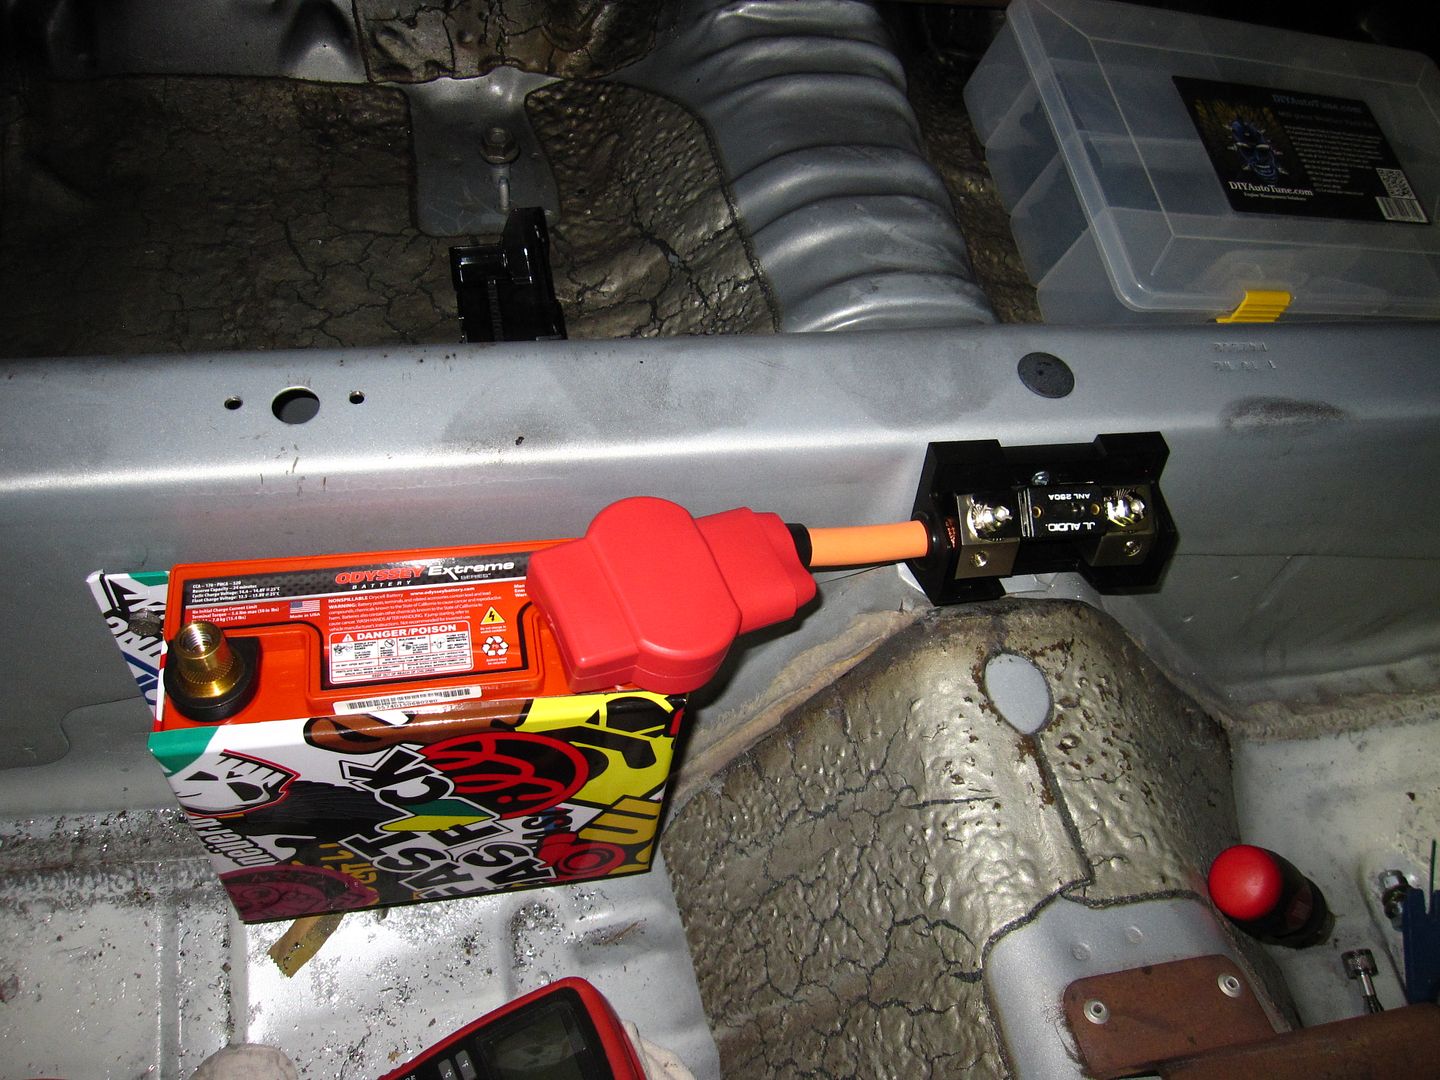
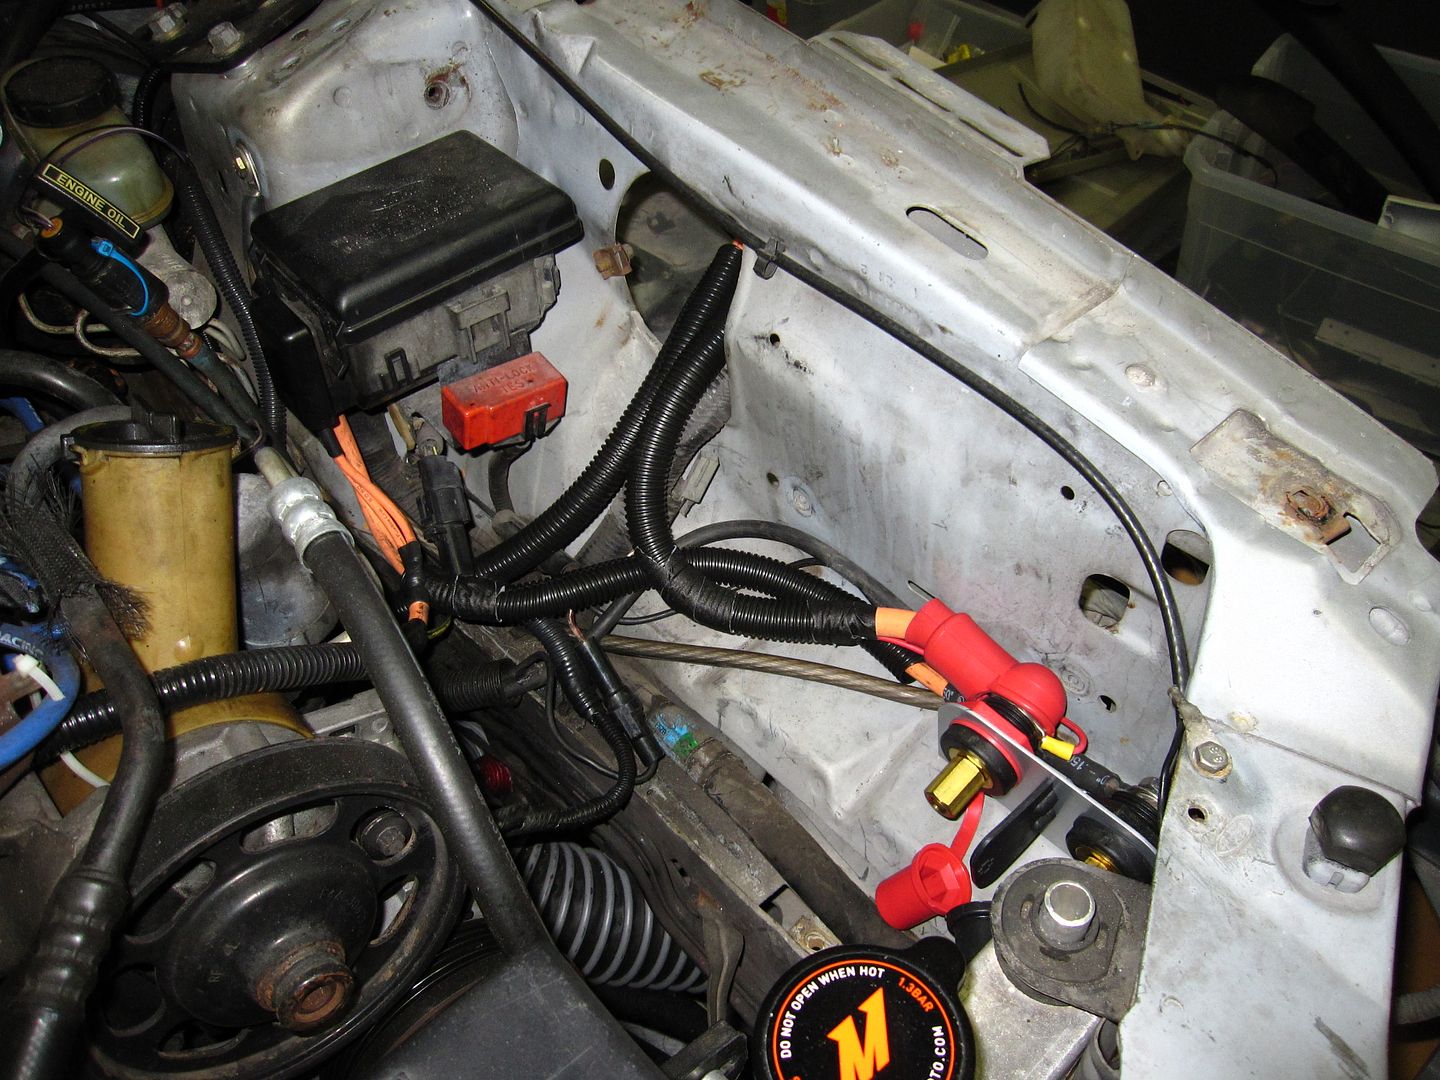
I used a different ANL fuse holder, this one: 
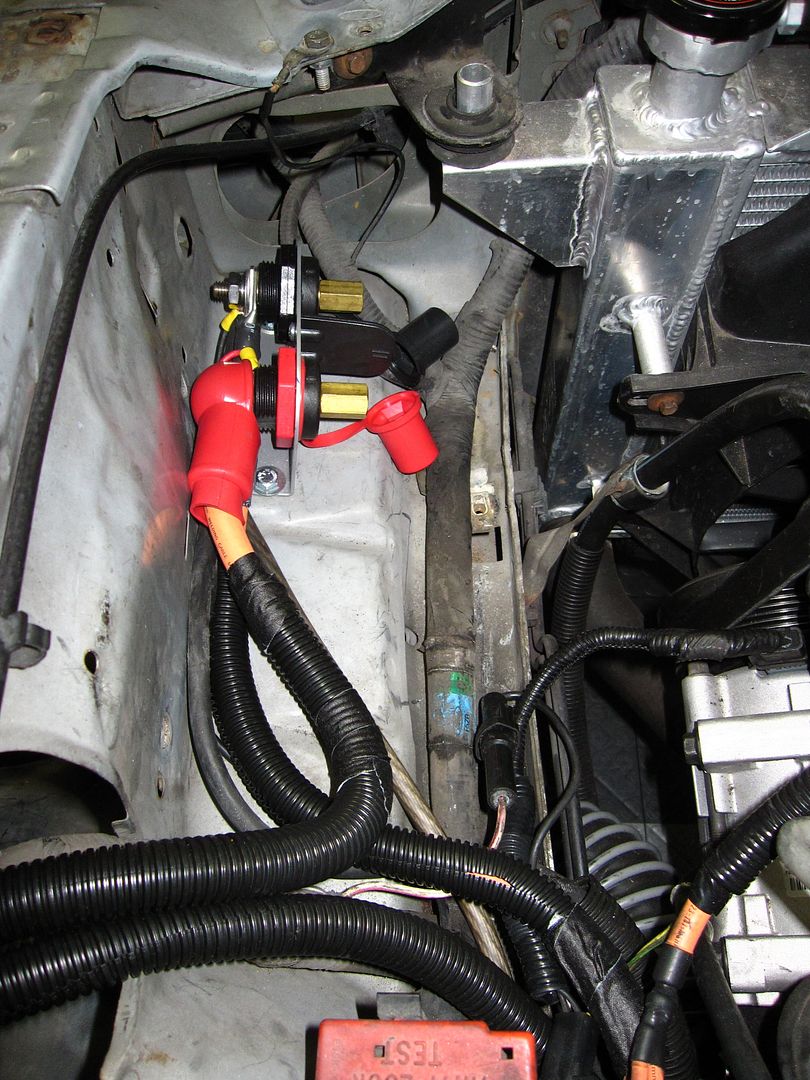
here. For some reason, Amazon has a terrible pic of it. This is what it looks like installed (it's the box to the right of the battery that the cable goes through:

IMG_4109.jpg


IMG_4345.jpg


As for the box and kit you got - what's the distance you plan on running the cable? The distance will dictate if you want to run the 1 AWG battery cable from the kit or purchase 1/0 cable. Here's a good read from Crutchfield on gauges vs. power - they intended it to guide car audio amp selection but the information is still relevant. The summary is this: at 250 amps (your fuse rating), 1 AWG battery cable is good for runs up to about 13 ft (the chart shows 2 AWG, but you can substitue 1 AWG there). For runs of about 13 to 22 ft, you should go with 1/0. So it depends on the length of cable you will need. You can use string or other wires to get a good estimate of the run. Don't forget bends and contours to the body of the car, don't just pull the string in a straight line.

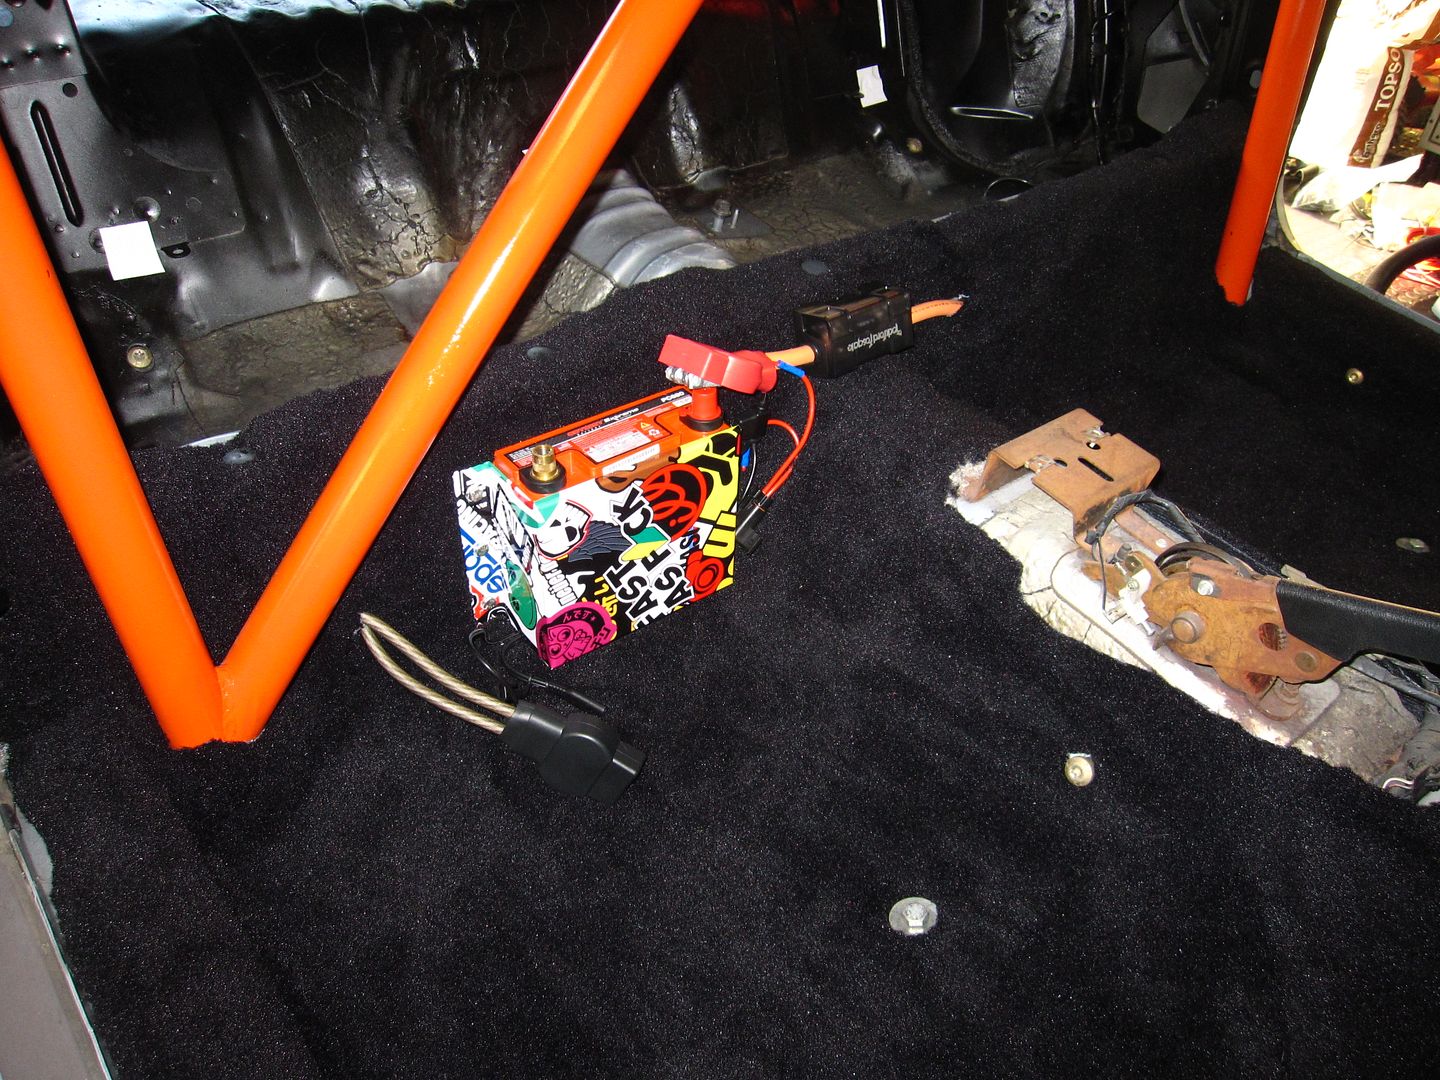
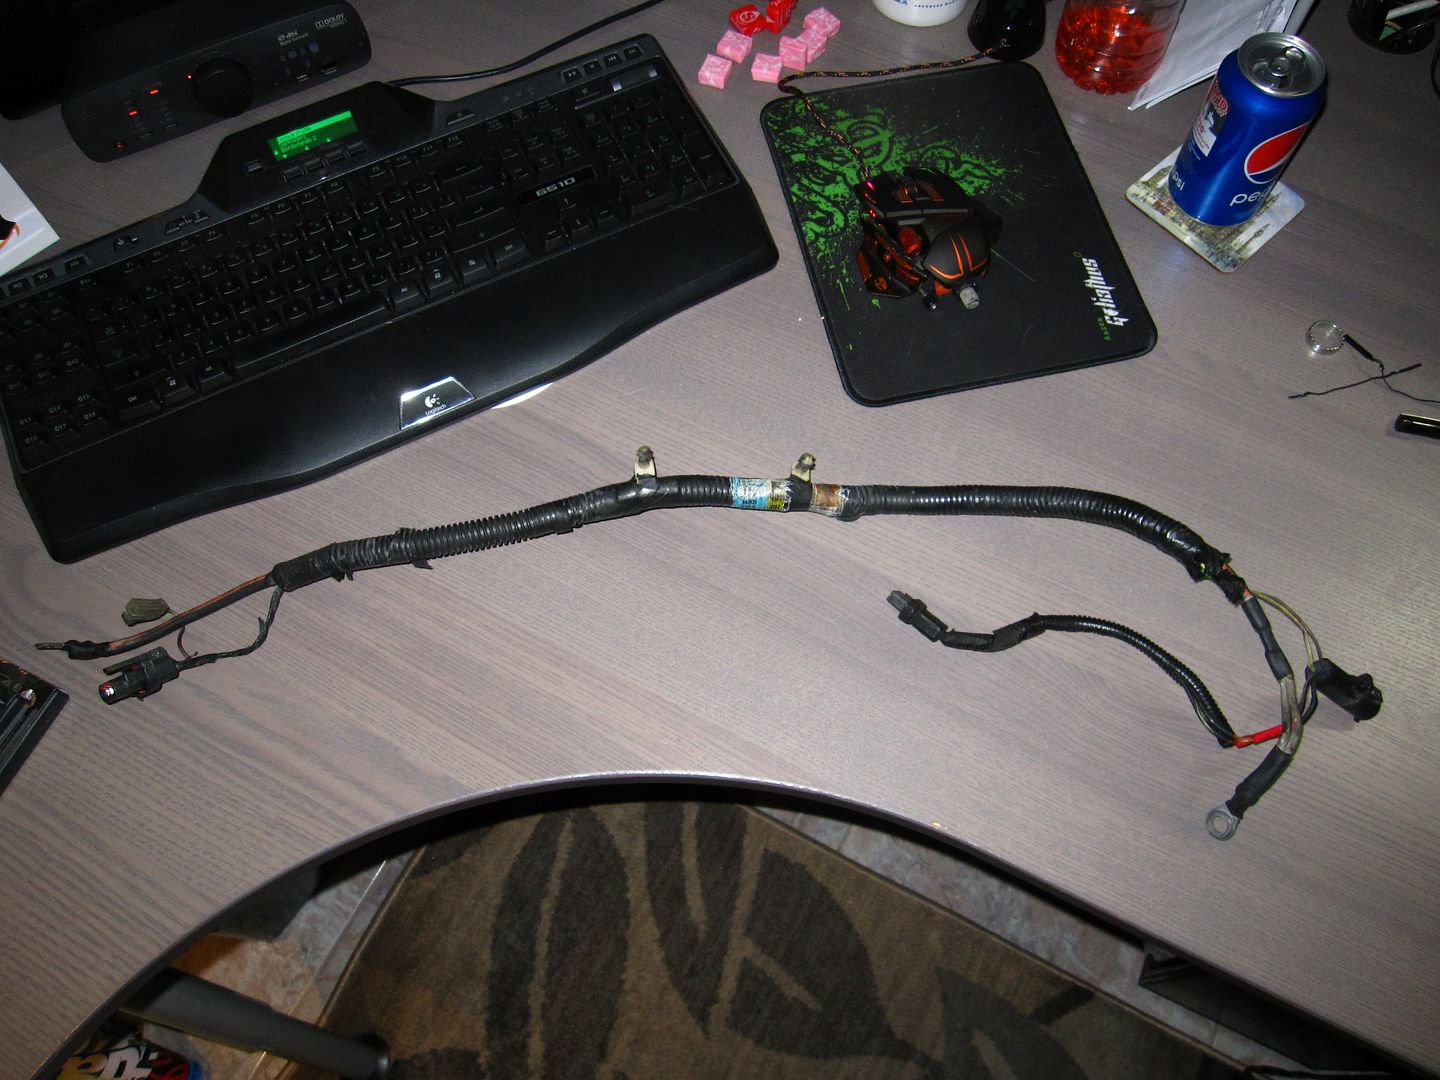
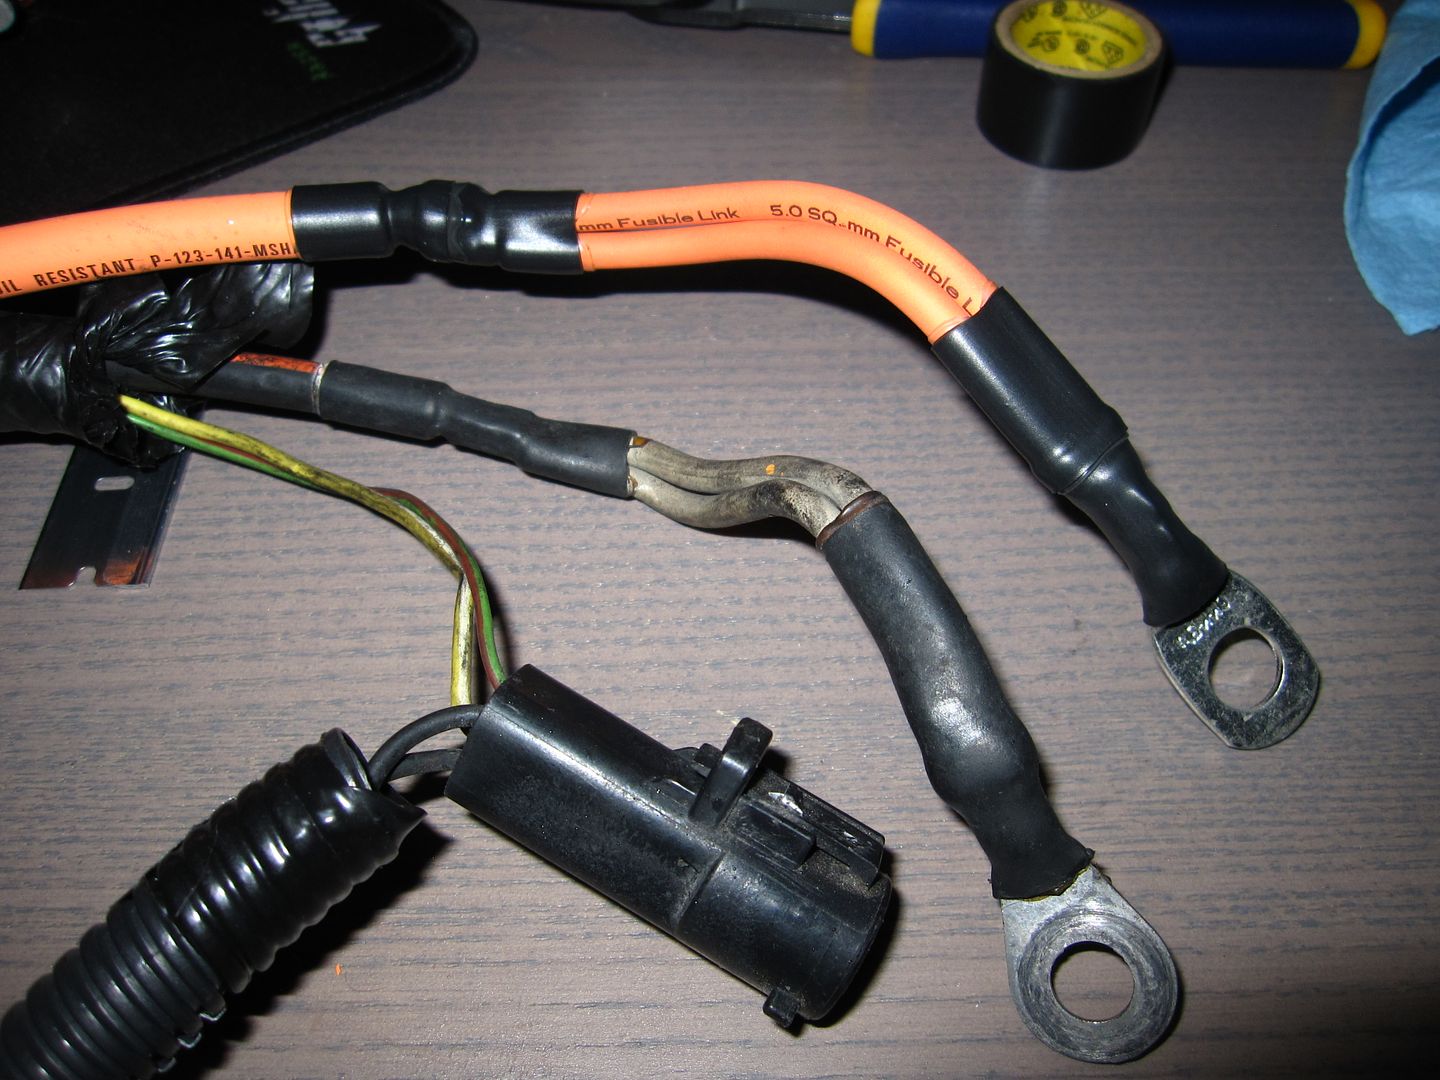
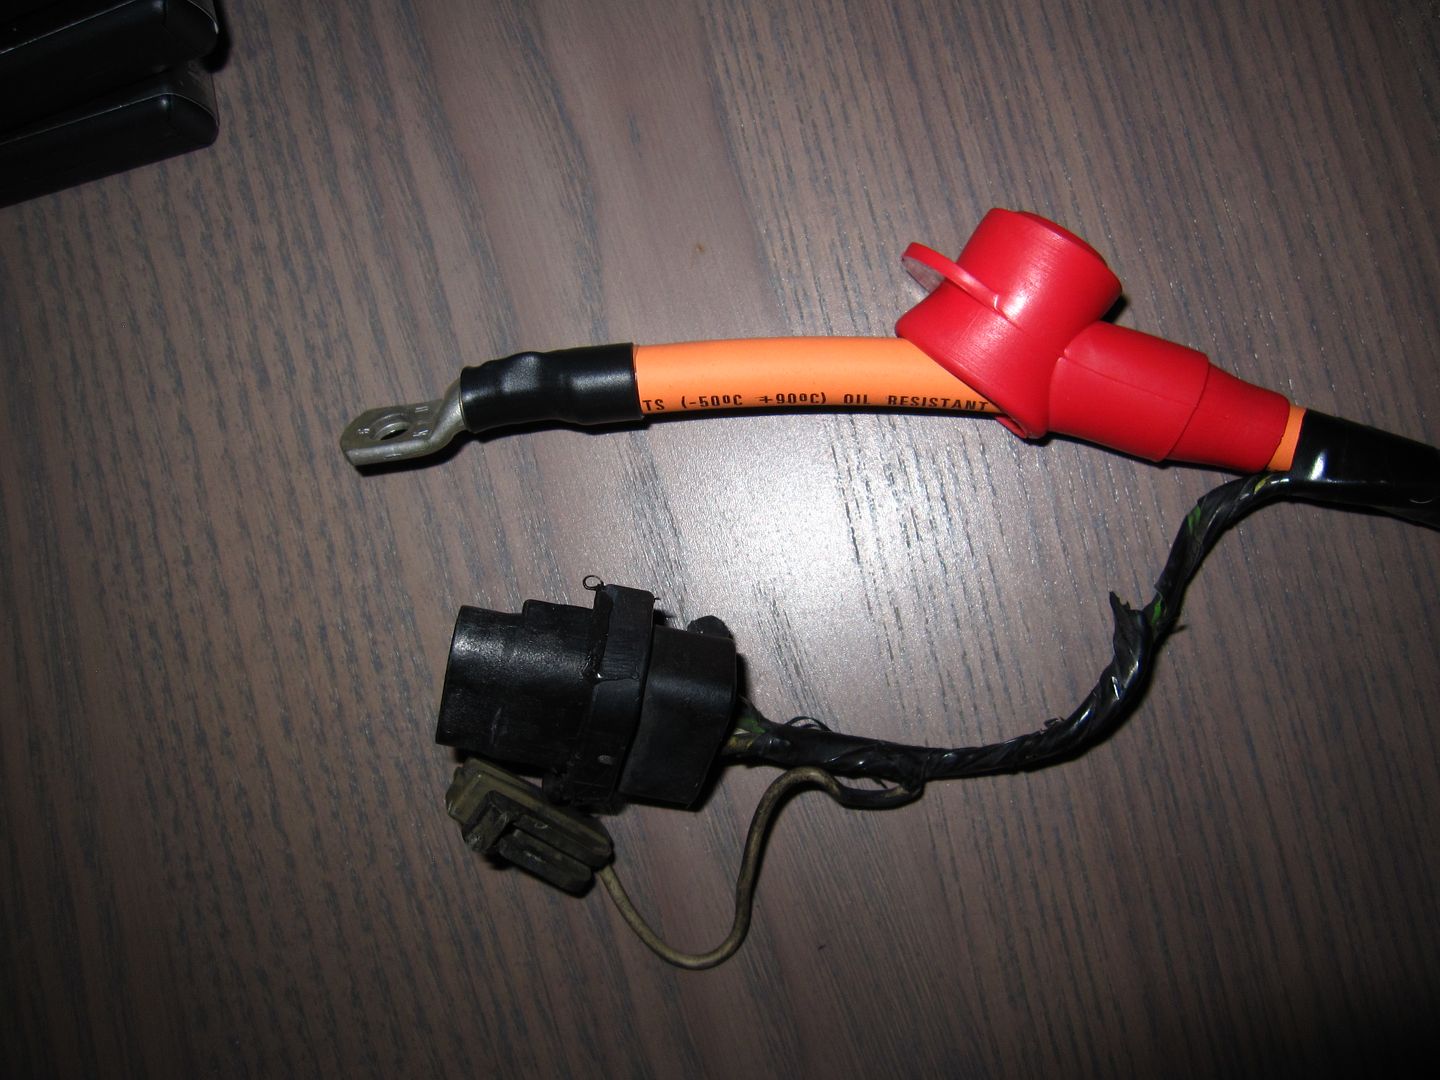
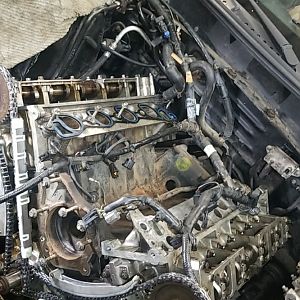
Assuming you want to purchase the 1/0 welding cable, use your measurements as a guide for how much to buy. For me, I bought 20 ft. I was able to run from the battery located on the rear little bulkhead thing behind the passenger seat, along the back of that bulkhead thing, up along the driver side sill, through a grommet in the firewall, up along the underside of the front fender (to a distribution block), and then continue to the front where the battery used to be (and where my jumper studs are now located.) Here's a series of pics showing the run. The cable is the thick orange cable (the thinner orange cable at the distribution block goes over to the starter):

IMG_4114.jpg


IMG_4118.jpg


IMG_4421.jpg


IMG_4428.jpg


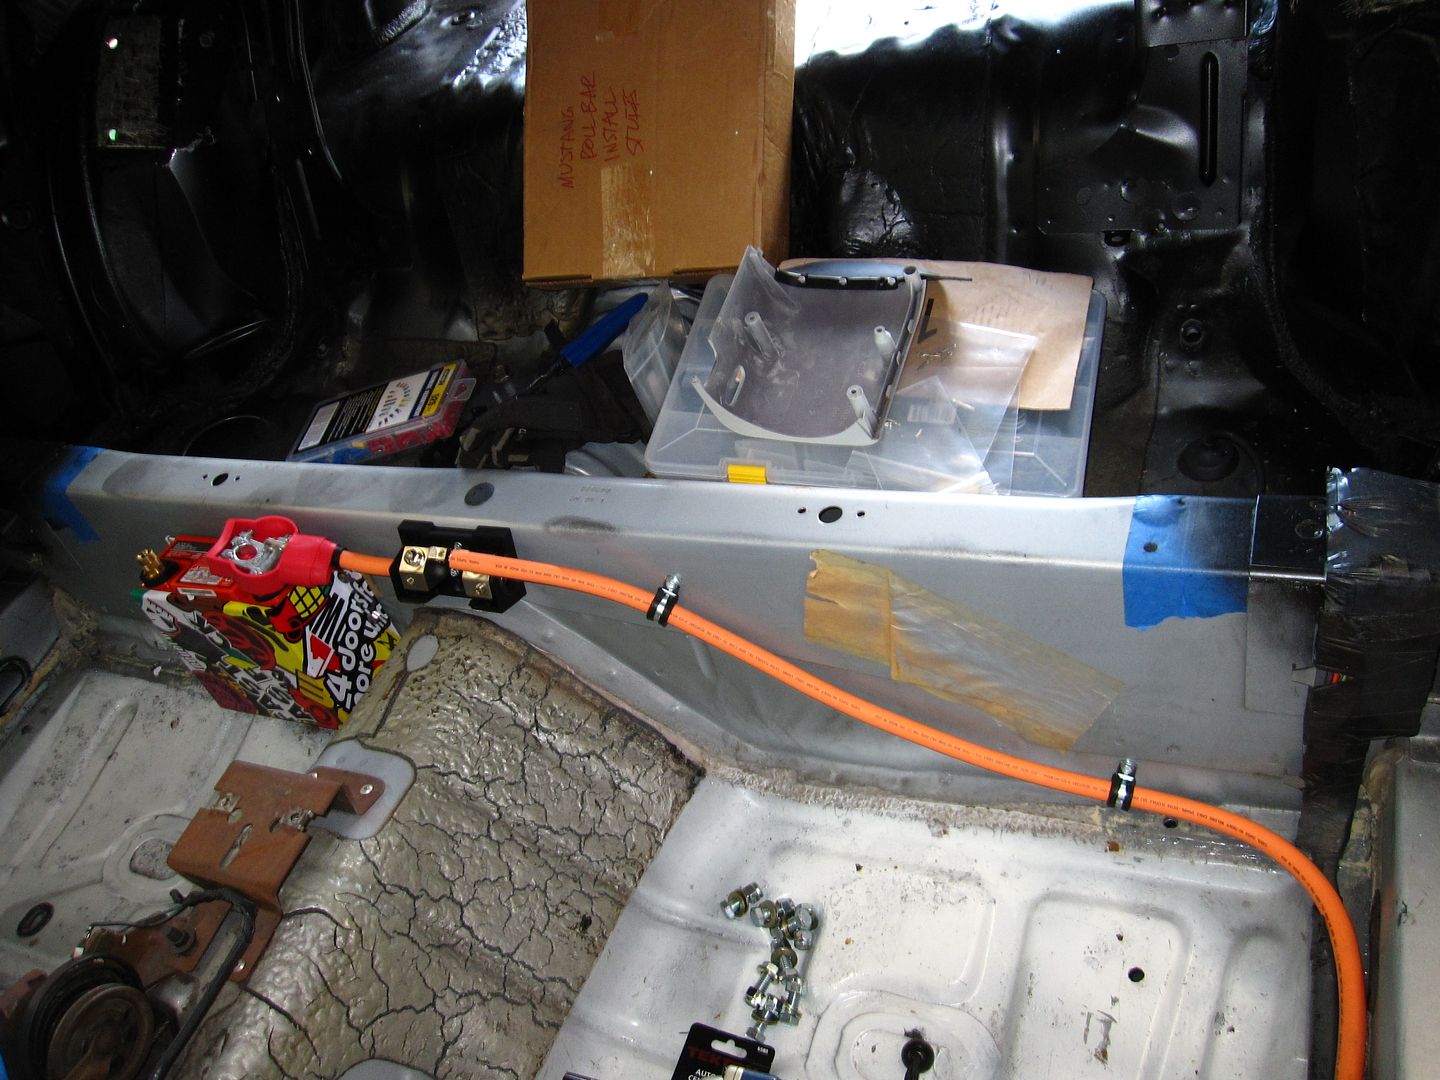
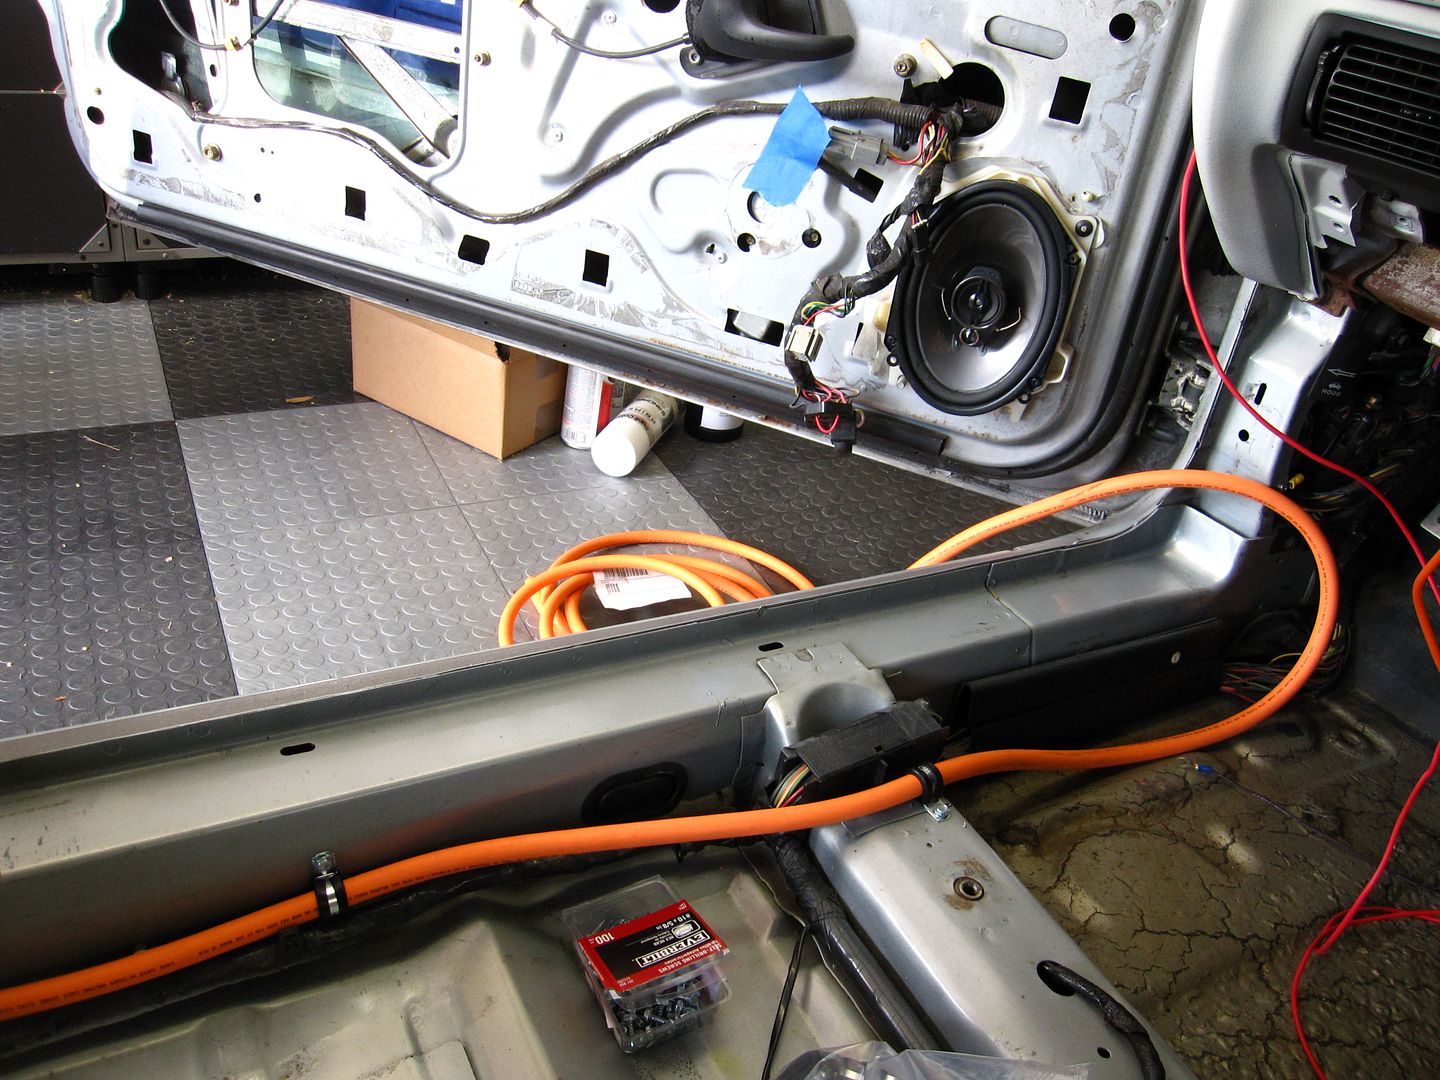
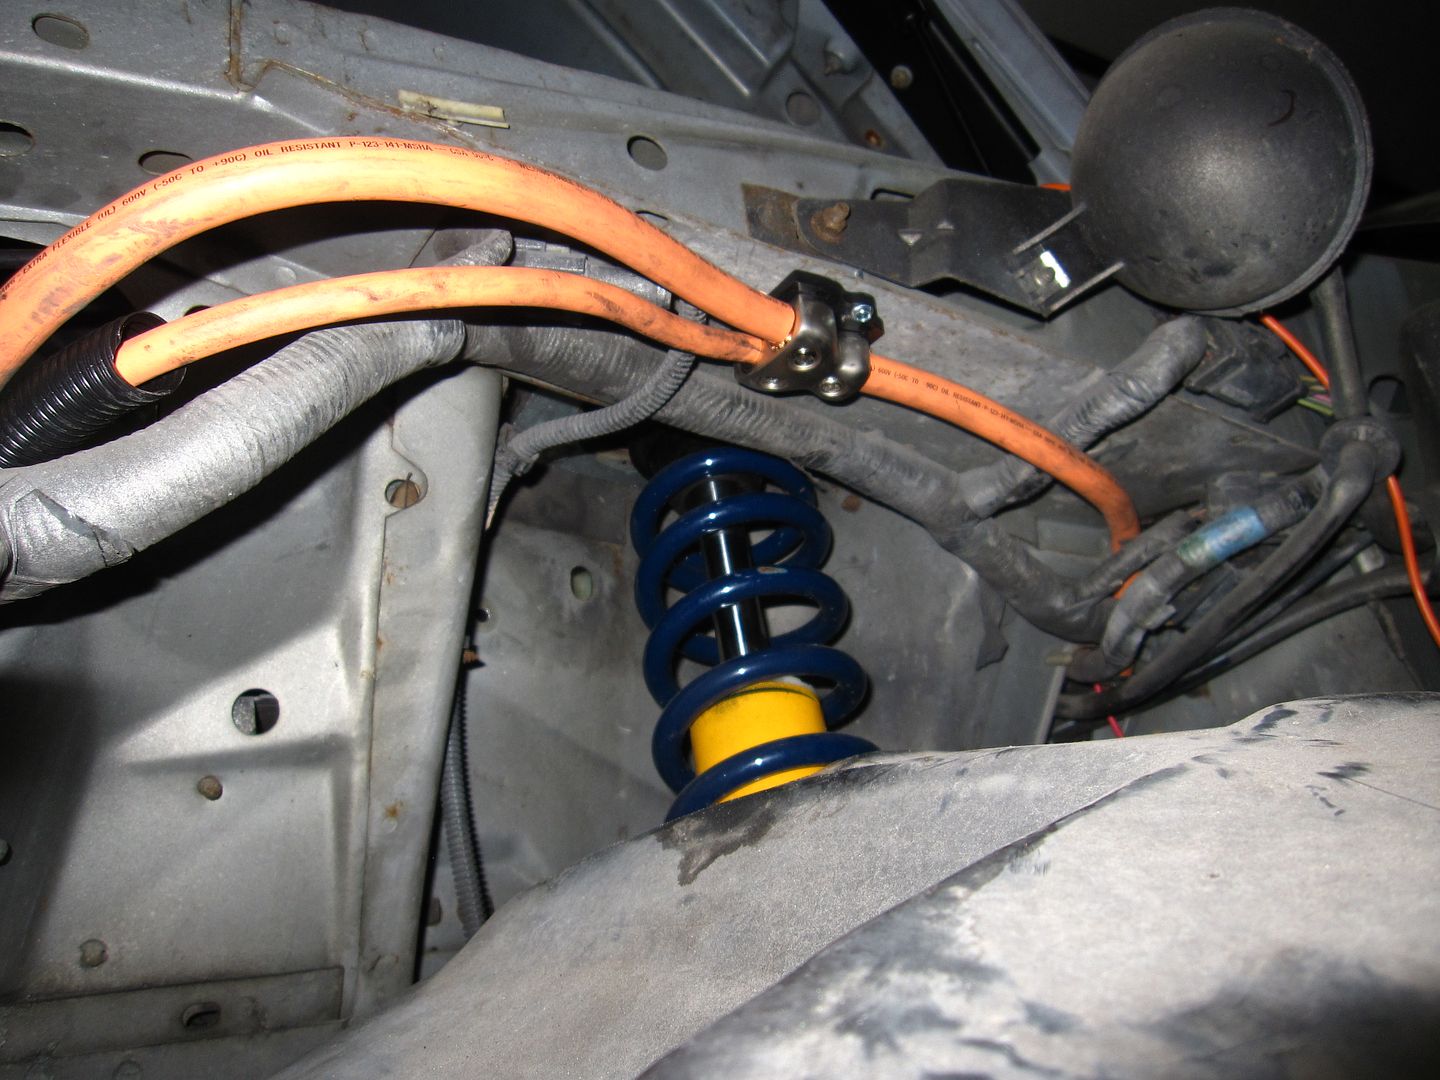
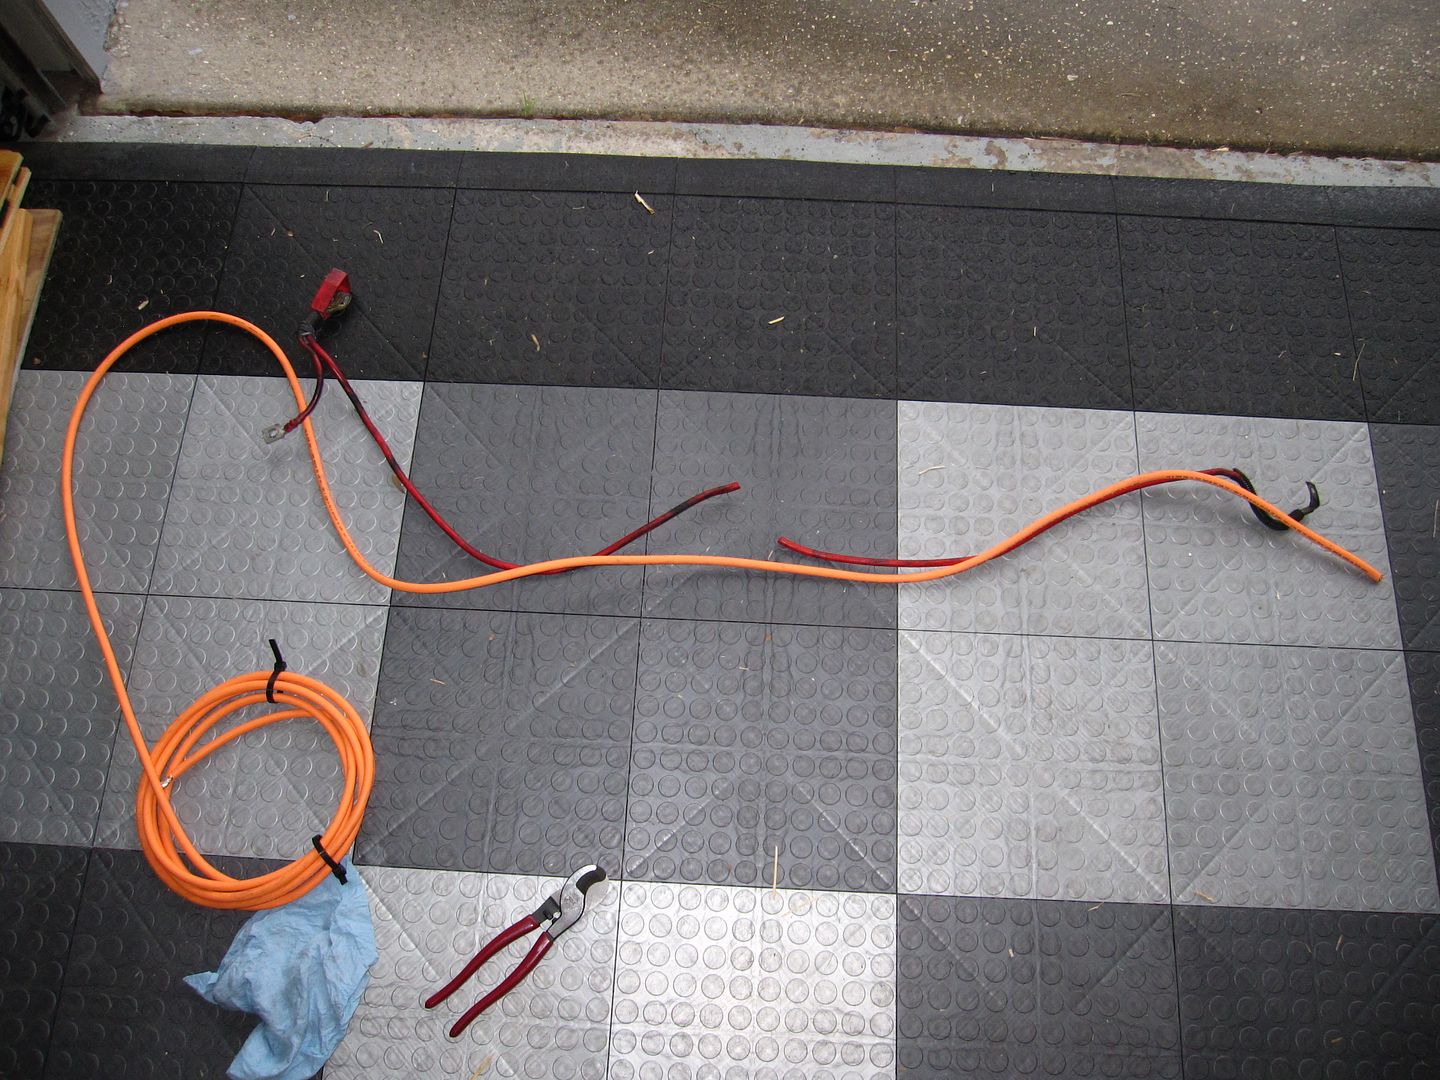
I have about 7' 8" left over. Which means I used a little over 12 ft for my run. Now, in my case, I could have gotten away with 2 AWG. However, because the battery I'm using is puny, I wanted to give it every advantage I could, thus the 1/0. Make sure you get some split loom as well to wrap around the cable. In the pics above, I didn't. I just ran the cable because I figured the thicker welding jacket was good enough plus the cable was going to be under carpet and not near any moving parts, so the likely hood of it getting nicked or cut was very small. In retrospect, I still should have loomed it, because why not. It would have taken me an extra 2 min to do it. So make sure you do it, be better than me. (Though, once the cable entered the engine bay from the firewall, I *did* loom it. In the engine bay, it *must* be loomed. In the cabin, it *should* be loomed.)

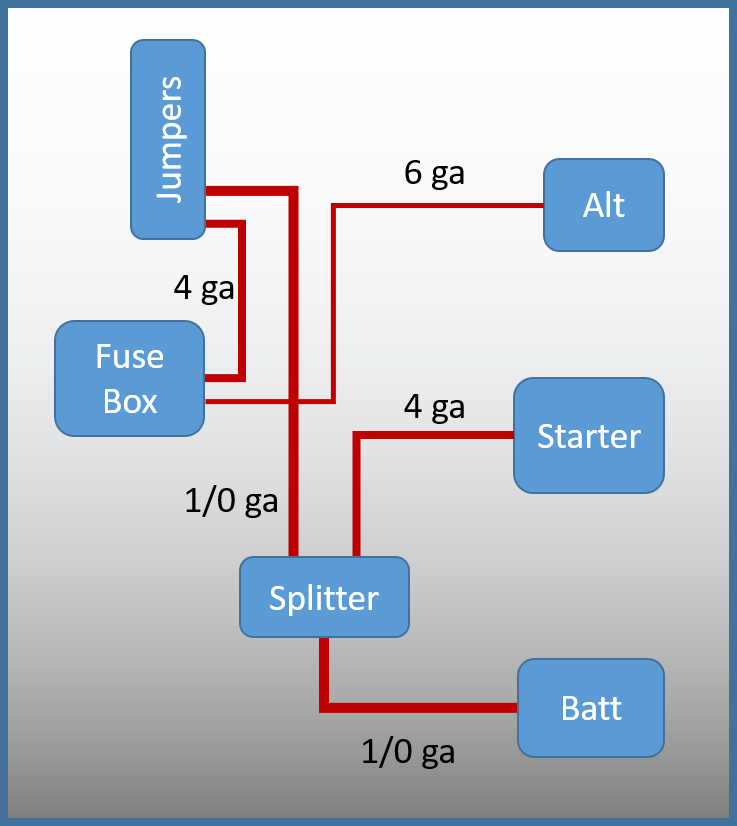
While buying the 1/0 welding cable, I also bought 4 AWG (20 ft) and 6 AWG (20 ft) as I was also replacing my alternator wire and my starter wire. I have a bunch of the 6 AWG and 4 AWG left over. For what it's worth, here's how I wired things, and what gauge I used:

Batt_wiring.png


If you are adding in a kill switch, it makes things A LOT more complicated. The issue stems from your alternator and computer. If you just wire it up like a lot of diagrams on the net seem to show, you run the risk of sending a high current spike to your computer and frying it. Full disclosure though: I haven't wired in a kill switch. So I haven't tried it, and maybe you won't fry your computer. I don't know for certain. What I do know, is that that I was this close |--| to putting in a kill switch (even have pics of it mounted) and decided not to at the last second. The kill switch, though, is one designed for cars with computers, and sends the alternator to ground when engaged, thus protecting the computer. So if you are looking at a kill switch, you may want to consider this.

And for the ground for the battery, make sure you find a really good spot - try to use something like the trunk floor; something that has a lot of good welds and solid metal connections to the rest of the car. A frame rail is good too, if you can get to it. Make sure you remove any paint, and use a bolt with a lock nut if no stud is available. Do not ground into the flimsy sheet metal behind the wheel wells where the rear fender area is. Also, keep your ground cable as short as you possibly can.

Edit: Oh, I forgot to mention, don't run your cable outside of the car. Some people run their battery cable under the car along the frame rails or something. Don't do that. Keep the battery cable inside the car. You never know what you will run over or hit. It's just not worth it. Could you get away with it? Sure, maybe. I'm sure people have. But why risk it.
 

mcglsr2

Well-Known Member
SN95 Supporter
Joined
Jul 4, 2011
Messages
3,410
Reaction score
40
Location
Orlando
As I'm thinking, you may also be wondering what to do with your stock battery cables, the positive and the negative. So, just in case you are, here's what I did, and a couple ideas on what you can do.

What a lot of people seemed to do when I was doing research was to leave the stock cables in place, and just connect up the new cables to these cables. In other words, the new battery cable from the battery in the trunk runs all the way up to where the stock positive cable is, the two get connected together somehow. This will work if you decide to do this, just make sure that no wire/terminal from the connection is exposed (obviously). For the stock ground, just find a way to bolt it to the car frame/body. Don't leave it hanging, you should ground it.

Another thing you can do is remove the cable altogether. The stock battery cable goes to 3 places. Here's a quick pic of the stock cable (it's the red one cut in half, the battery connector part is on the left side, starter post connector on the right side):

IMG_4419.jpg


You have the battery terminal connector (the red boot on the left side of the red wire in the above pic). From there, there are 2 cables: 1 goes to the fuse box (the short red cable on the left side), and the other goes to the starter (the long red cable, which is cut).

You can remove the stock positive cable, as long as the new battery cable from the trunk goes to the fuse box and starter. In my case, I used a power distribution block (as seen in my previous post) to split the battery off to the starter. I then used the jumper stud to connect the battery to the fuse box. You can see this in the diagram I put in that previous post.

The alternator cable, which I'll show in a second, goes from the alternator to the fuse box. So you could technically leave this cable in if you don't want to replace it. Just make sure, if you do alter the stock positive cable, that you reconnect the alternator cable to the fuse box. Here's the stock alternator cable:

IMG_4119.jpg


And the replacement alternator cable:

IMG_4152.jpg


The left side connects to the alternator, and the right side has two fusible links that connect to the fuse box. In my case, I opted to replace the alternator cable with a larger gauge one (because of the small battery). So I used 1 size larger AWG cable, and 1 size larger fusible links (orange is new cable, other is stock):

IMG_4127.jpg


And then just used a boot on the alternator side:

IMG_4151.jpg


So, in summary, you can quite easily remove the stock positive cable, as long as you ensure that the battery goes to the fuse box and starter.


For the negative wires, I opted to leave the stock one in place. It goes a couple different places and it never hurts to have extra grounds, so I just left it. I cut the battery terminal off of it, put a ring terminal on it, and attached it to the negative jumper stud. I also ran an additional ground from negative jumper stud over to the driver side shock tower. It's a little hard to see in this pic, but the negative jumper is the one closest to the front of the car (with the black boot) - you can see the stock negative cable coming out of the jumper - it's the dark black one that doesn't have split loom on it. And the other one without split loom, that looks like a smoke clear jacket with wire is the additional ground I added from the jumper to the shock tower:

IMG_4427.jpg


In this pic, you can see the additional ground I added better (no split loom, looks like it's not factory cable), and if you look at the shock tower right above the fuse box lid, you can see where I removed the paint and attached the cable via bolt (make sure you spray clear coat on it afterwards to keep the bare metal from rusting):

IMG_4428.jpg
 

Latest posts

Forum statistics

Threads
77,505
Messages
1,503,934
Members
14,977
Latest member
Vallybell

Members online

No members online now.
Top