MustangMatt96GT
Well-Known Member
- Joined
- May 29, 2007
- Messages
- 1,295
- Reaction score
- 6
This is just a generalization of changing the heater core on the 96-98 mustang gt. I would think the 94,95 & 99-04 would be very similar if not the same. I have included picture for the areas I think deserve the most attention. Any process of the removal not pictured should be pretty simple and easy to figure out on your own. You WILL have to evacuate the Air Conditioning system.
Here is a list of tools I used.
Small cordless drill w/ 1/4 socket adapter.
Deep and shallow set of 1/4 inch metric sockets.
Flathead screw drive and Pry bar
1/4 inch swivel and extensions
Hose clamp pliers
AC line and or fuel line disconnect tools (2 differant sizes)
2 Gallons of Antifreeze/Coolant (Green)
1 New Heater core.
1. Evacuate the air conditioning system.
2. Remove negative battery post.
3. Start off by removing the shifter knob,boot and bezel and shifter handle. I suggest that you even remove the shifter if possible. This will give you more room to move the dash towards the seats.
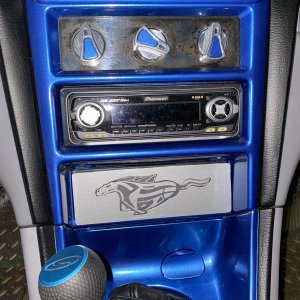
4. Remove the bezel that surrounds the stereo, hvac controls and center vent registers. No need to remove the stereo or cd player from this bezel, just unplug all the connectors from the back of them.
5. Remove the center console. There are 2 bolts inside the console that hold it to the floor boards, and then there are 2 where you removed the shifter bezel that screws the console to the dash. For ease of removal and installation I suggest to put the E-brake in its highest postion you can get it this will ease getting the ebrake boot off.
6. Remove the plastic piece of the dash located just below the steering wheel, it has 2 8mm bolts at the bottom and gently pry it off from its retaining tabs on the upper section. Behind this is another metal piece it has a few 8mm bolts holding it in also. Remove it.
7. Remove the door sill plates and the kick panels from both passenger and driver's side of the car. These pretty much pop out.
8. On the passenger side you have a few wire connectors that need disconnected. Including the blower motor. Here is a picture of the passenger side. Drivers side is similar although there is one connector that has a 10mm bolt holding it together, just unscrew that bolt.

9. Working under the steering column. Located on the left of the column there is your ignition switch harness, it has a 7mm bolt that holds it in. Remove harness. Located on the right side of the steering column there are 3 wire connectors secured to a piece of metal. Unplug all 3. Then look towards the firewall and up on the trans tunnel. You see the blue box? (Located behind the carpet pull carpet down out of the way) That is your airbag module, there are 2 connectors going into it. Disconnect those and remove both of the green 8mm bolts.
10. After you have the carpet pulled down from around the trans tunnel, you will see on the drivers side 2 green 8mm bolts which you should have removed in the previous step. Look just right of those and see the 3 gold colored 8mm bolts with huge washers on them. Remove those also. This step is the same on the passenger side except there is only 1 green 8mm bolt and the gold bolts are located to the left of the green bolt (towards the rear of the car).
11.Working in the drivers floor board. look under the steering column and find the 4 nuts that hold it up. Remove the 4 nuts. I believe they are 13mm. (13mm deepwell socket is handy here with an extension) Let the steering column down easily. When you have it down enough that you can see the top of the column, you will notice a wire connector there, disconnect it.
12. Working in the passenger side floor board. Look where you disconnected those wiring plugs. There is an 8mm bolt take that out. Then let your glove box down where you can see behind it. Look just above where you took the 8mm bolt out, but behind the dash hidden. There is another 8mm bolt. Remove it also. Here is a pic of the lower 8mm bolt. You will see the hidden one once you pull the glove box down.

13. Working in the drivers floor board. On this side your gonna pretty much do what you just done on the passenger side with a few exceptions. The lower bolt has a 15mm nut on it, remove it. and Look above that one hidden behind the dash, there is another 8mm bolt. Remove it. You might need a 6 inch 1/4 inch extension for this one.
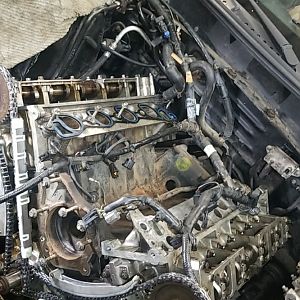
14.Working under the hood on the passenger side. Place drain pan under car where your going to disconnect the heater hoses from the heater core. Disconnect heater hoses. (Replace hose clamps with new ones when reinstalling). Using your fuel line/AC disconnect tools disconnect the evaporator core lines, and the line on the dryer (3 connections total)
Here is a picture of the area your working in afterwards.

15. Remove this vaccum line.

16. Notice the bracket that the dryer is in. There is a 10mm nut on the front of the bracket, remove that nut and the remove the dryer and set it aside. Now you can see there are 2 10mm nuts holding that bracket to the firewall, remove these and set bracket aside. Where you removed the bracket you should see 2 studs sticking out of the firewall still. Remove the one on the left. Then using an 11mm socket remove the nut on the stud located to the right and under the heater core hoses. This stud will not come out it is part of the evaporator core box. Just remove the 11mm nut as shown.

17. Working inside vehicle. Using a prybar or flat head screw driver pry the defrost vent register out of place. You will see 3 8mm bolts located where you removed the register. Remove these bolts. Your dash should now be fully unbolted.
18. Using a friend. Both persons located on each side of the dash. Lift the dash upwards and pull it back in sorta a rolling motion. Setting it as far back as possible on the seats. Mainly on the passenger side since this is where you will be spending the rest of your time. Becareful not to pull anywires or vaccum hoses. Your dash should now look like this.

19. Disconnect this vaccum connection. To keep from tearing it up and give you alittle more room to work behind the dash.

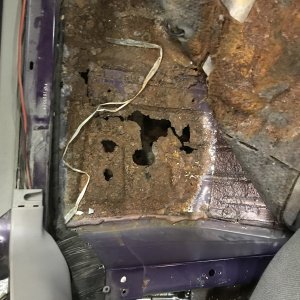
20. There you have finally gotten to that damn box that holds your leaking heater core! Now you have to either get it out or back off the firewall enough to get the heater core out.
21. No you see 2 rusty brackets that hold the evaporator/heatercore box to the firewall from the inside. These are held on by 10mm bolts. Remove these.

22. Now work the box back off the firewall as far as possible. I couldnt get mine back but about 4 or 5 inches on the passenger side. For some reason I couldnt get the driverside to move back much at all.
23. See in the picture the 2 screws that are highlighted. 2-10mm Bolts. Remove these.

24. Now that you have those 2 bolts out use a pry bar and pry up on the plastic cover that you just unbolted until you can reach in and pull the heater core out. If you dont have enough room. Work the evaorator core box back of the firewall alittle further.

.Replace with new heater core! Installation is reverse of removal!!!
Refill with proper ammount of coolant and water mixture, and recharge AC system.
Good Luck and be patient its not that bad.
Written By a good friend of mine, ujslost on other sites.
Here is a list of tools I used.
Small cordless drill w/ 1/4 socket adapter.
Deep and shallow set of 1/4 inch metric sockets.
Flathead screw drive and Pry bar
1/4 inch swivel and extensions
Hose clamp pliers
AC line and or fuel line disconnect tools (2 differant sizes)
2 Gallons of Antifreeze/Coolant (Green)
1 New Heater core.
1. Evacuate the air conditioning system.
2. Remove negative battery post.
3. Start off by removing the shifter knob,boot and bezel and shifter handle. I suggest that you even remove the shifter if possible. This will give you more room to move the dash towards the seats.
4. Remove the bezel that surrounds the stereo, hvac controls and center vent registers. No need to remove the stereo or cd player from this bezel, just unplug all the connectors from the back of them.
5. Remove the center console. There are 2 bolts inside the console that hold it to the floor boards, and then there are 2 where you removed the shifter bezel that screws the console to the dash. For ease of removal and installation I suggest to put the E-brake in its highest postion you can get it this will ease getting the ebrake boot off.
6. Remove the plastic piece of the dash located just below the steering wheel, it has 2 8mm bolts at the bottom and gently pry it off from its retaining tabs on the upper section. Behind this is another metal piece it has a few 8mm bolts holding it in also. Remove it.
7. Remove the door sill plates and the kick panels from both passenger and driver's side of the car. These pretty much pop out.
8. On the passenger side you have a few wire connectors that need disconnected. Including the blower motor. Here is a picture of the passenger side. Drivers side is similar although there is one connector that has a 10mm bolt holding it together, just unscrew that bolt.
9. Working under the steering column. Located on the left of the column there is your ignition switch harness, it has a 7mm bolt that holds it in. Remove harness. Located on the right side of the steering column there are 3 wire connectors secured to a piece of metal. Unplug all 3. Then look towards the firewall and up on the trans tunnel. You see the blue box? (Located behind the carpet pull carpet down out of the way) That is your airbag module, there are 2 connectors going into it. Disconnect those and remove both of the green 8mm bolts.
10. After you have the carpet pulled down from around the trans tunnel, you will see on the drivers side 2 green 8mm bolts which you should have removed in the previous step. Look just right of those and see the 3 gold colored 8mm bolts with huge washers on them. Remove those also. This step is the same on the passenger side except there is only 1 green 8mm bolt and the gold bolts are located to the left of the green bolt (towards the rear of the car).
11.Working in the drivers floor board. look under the steering column and find the 4 nuts that hold it up. Remove the 4 nuts. I believe they are 13mm. (13mm deepwell socket is handy here with an extension) Let the steering column down easily. When you have it down enough that you can see the top of the column, you will notice a wire connector there, disconnect it.
12. Working in the passenger side floor board. Look where you disconnected those wiring plugs. There is an 8mm bolt take that out. Then let your glove box down where you can see behind it. Look just above where you took the 8mm bolt out, but behind the dash hidden. There is another 8mm bolt. Remove it also. Here is a pic of the lower 8mm bolt. You will see the hidden one once you pull the glove box down.
13. Working in the drivers floor board. On this side your gonna pretty much do what you just done on the passenger side with a few exceptions. The lower bolt has a 15mm nut on it, remove it. and Look above that one hidden behind the dash, there is another 8mm bolt. Remove it. You might need a 6 inch 1/4 inch extension for this one.
14.Working under the hood on the passenger side. Place drain pan under car where your going to disconnect the heater hoses from the heater core. Disconnect heater hoses. (Replace hose clamps with new ones when reinstalling). Using your fuel line/AC disconnect tools disconnect the evaporator core lines, and the line on the dryer (3 connections total)
Here is a picture of the area your working in afterwards.
15. Remove this vaccum line.
16. Notice the bracket that the dryer is in. There is a 10mm nut on the front of the bracket, remove that nut and the remove the dryer and set it aside. Now you can see there are 2 10mm nuts holding that bracket to the firewall, remove these and set bracket aside. Where you removed the bracket you should see 2 studs sticking out of the firewall still. Remove the one on the left. Then using an 11mm socket remove the nut on the stud located to the right and under the heater core hoses. This stud will not come out it is part of the evaporator core box. Just remove the 11mm nut as shown.
17. Working inside vehicle. Using a prybar or flat head screw driver pry the defrost vent register out of place. You will see 3 8mm bolts located where you removed the register. Remove these bolts. Your dash should now be fully unbolted.
18. Using a friend. Both persons located on each side of the dash. Lift the dash upwards and pull it back in sorta a rolling motion. Setting it as far back as possible on the seats. Mainly on the passenger side since this is where you will be spending the rest of your time. Becareful not to pull anywires or vaccum hoses. Your dash should now look like this.
19. Disconnect this vaccum connection. To keep from tearing it up and give you alittle more room to work behind the dash.
20. There you have finally gotten to that damn box that holds your leaking heater core! Now you have to either get it out or back off the firewall enough to get the heater core out.
21. No you see 2 rusty brackets that hold the evaporator/heatercore box to the firewall from the inside. These are held on by 10mm bolts. Remove these.
22. Now work the box back off the firewall as far as possible. I couldnt get mine back but about 4 or 5 inches on the passenger side. For some reason I couldnt get the driverside to move back much at all.
23. See in the picture the 2 screws that are highlighted. 2-10mm Bolts. Remove these.
24. Now that you have those 2 bolts out use a pry bar and pry up on the plastic cover that you just unbolted until you can reach in and pull the heater core out. If you dont have enough room. Work the evaorator core box back of the firewall alittle further.
.Replace with new heater core! Installation is reverse of removal!!!
Refill with proper ammount of coolant and water mixture, and recharge AC system.
Good Luck and be patient its not that bad.
Written By a good friend of mine, ujslost on other sites.