late night cnc

ttocs

Post Whore
Joined
Oct 9, 2009
Messages
32,649
Reaction score
5,662
Location
Evansville Indiana
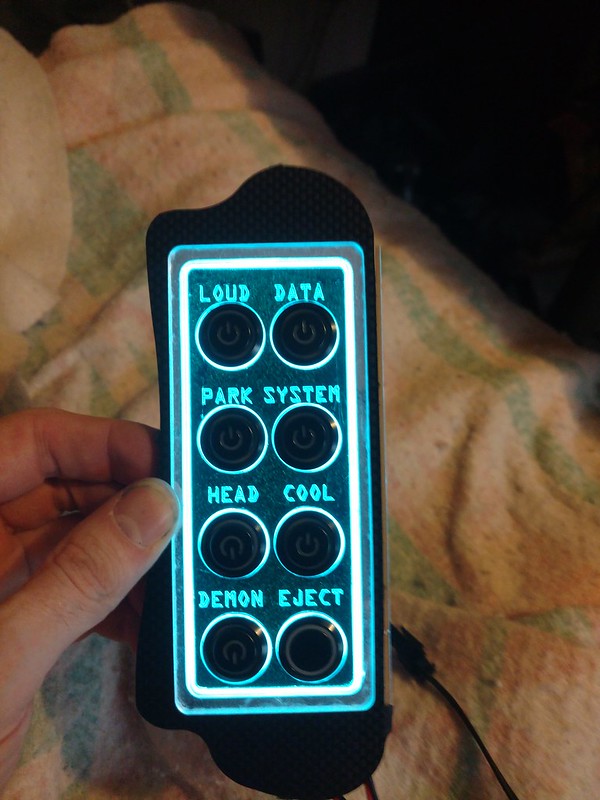
I needed to change and clean up a HUGE mess of wires in my dash that has grown into a hell of a nest now after all the upgrades, changes, and troubleshooting. One thing I have been needing to do was to replace the switch boxes that I have been using as I was never happy with where I had to mount them because of the length of some cables. I recently discovered sparked innovations switch boxes so I got 2. This panel will be mounted in the middle section where the back seat was. I need to get some 8 awg wire to complete the dist blocks and then complete the wiring to it. The small spots you see down the middle and off to the left are leds that will edge lite the plexiglass that will make the wire look like its glowing. I think I made a flux capacitor....
45860507064_868c31d4a8_c.jpg

I decided to pull out my new toy/cnc and see if I could make a switch panel for it. After a little thought I hope I have not bit off more then I can chew but so far the first part has not gone bad. Inside the pocket area I will first put a sheet of electroluminescent lighting (EL) and then there will be two plexi inserts above it. The larger one will have the words for what each switch is etched/engraved onto them so that they light up when the EL lighting is on, and then there will be a small chrome looking trim ring to go around it and help me hide the EL wiring.
44766833370_469e677374_c.jpg

this one was actually a little bit big so I scaled it down a bit and hope the next will fit. Its only the 4th time I have fired it up and the first time I have ever tried to transfer a weird shape into it so I was expecting to have one or two not work. Still learning...
 

evilcw311

Most Evil Member!
SN95 Supporter
Joined
May 9, 2010
Messages
7,456
Reaction score
2,136
Location
Louisville, KY
By the time you get that machine mastered maybe I’ll be working on the beast again. Then I’ll come out and pay you to make me some cool stuff!!!! Lol


Sent from my iPhone using Tapatalk
 
OP
OP
ttocs

ttocs

Post Whore
Joined
Oct 9, 2009
Messages
32,649
Reaction score
5,662
Location
Evansville Indiana
I can see many many cool things being made with this. I am going to make my friend a nice cedar sign for his business and if it goes well I might try to do a few of those for a few bucks. Like any cnc the handibot is limited by its size but it comes with a couple of jigs that allow you to either move the machine, or move the piece your working on. The software can take a one big file and cut it into as many "tiles" as is needed.
 

Burninriverdiver

Well-Known Member
Joined
Jan 1, 2014
Messages
2,770
Reaction score
234
That's a great tool to have, I'm interested in seeing everything it can make. Keep us updated with projects like this and the cedar sign
 
OP
OP
ttocs

ttocs

Post Whore
Joined
Oct 9, 2009
Messages
32,649
Reaction score
5,662
Location
Evansville Indiana
watching all the videos there are all kinds of neat projects it can do. The 2nd version of this one I shrank down and now it fits in the ashtray area. The challenge in this project was getting the strange shape into the v-carve. Until now I have only done basic shapes but it was not all that hard to take a pic of the area, load it onto the software and then I traced the outside of the area on the pic and then transferred that as my base plate to build on. One good thing was that I also shrank the switch holes .05" so that now they screw into the base so that I can adjust the height to get the perfect.
44773239550_a96e4e4082_c.jpg

Unfortunately it was a bad stomach day which prevented me from doing more but it might be another late night in the basement with it learning. The trim ring SHOULD not be that hard to do but then after the larger piece that goes around the switches with the writing/engraving is something I have not done yet so there might be some scrap in that learning process. Its frustrating as heck dialing things in down to the closest .05" but when the finished piece pops out of the tabs it is rewarding to see the finished product. I also got my EL lighting kit today so stay tuned there might be a late night update. The broken piece of plexi next to the switch I was just using to make sure the depth was good and it looks like after the EL panel is put in it should be nearly flush.


#1 - The large panel with the writing on it I have some choices I can make. I have a piece of smoked plexi that I could engrave that when lit up the entire area should glow dim but the letters then would be brighter. With it off it would probably just look gloss black.

#2 - I could paint it body color/green and then engrave it

#3 - just a gloss black, then engrave it.

What do you think would look the best?
 

Burninriverdiver

Well-Known Member
Joined
Jan 1, 2014
Messages
2,770
Reaction score
234
I'd vote for #2. Body matched green will look clean in the daylight but the engraved part will still be illuminated. All the options will look awesome though so it's up to you man
 

Shaggy

Administrator
Admin
Joined
Nov 27, 2013
Messages
522
Reaction score
75
Location
Arizona
Crazy! Cant wait to see the end product on this!
 
OP
OP
ttocs

ttocs

Post Whore
Joined
Oct 9, 2009
Messages
32,649
Reaction score
5,662
Location
Evansville Indiana
part 2 was making the trim ring for the pocket. The challenge here was I have never done an insert/inlay like this so it took 3 tries to get the numbers right so it would slide in, hold in place and not be so tight it was about to break. But after 3 adjustments this piece only needed the tabs knocked off, a light sand and it fits!
31665251807_d1f233b19e_c.jpg

Now for stage 3 the center portion. I think I have the #'s I need to have them slide in now but I have never engraved anything before or back lit it so as you can tell this is a big learning project for me with something new in each step.
 
OP
OP
ttocs

ttocs

Post Whore
Joined
Oct 9, 2009
Messages
32,649
Reaction score
5,662
Location
Evansville Indiana
in tonights episode of "as the cnc turns (at 19krpm)" I learned that if I do not have small scrap pieces I am cutting off of mounted down that this happens. But I also learned my painted back/engraving will work as well as the holes in that center plate are a tad too small. All that I can easily fix but I am out of paint now dangit! If walmart sold duplicolor I would be on the way already.....

45696657435_d422fb19f1_c.jpg
 
OP
OP
ttocs

ttocs

Post Whore
Joined
Oct 9, 2009
Messages
32,649
Reaction score
5,662
Location
Evansville Indiana
and done! I am happy to say it came out better then I planned but it was not with out one more redesign. After cutting the center section on the old one I realized that the switch holes had somehow drifted off about a 1/16" and screwed it all up. So while watching a movie last night I did a quick redesign and then last night was able to cut them all out. Not that I have the software/cnc figured out better its going quicker. Anyone else have any cool stuff they want made?
39672697253_89836566cc_c.jpg
 
OP
OP
ttocs

ttocs

Post Whore
Joined
Oct 9, 2009
Messages
32,649
Reaction score
5,662
Location
Evansville Indiana
lol well its a victory but a little one as I realized I have the words on upside down HA! Not that big of a deal as I already have it switched in the program and have another section of plexi already painted so I will do another one tonight.
 

96blak54

Moderator
Staff
Joined
Feb 21, 2011
Messages
10,040
Reaction score
2,880
Location
In the shop
Oh now thats all to funny! Only because i know your pain all to well!

Welcome to the machinist word
 

evilcw311

Most Evil Member!
SN95 Supporter
Joined
May 9, 2010
Messages
7,456
Reaction score
2,136
Location
Louisville, KY
Can we get an explanation of each switch and how I goes with the name???


Sent from my iPhone using Tapatalk
 
OP
OP
ttocs

ttocs

Post Whore
Joined
Oct 9, 2009
Messages
32,649
Reaction score
5,662
Location
Evansville Indiana
park/head - goes to the headlights since I got rid of the stock switch
cool - powers the fan/water pump for track days
system - turns on the stereo with out the key for show days
data - activates the recording process on the holley efi for tuning or problem diagnosis
demon - demon eye leds mounted in the hids
eject - This goes to the line lock. Line lock was too long and would not fit and it just seemed silly of me to make a custom switch panel and not have an eject button on it.
 
OP
OP
ttocs

ttocs

Post Whore
Joined
Oct 9, 2009
Messages
32,649
Reaction score
5,662
Location
Evansville Indiana
took a little longer then I thought to correct only because I finally set up a work area for the cnc and the usual puking problem. In the redesign I moved some of the switch locations and shortened a couple of names so they would fit better and decided to add the small detail line that wraps around the words back up to the switch. Now if my stomach will let me put it in the car, we shall see....
32798745908_83501e3d66_c.jpg
 

evilcw311

Most Evil Member!
SN95 Supporter
Joined
May 9, 2010
Messages
7,456
Reaction score
2,136
Location
Louisville, KY
You named a switch after me?!?!? That’s so awesome!!!!!!! [emoji38]


Sent from my iPhone using Tapatalk
 

Forum statistics

Threads
77,512
Messages
1,504,072
Members
14,980
Latest member
TreeScholar

Members online

Top