That’s the oneI take it that's the 22900 Gates hose you mention in the Coyote thread.
You are using an out of date browser. It may not display this or other websites correctly.
You should upgrade or use an alternative browser.
You should upgrade or use an alternative browser.
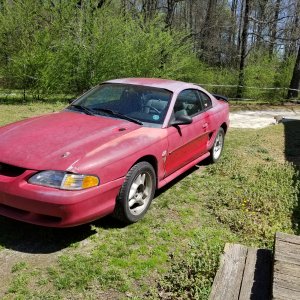
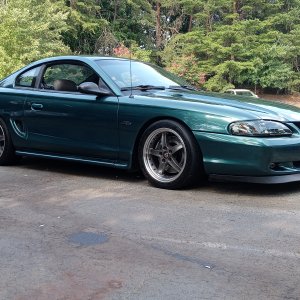
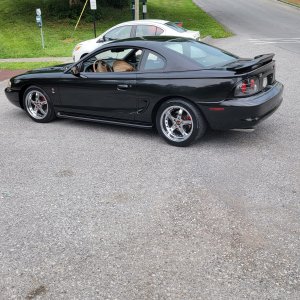
My '02 GT Coyote Swap
- Thread starter weendoggy
- Start date
Venompower
Active Member
Man I applaud the work, but it's threads like these that scare me away from considering a swap like this down the road when it becomes necessary to refresh my current engine. Rocket Surgery for sure!
Rocket surgery? Not hardly. I do it in the dirt at my house. There’s really nothing to it. Just understand how it works and take your time.Man I applaud the work, but it's threads like these that scare me away from considering a swap like this down the road when it becomes necessary to refresh my current engine. Rocket Surgery for sure!
OP
OP
weendoggy
Active Member
- Joined
- May 31, 2019
- Messages
- 639
- Reaction score
- 731
I totally understand your concern. Being in this business my entire life has had challenges. Many I don't walk away from. This is my first (maybe my last) swap and it's been a challenge at times. I did a lot of research from others who've done this, i.e. MSTCMan I applaud the work, but it's threads like these that scare me away from considering a swap like this down the road when it becomes necessary to refresh my current engine. Rocket Surgery for sure!
 , white95 on this forum as well as several YT projects, even though I knew I'd be doing it anyway. Having the "ground breakers" made it easier, but there's a LOT that isn't covered. This is why I'm doing my YT video's to explain more in detail to help others.
If you're afraid or intimidated by wiring, that's a huge setback, and if you do it, get the Ford Wiring Diagrams. You will need them if you plan on marrying two different vehicles. For me, this is the fun part and I've had numerous friends ask me to do their cars, which I do, and it's a rewarding challenge. I'm always thinking "how do I take this out after the car is done" when routing or fabricating parts.
Nuts and bolts are just that, nuts and bolts. Once that part is done, there's a lot to do and it's always the small details to connect one type to another. This is where the head scratching comes in. Once that's figured out, it's just connect the dots.
Now, that being said, this again is my first, and knowing what I know now would make each successive one easy.
Thanks for the comment and don't give up or give in.
OP
OP
weendoggy
Active Member
- Joined
- May 31, 2019
- Messages
- 639
- Reaction score
- 731
Going to try that. I have my PS there so may need some massaging.That’s the one
Venompower
Active Member
Rocket surgery? Not hardly. I do it in the dirt at my house. There’s really nothing to it. Just understand how it works and take your time.
I'm sure a rocket surgeon could do the same, but that doesn't mean everyone can... I would love to just build a 4.6 but between two kids and a job, I don't currently have the funds or time to learn right now. It's definitely on my bucket list... I'd love to build a solid forged 4.6 and turn up the boost.
I totally understand your concern. Being in this business my entire life has had challenges. Many I don't walk away from. This is my first (maybe my last) swap and it's been a challenge at times. I did a lot of research from others who've done this, i.e. MSTC
If you're afraid or intimidated by wiring, that's a huge setback, and if you do it, get the Ford Wiring Diagrams. You will need them if you plan on marrying two different vehicles. For me, this is the fun part and I've had numerous friends ask me to do their cars, which I do, and it's a rewarding challenge. I'm always thinking "how do I take this out after the car is done" when routing or fabricating parts.
Nuts and bolts are just that, nuts and bolts. Once that part is done, there's a lot to do and it's always the small details to connect one type to another. This is where the head scratching comes in. Once that's figured out, it's just connect the dots.
Now, that being said, this again is my first, and knowing what I know now would make each successive one easy.
Thanks for the comment and don't give up or give in.
If I went for the Coyote Swap I would probably just bite the bullet and get the control packs and harnesses from FRPP.
OP
OP
weendoggy
Active Member
- Joined
- May 31, 2019
- Messages
- 639
- Reaction score
- 731
That's an OK solution, however, you will/may have issues with gauges, fuel, cooling, etc. to deal with. It's just not a complete PNP setup. I don't mean to discourage you, just telling you what I know.If I went for the Coyote Swap I would probably just bite the bullet and get the control packs and harnesses from FRPP.
OP
OP
weendoggy
Active Member
- Joined
- May 31, 2019
- Messages
- 639
- Reaction score
- 731
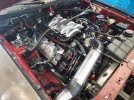
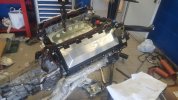
Busy finalizing the wiring aspect. I have the engine all done, interior wires in cockpit (ign, start, clutch, DLC, pedal), transmission harness's done and now just cleaning up the fender side harness's. I'm going to run the fan lead from the Coyote to the "hot" side of the CCRM fan wire which should work just fine and still go through the chassis 30A breaker. I know the Coyote will control the fan but want to see if the AC will work OK doing it this way. I can always change it. Other than having a bunch of looms that could be shortened, I'm pretty happy. I'll be looking for plug pins and clean it up later on.
Put two extra PCM mount bolts in so the PCM could be removed without having to deal with holding the bracket. Plus it should eliminate vibration.
Mocked up the air filter intake assy. and hope it'll work. I'm going to test with the hood this weekend. I think I have ample room.
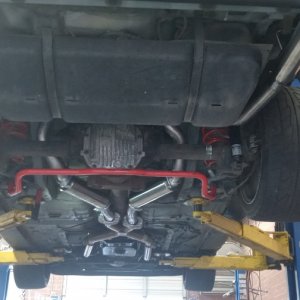
Going to use the Moroso de-gas tank and modify it to clear the elbow on the TB. The Gates hose should work but need to use the lower Coyote hose as well off the water inlet to clear the PS and will use a sleeve to connect the two. Won't get to that for a bit as I'll be doing fuel next.

1/4"x20 screw head bolts with spacers mounted behind. I tapped the frame for the bolts.

Dieted Coyote harness for O2 sensors only. The longer "rear" ones won't be used. Also have the chassis harness for backup lights and OSS.

Testing fit for right side intake. I do have the tube to connect. Just making sure I can clear PCM and upper radiator hose. All good. Next step is hood clearance.

Will finish this up tomorrow or by the weekend.
Put two extra PCM mount bolts in so the PCM could be removed without having to deal with holding the bracket. Plus it should eliminate vibration.
Mocked up the air filter intake assy. and hope it'll work. I'm going to test with the hood this weekend. I think I have ample room.
Going to use the Moroso de-gas tank and modify it to clear the elbow on the TB. The Gates hose should work but need to use the lower Coyote hose as well off the water inlet to clear the PS and will use a sleeve to connect the two. Won't get to that for a bit as I'll be doing fuel next.
1/4"x20 screw head bolts with spacers mounted behind. I tapped the frame for the bolts.
Dieted Coyote harness for O2 sensors only. The longer "rear" ones won't be used. Also have the chassis harness for backup lights and OSS.
Testing fit for right side intake. I do have the tube to connect. Just making sure I can clear PCM and upper radiator hose. All good. Next step is hood clearance.
Will finish this up tomorrow or by the weekend.
Last edited:
OP
OP
weendoggy
Active Member
- Joined
- May 31, 2019
- Messages
- 639
- Reaction score
- 731
Sometimes there's just not enough room. Case in point, trying to put the C5 fuel filter to keep from running another return line up front. It's tighter than a bull frogs butt in fly season back there with the MM panhard bar setup and exhaust. I'm not giving up just yet and will scope it out more in the next couple days. I can get the filter in but the feed/return lines to the tank will be really close to the exhaust on the right side. Best part I guess is not having to deal with all the evap lines.
On a brighter note, the interior wiring will be complete tomorrow and I'll post pics. That was the easiest part of the swap so far.
Got the cooling system figured out with a couple of ideas and that looks good as well.
Bigger problem is the PS reservoir and I think I can make it work with the use of a smaller battery. I'll probably get a Odyssey PC925MJ. I use one in my Cobra and love it. I think it'll be ample for the Coyote.
cobrajeff96
Well-Known Member
When it comes to lines, there's sheathing and heat barrier products that'll stand up to tail pipes easily. Hell you could rest the lines directly on the exhaust metal if you wanted to and it wouldn't affect them (but of course you wouldn't really do that). There's all kinds of stuff out there. I'm partial to that fiberglass braided stuff that would normally cover an old school spark wire -- I'll heat shrink that stuff onto the line or tube or whatever with dual-wall adhesive lines 3:1 or 4:1 stuff, and then for good measure I'll do a top layer of the semi-rigid aluminuzed tube if it's right near a header primary.
Lately I experimented with this stuff called Dragon Sleeve by Racetronix. The numbers they're claiming make it the toughest high-heat product I've ever heard about, so I covered the tips of the starter motor connections in it with that same sort of heatshrink material (made by 3M). I was pleasantly surprised by this stuff because it is incredibly flexible which was also what was needed in that tight space by the passenger side headers.
Lately I experimented with this stuff called Dragon Sleeve by Racetronix. The numbers they're claiming make it the toughest high-heat product I've ever heard about, so I covered the tips of the starter motor connections in it with that same sort of heatshrink material (made by 3M). I was pleasantly surprised by this stuff because it is incredibly flexible which was also what was needed in that tight space by the passenger side headers.
OP
OP
weendoggy
Active Member
- Joined
- May 31, 2019
- Messages
- 639
- Reaction score
- 731
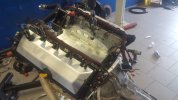
Updates:
1. Fuel tank and vapor lines are out. Thinking I'm going to make a 8" hole in the trunk area to access the pump and make a cover to go over that.
2. Decided to go the regulator route so will start plumbing that tomorrow. Going to use a solid line under the chassis with flex hose at either end. I did pull my vapor tube out un-bent with a MM full frame support welded in. That was fun.
3. Finished all the interior wiring and DLC, pedal etc. That was the easiest part of the swap so far.
4. Finished all the chassis wiring under R/fender except for the 2' of extra harness I want to shorten. Not looking to cut/splice, but to find terminal ends for the Molex plugs. If I can't or don't, I'm making my own plugs! Yeah, that's the ticket!!
Lot's of little things to finish and hope to test fire later this coming week. All the heater hoses are figured out and will get a pic when all connected. 4.6 de-gas tank is getting a massage and will look good when done. Air filter is going to passenger side and I'll be keeping my battery in the stock area, although it'll be a smaller one.

Pulled and cleaned tank. Removed all the vapor lines and will connect a charcoal "home made" canister to the vent connection.

Inside all done. Can't see a thing, which is GOOD!

I was able to utilize an unused plug for the clutch safety switch (start). Just de-pinned the plug and heat shrink the connection.

The main fuse block lead and chassis harness is WAY to long. Looking for correct pins and I'll cut/re-pin the ends. Or, make my own plug(s).

Inside engine compartment with everything in place. Moved some original chassis routing and stuff to fit the fuse block and mega-fuse. I want it all inside so I can get to things if necessary. Battery feed wire isn't present when I took this pic earlier but runs behind PCM and over radiator to BJB on driver's side.
1. Fuel tank and vapor lines are out. Thinking I'm going to make a 8" hole in the trunk area to access the pump and make a cover to go over that.
2. Decided to go the regulator route so will start plumbing that tomorrow. Going to use a solid line under the chassis with flex hose at either end. I did pull my vapor tube out un-bent with a MM full frame support welded in. That was fun.
3. Finished all the interior wiring and DLC, pedal etc. That was the easiest part of the swap so far.
4. Finished all the chassis wiring under R/fender except for the 2' of extra harness I want to shorten. Not looking to cut/splice, but to find terminal ends for the Molex plugs. If I can't or don't, I'm making my own plugs! Yeah, that's the ticket!!
Lot's of little things to finish and hope to test fire later this coming week. All the heater hoses are figured out and will get a pic when all connected. 4.6 de-gas tank is getting a massage and will look good when done. Air filter is going to passenger side and I'll be keeping my battery in the stock area, although it'll be a smaller one.
Pulled and cleaned tank. Removed all the vapor lines and will connect a charcoal "home made" canister to the vent connection.
Inside all done. Can't see a thing, which is GOOD!
I was able to utilize an unused plug for the clutch safety switch (start). Just de-pinned the plug and heat shrink the connection.
The main fuse block lead and chassis harness is WAY to long. Looking for correct pins and I'll cut/re-pin the ends. Or, make my own plug(s).
Inside engine compartment with everything in place. Moved some original chassis routing and stuff to fit the fuse block and mega-fuse. I want it all inside so I can get to things if necessary. Battery feed wire isn't present when I took this pic earlier but runs behind PCM and over radiator to BJB on driver's side.
cobrajeff96
Well-Known Member
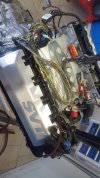
I did a lot of lengthening & shortening for the Gen2 harness (mostly the engine side of it). All I can say is to make sure you modify wires one at a time. Solder seals are well suited for the job too.
Attachments
OP
OP
weendoggy
Active Member
- Joined
- May 31, 2019
- Messages
- 639
- Reaction score
- 731
Not worried about dieting the harness. That is one of my strong suits. I tend to make things tidy, but serviceable and having two feet of "extra" stuff to bundle is a no-go for me. I did the same inside the cockpit by cutting and putting new pins on the DLC and Pedal plugs. There was over 4'+ of extra stuff! I'm more of a terminal end replacement rather than cut/splice, but sometimes that's the only option.I did a lot of lengthening & shortening for the Gen2 harness (mostly the engine side of it). All I can say is to make sure you modify wires one at a time. Solder seals are well suited for the job too.
I can get the small pins for the connectors, it's the larger corner end ones that's become difficult to find, so I may end up putting those 4 in their own plug. There's always a solution.
cobrajeff96
Well-Known Member
Comes down to the choice of the individual, but I myself couldn't allow all the extra wire of the engine harness to sit around in the bay like a bump on a log, especially being covered in that ugly corrugated plastic with the vinyl tape all over it. Hideous. Almost no wiring in my car is still vinyl taped anymore.
OP
OP
weendoggy
Active Member
- Joined
- May 31, 2019
- Messages
- 639
- Reaction score
- 731
True. This is more my track car than everyday driver so it doesn't matter too much. However, my Cobra is in split loom mesh and mostly all hidden. If I were to tear into the Mustang, a lot of changes would be made. Goal now is to make sure it runs and then after track season do some real trimming. I too don't like the "drain pipe" stuff.Comes down to the choice of the individual, but I myself couldn't allow all the extra wire of the engine harness to sit around in the bay like a bump on a log, especially being covered in that ugly corrugated plastic with the vinyl tape all over it. Hideous. Almost no wiring in my car is still vinyl taped anymore.
I was able to source the pins for the Molex connectors so that mess will be taken care of.
Where are you finding the pins and how are you determining which pins to get? I feel the same way you do about splicing, but I’ve had a hard time finding pins in the past.True. This is more my track car than everyday driver so it doesn't matter too much. However, my Cobra is in split loom mesh and mostly all hidden. If I were to tear into the Mustang, a lot of changes would be made. Goal now is to make sure it runs and then after track season do some real trimming. I too don't like the "drain pipe" stuff.
I was able to source the pins for the Molex connectors so that mess will be taken care of.
OP
OP
weendoggy
Active Member
- Joined
- May 31, 2019
- Messages
- 639
- Reaction score
- 731
I know what the connector is and before I tell you what to get, I want to be sure. Should know by weeks end. If not, back to the drawing board.Where are you finding the pins and how are you determining which pins to get? I feel the same way you do about splicing, but I’ve had a hard time finding pins in the past.
Keep up the good work.
OP
OP
weendoggy
Active Member
- Joined
- May 31, 2019
- Messages
- 639
- Reaction score
- 731
Spent my 4th making a new hard line, fuel return line. Pulled out the feed and made a pretty good copy. Left each end open for a 6AN compression fitting. Snaking each one in/out with a full MM frame connector is a challenge. Both lines are in the car and set to secure and then route hose to the return. The stock one is going to stay stock for now so no fittings needed for the filter and using a EFI/6AN at the engine side to the regulator. Return line starts just behind the filter and exits the same area up front.

Nice work on those bends. How well did it fit in the car?
Similar threads
- Replies
- 15
- Views
- 2K