Need tips for a radio bezel swap...

heffe2001

Active Member
Joined
Apr 17, 2013
Messages
254
Reaction score
0
Location
Conover, NC
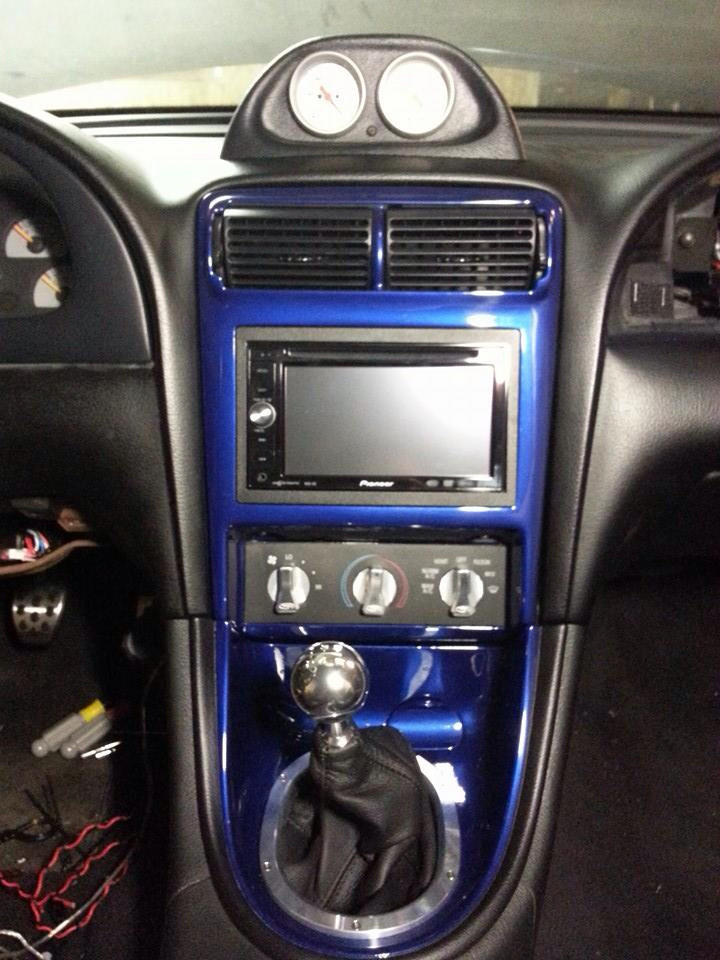
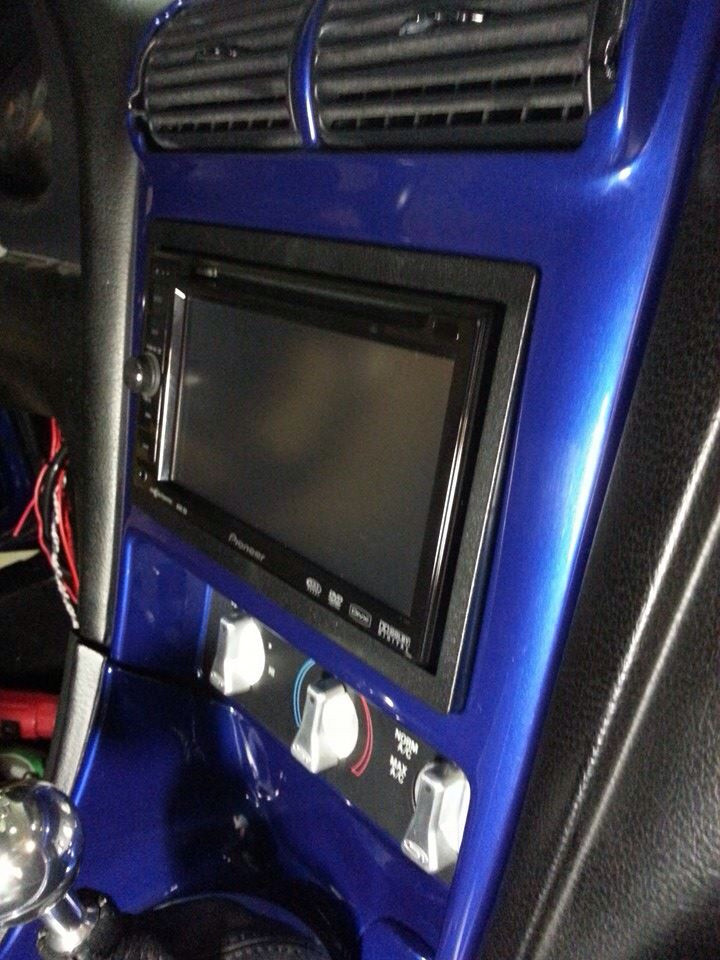
Mustang Monthly had a write up on how to swap out the bezel for the 01+ cars in the older models (it's how I did mine, still need to adjust the radio back a hair to get the radio bezel to mount flush like it's supposed to, and you have to cut a piece of your dash out for the buttons):

http://www.mustangmonthly.com/techarticles/mump_1304_1994_2004_ford_mustang_interior_upgrades/

You also just can't wire up the defrost switch and it work, it requires the relay in the existing switch to be present. Without the existing switch it won't work. Write up over on SVT Performance from TheSinner on how to do that:

http://www.svtperformance.com/forum...in-conversion-picture-heavy.html#post13443915

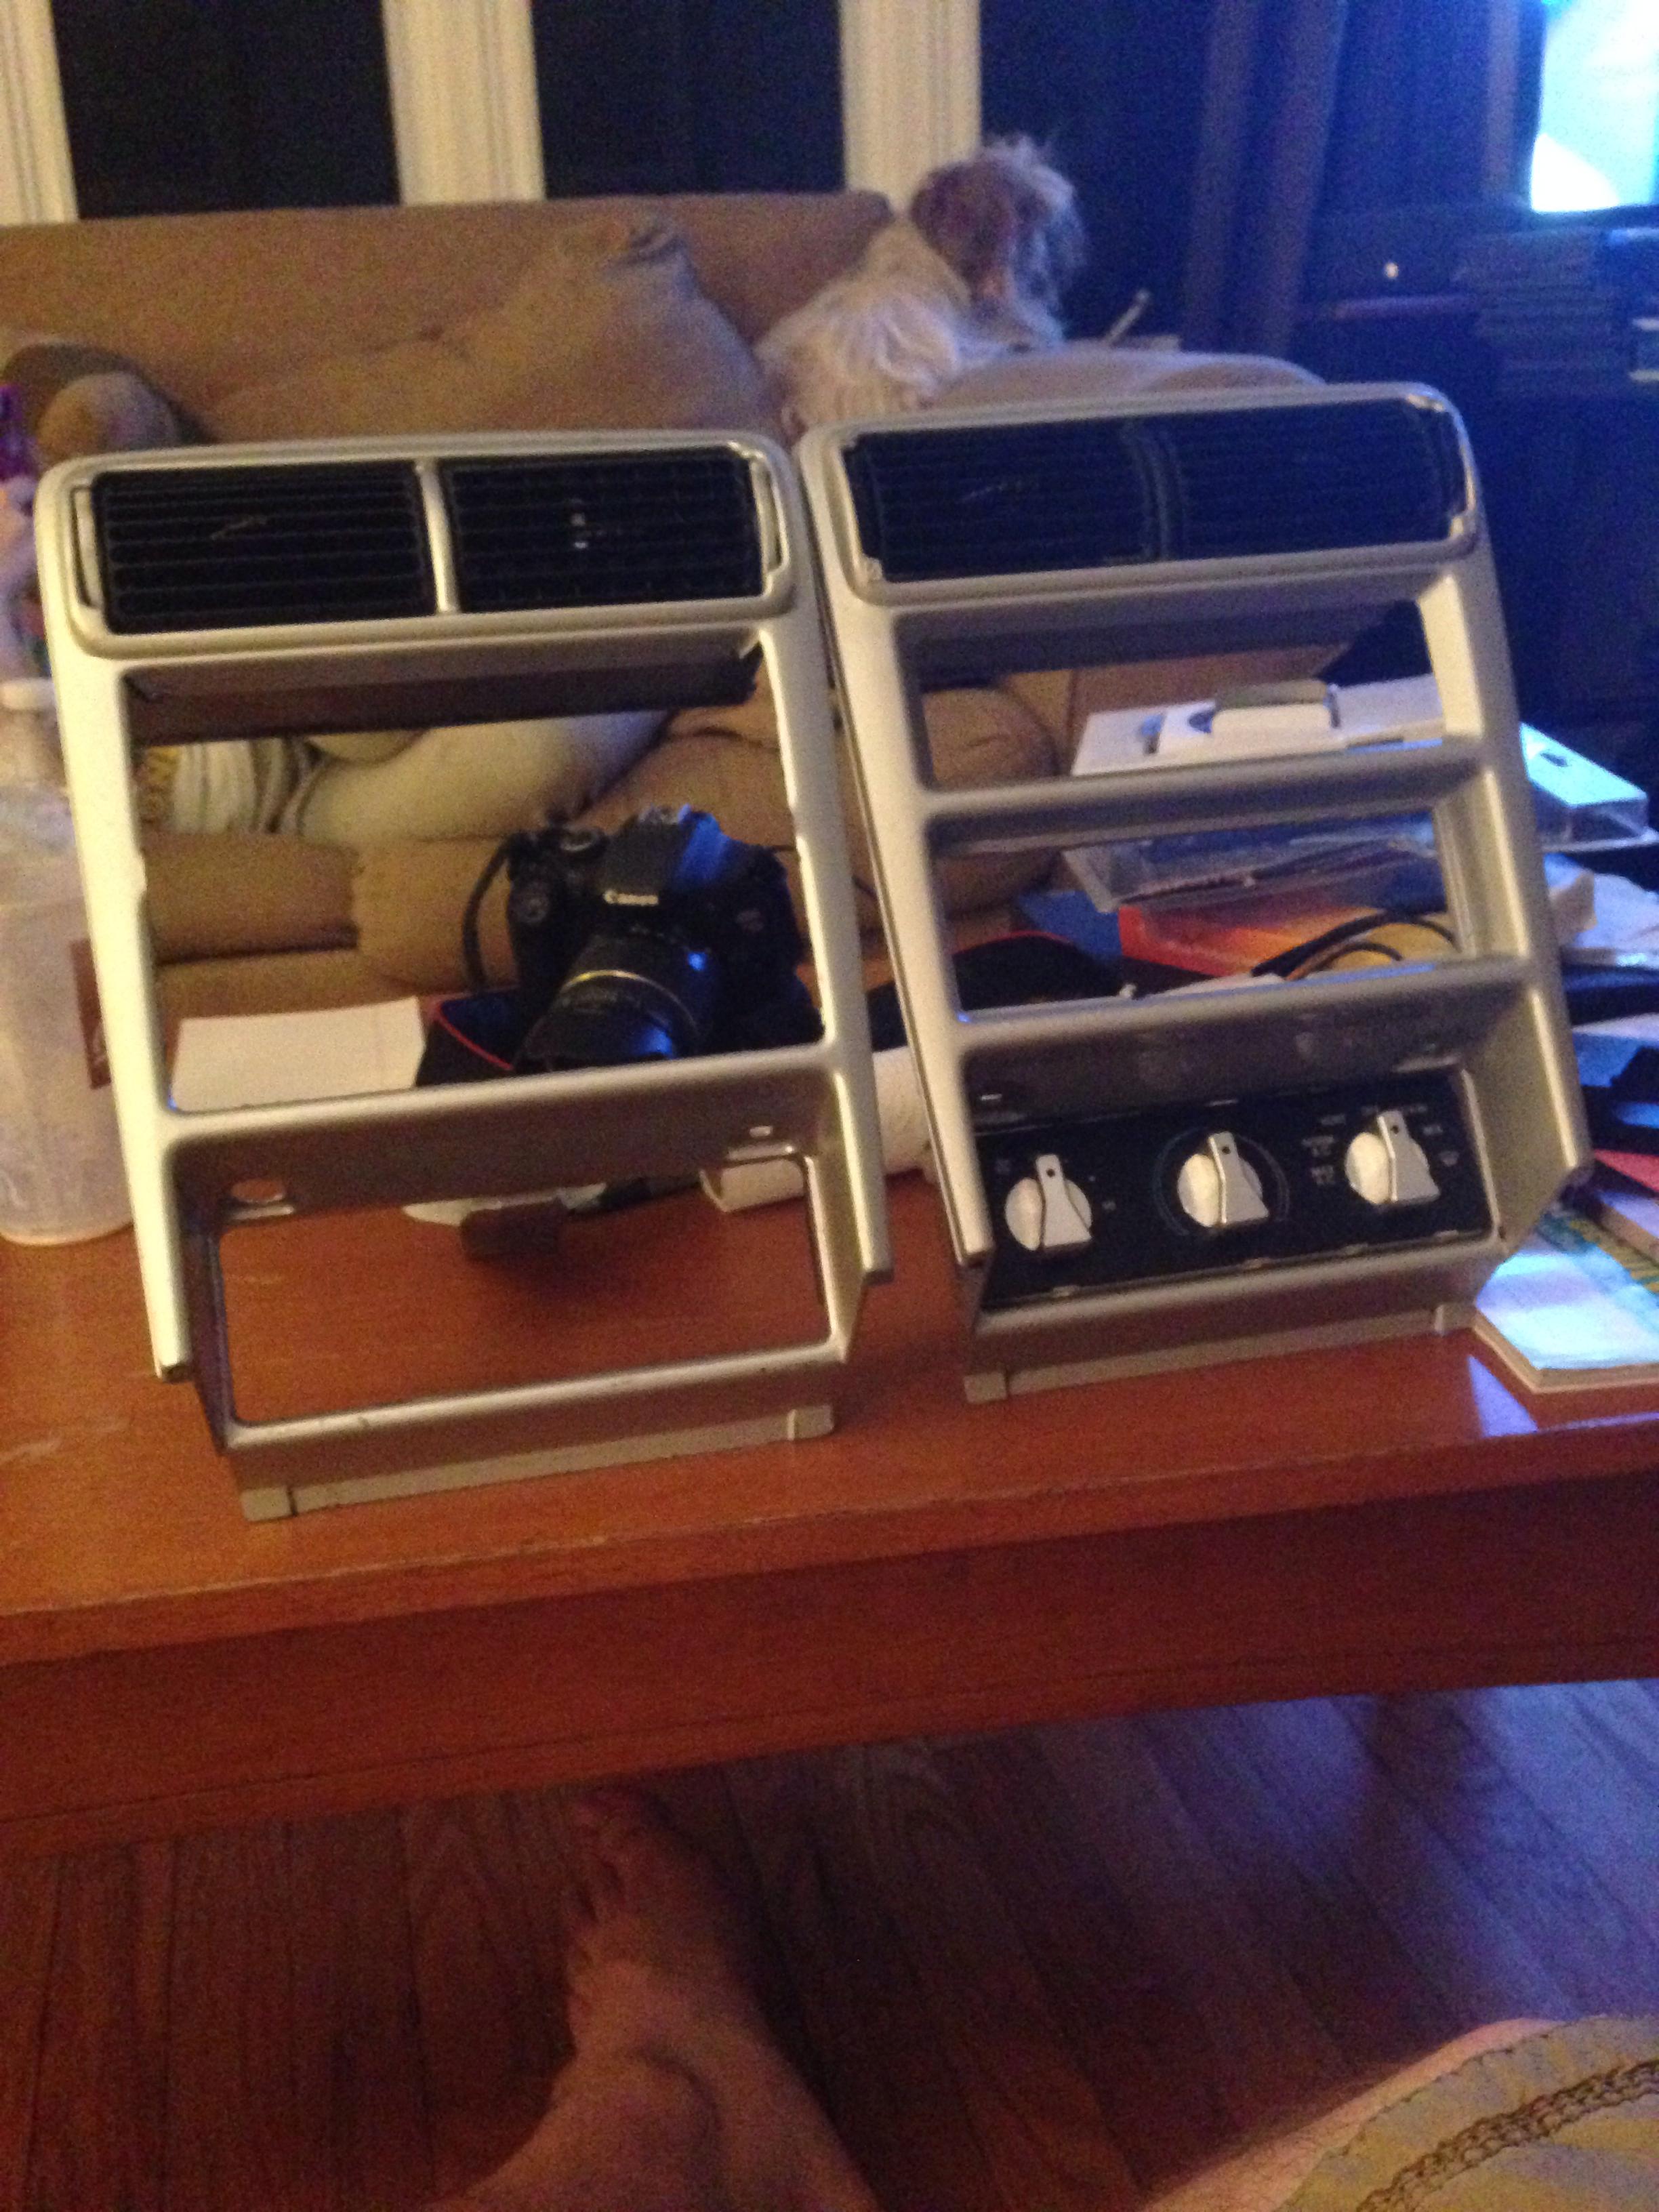
I still need to get the real harnesses for my buttons, so I can splice in for the traction control and fogs (probably will replace the one on the defrost as well, it's not the most secure method that I used, lol). If you mod the existing defrost housing like I did (same with the wiring), it will fit behind a later model dash insert without the defrost hole fine. You still hear the click from that module when you hit the button on the lower panel, but the LED lights like it should and everything works perfectly. I'd definitely suggest you either purchase or otherwise aquire the real button harnesses, it'll make your live MUUUUCH easier, lol. The traction control and defrost switches wiring were the same color code as my 2000, but I haven't had time to cut/splice it in yet...
 

DeepList

Administrator
Admin
SN95 Supporter
Joined
Jan 2, 2013
Messages
9,695
Reaction score
348
Location
Auburn, IN
You also just can't wire up the defrost switch and it work, it requires the relay in the existing switch to be present. Without the existing switch it won't work. Write up over on SVT Performance from TheSinner on how to do that:

http://www.svtperformance.com/forum...in-conversion-picture-heavy.html#post13443915

Of course, he posted that write up over there AFTER I did mine last spring. Good detailed write up though.

I hate seeing people going through the hassle of doing the double din swap and then leave the defroster button over by the headlight knob. The dummy button(s) below the radio make it look like the job is only half done.
 

heffe2001

Active Member
Joined
Apr 17, 2013
Messages
254
Reaction score
0
Location
Conover, NC
Do you have a write up or something on it here? If so I'd be happy to change it in my post, lol. I drove around for 6 months without the buttons in the console, lol. I definitely know what you mean about it looking half finished. Once I got the spare parts I needed to move the defroster, I got on it pretty quick, that huge defrost button on the left, to me, was an eyesore, lol.


Of course, he posted that write up over there AFTER I did mine last spring. Good detailed write up though.

I hate seeing people going through the hassle of doing the double din swap and then leave the defroster button over by the headlight knob. The dummy button(s) below the radio make it look like the job is only half done.
 

DeepList

Administrator
Admin
SN95 Supporter
Joined
Jan 2, 2013
Messages
9,695
Reaction score
348
Location
Auburn, IN
Do you have a write up or something on it here? If so I'd be happy to change it in my post, lol. I drove around for 6 months without the buttons in the console, lol. I definitely know what you mean about it looking half finished. Once I got the spare parts I needed to move the defroster, I got on it pretty quick, that huge defrost button on the left, to me, was an eyesore, lol.

No, I don't. I should have done an extensive write up when I did mine last spring, but I was in a hurry to get it done and didn't bother. His write up is pretty detailed though. I may do a more extensive one when I get to the interior on the white cobra project... but who knows when that will be.
 

bhorne89

Member
Joined
Mar 9, 2007
Messages
223
Reaction score
12
Location
Kansas City, Mo.
I was actually just about to update this with these pictures I came across the other day...
If I where to swap the bezels I'd want to swap the position of the radio and a/c controls. The way the s197's are setup with the controls below the radio makes much more sense.
b1RYm2Q.jpg

OSbq5E9.jpg


I have no experience in fiberglass but I have a good idea on how to work with it. I also have a buddy that could help me he's good with fiberglass.

I'm more worried on the whole how the hell to support the radio than how to modify the bezel. But I could use some help with both.


Crapatalkin' on the iPhone 5.0

The Sonic Blue dash is from my car, I do have a few more pics if you want, but the Pioneer Avic line has a can/kit for installation. I cut my factory dash the way the other guy posted in here. The stereo actually screws into the can, not just snapped in. The wieght is supported really nice, but I did make an "L" bracket that bolted to the factory dash support, and attached to the back of the pioneer. In the second picture, the black trim is out on the bottom, that is is consistant and straight across the whole piece, I did that to get a better angle on the screen. ALso this helped to clear the a/c duct in the dash, going to the two center vents. I also have to heat the duct up a little and reshape it in about a 1/4 of an inch. Let me know if you have other questions.
 
OP
OP
FivepointSlow

FivepointSlow

Well-Known Member
Joined
Oct 22, 2013
Messages
2,646
Reaction score
60
Location
Enfield, CT, USA
The Sonic Blue dash is from my car, I do have a few more pics if you want, but the Pioneer Avic line has a can/kit for installation. I cut my factory dash the way the other guy posted in here. The stereo actually screws into the can, not just snapped in. The wieght is supported really nice, but I did make an "L" bracket that bolted to the factory dash support, and attached to the back of the pioneer. In the second picture, the black trim is out on the bottom, that is is consistant and straight across the whole piece, I did that to get a better angle on the screen. ALso this helped to clear the a/c duct in the dash, going to the two center vents. I also have to heat the duct up a little and reshape it in about a 1/4 of an inch. Let me know if you have other questions.

I'm gonna take you up on those pictures. And maybe some vague instructions lol.
I got the cage for a double din and my new bezel showed up.. Already started working on it and got the HVAC part done.
FUMi6lr.jpg


Crapatalkin' on the iPhone 5.0
 

ttocs

Post Whore
Joined
Oct 9, 2009
Messages
32,622
Reaction score
5,653
Location
Evansville Indiana
well that depends on what you are use to working with, and what tools and materials you have access too. You could use wood like a 1/4" mdf or abs plastic makes for easy gluing if you have access to that.
 
OP
OP
FivepointSlow

FivepointSlow

Well-Known Member
Joined
Oct 22, 2013
Messages
2,646
Reaction score
60
Location
Enfield, CT, USA
well that depends on what you are use to working with, and what tools and materials you have access too. You could use wood like a 1/4" mdf or abs plastic makes for easy gluing if you have access to that.

Wood is probably the way to go. I can a always bring it to school to work on so I have access to everything needed lol


Crapatalkin' on the iPhone 5.0
 

ttocs

Post Whore
Joined
Oct 9, 2009
Messages
32,622
Reaction score
5,653
Location
Evansville Indiana
Quick/easy way to cut the hole is with a jig/saber saw. If you have access to a router and know how too use it there is a cleaner way to ensure a perfect hole I can explain if you want.

But in a nut-shell start off by cutting the hole. Once you have that cut around it to make the piece out that you will use a the mount for the cage. Cut it big at first and then you will need to trim it down so that it will fit into/behind the dash where you cut it out. From there its going to be up too you too figure out how it will be best to glue/screw/stick the two pieces together. If you can figure out a way to get a mechanical fastener(IE:screw/brad) through the two that is your best bet. you are going to be making a permanent connection and using filler eventually so its normally not too hard to bury a couple of screws somewhere that will not be seen. If you can't well then there are a number of glues or ways of getting them too stick together, but if I can help it I like to use both.......... Glue and adhesives can shrink/expand as well as slowly develop cracks from uncontrolled shrinking/expanding so more is better imo. Remember that the deck will lock into the cage and sit in front of it and there is a frame that goes around the deck in that goes around it so you will want to keep that in mind...
 

Forum statistics

Threads
77,495
Messages
1,503,764
Members
14,965
Latest member
wbarter

Members online

Top