Project Cherry Bomb: 90 LX

OP
OP
Werecow

Werecow

Well-Known Member
Joined
Feb 3, 2020
Messages
1,043
Reaction score
785
Location
Virginia
I've been tracing down wiring to the fuel pump for the last oohhh idk week or so it seems like and have really been woozy and weak the whole time. Just did a lil checking on myself and found out the top number on my BP is dropping by 20 when I stand up from sitting down or kneeling.. that's why I've just about fallen over several times while working on Cherry Bomb.. I've got an appointment on Monday with my heart Dr so maybe we can get me fixed a lil bit so I can get my pony fixed a lil bit more before winter hits.. Oh I did find the issue with the fuel pump wiring but that'll take a whole new update in itself with pics, diagrams, pie charts an other shit... But y'all get the drift...
 

Silver95bird

Active Member
Joined
Sep 5, 2016
Messages
491
Reaction score
113
Be careful out there. we want to see the car (and you) both running well.

i had a FP fail halfway once, it would idle okay, so we never initially suspected it. Weird stuff happens sometimes.


Sent from my moto z3 using Tapatalk
 
OP
OP
Werecow

Werecow

Well-Known Member
Joined
Feb 3, 2020
Messages
1,043
Reaction score
785
Location
Virginia
I've still yet to put the tank back in, that's why I've been doing all this tracking down on the fuel pump wiring.. I didn't figger it would do any good to put it in then go "Oh shit the pump isn't getting any power" I'm gnna have to wire it in to a key hot cause part of my harness is gone. Yeh PO went kinda nutz with the wiring on it but I got it figgered out now, I just gotta get meself situated so that I can fix it!
 
OP
OP
Werecow

Werecow

Well-Known Member
Joined
Feb 3, 2020
Messages
1,043
Reaction score
785
Location
Virginia
Fixed hot side and ground to relay under seat for fuel pump!! Finally can put the tank under it now that the electrical for the pump is lined out!!20200828_1442474550.jpg
And works without the computer too!!
 
OP
OP
Werecow

Werecow

Well-Known Member
Joined
Feb 3, 2020
Messages
1,043
Reaction score
785
Location
Virginia
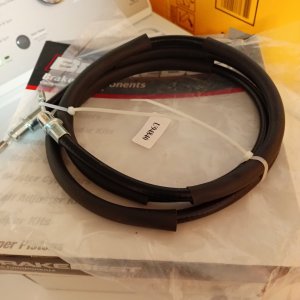
Allllllllrighty then!!! It's been awhile since I updated here.. I have been doing a few small things which I've outlined in the "What did you do to your car today" section, but I figger that major type stuff I need to put here so that I can track it as well. Today I took of the fuel filter so I could blow out the fuel lines. After sitting for 10 years no telling what kinda crudage was in the lines, besides the return line was open under the hood... Yup, nothing to cover the line, seal it off or anything.. just open to whatever was able to get in it... When I put the air hose to that one.. for some reason old gas came blowing out it all over the place!! Go figger... The feed line spluttered some old crud then if cleared out.. so we have power to the harness back there (will get back to the wiring later, I'll explain in a bit) and we have open fuel lines! Now we're ready to put in the fuel tank!! Well after installing a new fuel filter!IMG_20200915_175203683.jpg

Sooo filter installed... Let's take a look at the tank!!IMG_20200915_153141086.jpg

Annnnnd the filler neck gasket! Should always be replaced whenever you have the tank out... It's cheap and easier than having to pull the tank back out cause it's leaking..IMG_20200915_153148616.jpg

Lubed the inside of it with Dielectric grease, as well as the filler tube. Also replaced the breather grommet and greased it up with the same stuff. I can't remember where I saw to use Dielectric grease for this application but if I remember correctly it was recommended. I also cleaned out the harness for the pump and the sending unit and put fresh Dielectric grease in all connections there as well. I also have to give kudo's where it's due, my X Cheyenne helped out a lot with this part of the project!! We got the tank under the car straps in place and held up with a jackstand..IMG_20200915_173629207.jpg
Then came the hard part... Some how while the tank was out I had bent the straps a little bit... My bad and I hope you, dear followers can learn from my mistakes... Whenever you have your tank out... Be careful with your straps!! It'll make it a lot easier putting either your old tank or a new tank in!! It took a lot of wrestling, pushing, tugging, and working with to get the straps close enough to bolt back in... But finally!! Got it in!! Also!! If you have to get a replacement tank.. on the filler neck there's a bolt the secures the neck to the tank, on the original tank there's a bolt hole for this bolt. On replacement fuel tanks this bolt hole is not there. To solve the problem is really easy.. You don't have to drill any holes in your new tank (bad idea), all you need is a couple of flat washers and bolt it to the lip of the tank as in the pic...IMG_20200915_175333608.jpg
Annnnnd fuel tank is installed!! To explain my logic as to why I decided to go back here and work on the fuel system to get this part finished up first, well winter is coming.. I don't have a garage.. I figured that id rather get everything done under the car first while I have decent weather that way we can work on the other stuff (wiring, cleaning up the engine, anything else I've forgotten.. after the weather starts getting cooler.. Sooo at least got the fuel tank,pump, and sending unit done and out of the way!!
 
Last edited:
OP
OP
Werecow

Werecow

Well-Known Member
Joined
Feb 3, 2020
Messages
1,043
Reaction score
785
Location
Virginia
Yuuuuirrrpp..... Back at it again!!! Did stuff today!!! Had a really productive day working in Cherry Bomb!!! Started out working on colored spaghetti mess, ripping out allllllll the computer side if the harness. Since it no longer has anything computer controlled it would make things a lot harder going forward leaving it in since I'm bypassing it anyway for the fuel pump, all the gauges, distributor ect... Soooo out with the old harness!!! IMG_20201005_124727333.jpg

Please ignore the redneck crappy looking valve cover... It's gnna get standard dark blue Ford paint... Anyhoooooo.... Had a time getting the harness started out with the grommet thru the firewall, but once that started out it was easy peasy lemon squeesy!!! IMG_20201005_132256805_HDR.jpg

And Bob's your uncle!! Took a box cutter, sliced the grommet off very carefully popped it back in place, a lil paper towel to hold the silicone in place till it sets up! And done! IMG_20201005_144920490.jpg

There's a reason I'm saving this instead of sealing it up for good... Later on I do plan on doing a battery relocation to the rear of the car. From what I've seen on YouTube when it's done on one of these the hot side is run thru the passenger compartment but tucked under the carpet.. This will give me a spot for the positive Cable to come out of the passenger compartment without having to make another hole and a grommet... And if I go to a different fuel injection setup... Hole is there for wiring harness already!!

Now... I had started putting the interior back together about this time when my Ex came by... Perfect timing!!! I needed help with the steering shaft, cause hard to like up bolts for access from bottom and turn steering wheel at the same time!! She got the bolts lined up, we got the upper and bottom bolts popped off actually pretty easy!!! Then I got to use my newest stuff from HF... Yeah laugh go ahead and make comments... I had to have a 18mm deep well impact and a set of pry bars... Worked beautifully!!! Steering rack popped loose no issues, and between me and the Ex getting pressure on the right place's... A lil persuasion with my trusty 2lb hammer... IMG_20201005_172452376.jpg

Out she popped!!!! Sooooooooo much easier than I was led to believe from YouTube... I was really dreading this and was thinking it was gnna be a fight!! After rolling around in the gravel for 11/2 hrs getting it out, I think tomorrow I'll take it easy an just break the shaft down, clean it up good, maybe put it back together and let that be a day... Oh BTW, for those enquiring minds about how I've got the front of the car supported?? It's nice and safe.. It's on heavy doody plastic ramps with a couple of 2x6 boards under the tires for a lil more lift... Front end isn't gnna go anywhere...
 
OP
OP
Werecow

Werecow

Well-Known Member
Joined
Feb 3, 2020
Messages
1,043
Reaction score
785
Location
Virginia
I'm not really sure yet which way I'm gnna go with that part.. The way they did my k-member and then welded the ears from the old motor mount to the k-member I'd have to have them welded to whatever I put back in it if I keep the engine that's in it now.. IMG_20201009_163235049.jpg
Here's a shot and thus one too.. IMG_20201015_143828911.jpg
So see what I mean? I'm in a situation where it's either do a lot of fab work to fix what I've got or dump it and go with something else all together.. I've just about decided that I'm gnna get this one running, work in getting the rest of it lined out, lights, suspension, interior, all the other stuff and start gathering parts for a big block swap which would call for a tubular k-member.. Not that I don't appreciate the offer, I do but it's just the mess I have to work with and I'm limited with options for fixing it..
 

ttocs

Post Whore
Joined
Oct 9, 2009
Messages
32,644
Reaction score
5,661
Location
Evansville Indiana
if that is the quality of the work done on it, yank it all out and get something from the junkyard or........
 

evilcw311

Most Evil Member!
SN95 Supporter
Joined
May 9, 2010
Messages
7,456
Reaction score
2,136
Location
Louisville, KY
I know what k member werecow is going with............... [emoji102]


Sent from my iPhone using Tapatalk
 
OP
OP
Werecow

Werecow

Well-Known Member
Joined
Feb 3, 2020
Messages
1,043
Reaction score
785
Location
Virginia
Yeahhhhhhhhh..... Now y'all see what I'm talking about... It would really take waaaaaaaaayyyy too much work to beef up what I've got under it for the engine that's in it... Soooooo plan B... It'll take some time but I've already been doing a lot of research so I'll have a good game plan moving forward after I get it running..
 
OP
OP
Werecow

Werecow

Well-Known Member
Joined
Feb 3, 2020
Messages
1,043
Reaction score
785
Location
Virginia
In other news.... I finally reassembled the dash on the passenger side where I took the ECM and related wiring harness out about a month ago, and straightened up my lil shop area a bit.. not much today, have to rest up a bit from everything I've done this week..
 
OP
OP
Werecow

Werecow

Well-Known Member
Joined
Feb 3, 2020
Messages
1,043
Reaction score
785
Location
Virginia
A further update from my lil corner of SW VA.... Finally got the fuel lines cut at the point they cross over to the driver's side of the car, need em to come up on the passenger side for well obvious reasons. Waaaaaaaaayyyy too much colored spaghetti on the driver's side, that's an accident waiting to happen it there ever was (Gods forbid) a gas leak and a lot more room in passenger side, less chance for heat soak... But all of you know this stuff anyway.. on to the good stuff.. pics!!! IMG_20201026_162419951_BURST000_COVER.jpg
Yup... A lil snug to try an work in there... That's one if the exhaust pipes next to my figners... IMG_20201027_140935763.jpg

Yeah... I know it's not really pretty.. it's just a temp deal to keep em away from the exhaust pipe so I can crank it up and move it around a lil bit.. I'll get something more permanent lined out when I can start getting more stuff done like subframe connectors and tranny cross member.. IMG_20201027_140954209.jpg
I'll work the slack up as I get it zipped down inside the fender well.. annnnnnnd I got this mocked up too!!!20201027_1558093660.jpg

Gnna have to make a different mount for it as well, I measured for the wrong set of holes to do the mount the way I wanted to, but that's just to roughly get an idea where it's all gnna set in.. The line will go across the valve cover with a pressure gauge in the middle somewhere before it gets to the carb... And as always I'm open to any suggestions and input that would help me out!! Cheers!!
 
OP
OP
Werecow

Werecow

Well-Known Member
Joined
Feb 3, 2020
Messages
1,043
Reaction score
785
Location
Virginia
: Placeholder: *something's coming.......* Check out post no 9175 in the recent purchase thread, I just got a 460 for project Cherry Bomb!!! It'll be awhile before it's ready for it, need to do some suspension work and get a lot of stuff in good working order first.. we also need subframe connectors, boxing in the torque boxes, some tranny work.. putting in an 8.8 rear end, then there's the buildup on the engine itself.. I'm being optimistic and hoping for somewhere around 500 to 525 hp. At that power level this engine should live a long life as it won't be stressing the engine at all!!
 
Last edited:
OP
OP
Werecow

Werecow

Well-Known Member
Joined
Feb 3, 2020
Messages
1,043
Reaction score
785
Location
Virginia
Got the new heartbeat for Cherry Bomb put away in the shop/work building.. Borrowed a cherry picker from a friend of mine and with the help of my X, her BF, and my X gf's nephew, (yeh my life sounds like a Jerry Springer rerun at times lol!!) We all got it out the back of my truck in the building.. took 2 4x8 sheets of 3/4 plywood and 2 more scraps placed just right and a lot of tugging, pushing, and pulling to get it in its home for now. Haven't decided on wether to work on it while I'm getting the car ready for it or just leave it all sealed up till the car is all ready.. I guess I'll just burn that bridge when I get to it.. We noticed one thing about it when we were moving it also... PO said the engine was pulled because it was using a lil oil.. we noticed that the oil pan was damp towards the front and back... I'm wondering if the oil usage wasn't from leaking and not burning?? I'm planning on pulling all the plugs out after I get a lil rest.. My back is screaming at me from all the miles and overdoing it this past week. Anyhoooooo.... Here's a snap of Cherry Bomb's new heartbeat all nestled in its new home for now... IMG_20201109_131802784.jpg
 

lwarrior1016

Mr. Secondary Timing Chain
Staff
Joined
Sep 22, 2014
Messages
8,551
Reaction score
4,366
Location
South Mississippi
Man, I just had to read through all this. Apparently I’ve been overlooking the thread. You’ve been putting in some serious work on this thing, just to bring it back to life. It looks like you’ve got a pretty good handle on it. Keep up the work, I can’t wait to see the 460 in there.
 
OP
OP
Werecow

Werecow

Well-Known Member
Joined
Feb 3, 2020
Messages
1,043
Reaction score
785
Location
Virginia
Got some work done on Cherry Bomb yesterday, weather was a lil nippy but I still fought thru and got some done.. I re-ran the fuel lines, brought them up thru from the front of the fender instead of the rear. My reasoning behind this is as I'm using a low pressure fuel pump it'll be more susucptible to vapor lock as running the lines in from the rear is a lil hotter area cause of the exhaust manifold. Then I got the fuel pressure regulator mount nailed down so I can then mount up the regulator itself.. I also took a piece of 3/8 fuel line, split it and used it to line the hole I ran the fuel line through to keep it from rubbing thru in any edges.. IMG_20201112_153343495.jpg
After this I moved inside my lil shop building and decided to pull plugs on the engine I got the other day to see what's what inside it!! All the plugs looked really good but 2... Nos 2 and 3 had been burning a lil oil... IMG_20201112_155532007.jpg
That's no 2...
IMG_20201112_160231479.jpg

Annnnnnnd that's no 3... The rest of em were dry and light tan, like you would normally pull on one with a good working fuel injection system..
 

lwarrior1016

Mr. Secondary Timing Chain
Staff
Joined
Sep 22, 2014
Messages
8,551
Reaction score
4,366
Location
South Mississippi
Were you wanting to throw it in there as is or did you want to rebuild it first? If a rebuild was going to happen, not much skin off you back. If not, that kinda sucks.
 

Forum statistics

Threads
77,506
Messages
1,503,996
Members
14,978
Latest member
jarthur1995

Members online

Top