Rear Suspension Rebuild

delling3

Active Member
Joined
Aug 14, 2018
Messages
387
Reaction score
167
Location
Sterling Heights, MI
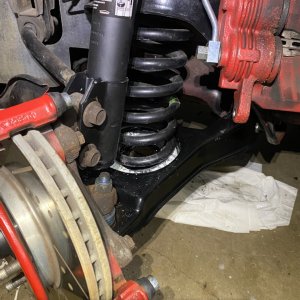
96 GT, currently all stock rear suspension. Getting ready to tear into things. New upper and lower control arms, bushings, lowering springs, shocks. I will be doing this on the garage floor: jack and jackstands, and likely without any assistance.

Looking for opinions on the right order to do this. I understand how to replace each component, but not necessarily the interaction between the various components when all are being replaced. I've read install instructions for MM, shop manual, and watched Youtube vids, but no "do this first, this second, etc." for the full job. I know more than one of you guys have done this and could do it in your sleep: what advice do you have to offer?
 

beyondEOD

Member
Joined
Nov 4, 2019
Messages
106
Reaction score
20
The order that worked for me.

Remove quads
Remove shocks
Remove springs
Remove lowers
Install lowers
Remove uppers
Install uppers
Install springs
Install shocks
Install quads

Sent from my SM-G960U using Tapatalk
 
OP
OP
delling3

delling3

Active Member
Joined
Aug 14, 2018
Messages
387
Reaction score
167
Location
Sterling Heights, MI
Thanks. Do the quads need to be removed? I am assuming you had the chassis and axle supported with jack stands?
 

DKblue98GT

Well-Known Member
Joined
Dec 19, 2009
Messages
1,406
Reaction score
333
The only thing I would add is between removing and installing the upper arms is to replace the rubber axle bushings. MM makes a tool that makes it fairly easy to do with the axle in the car.
 

beyondEOD

Member
Joined
Nov 4, 2019
Messages
106
Reaction score
20
I concur with the axle bushings and the MM tool.

Simply if you didn't remove the quads I think they would be in your way. Also it gives you a little more free movement of the rear end when installing the arms and shocks.

Sent from my SM-G960U using Tapatalk
 
OP
OP
delling3

delling3

Active Member
Joined
Aug 14, 2018
Messages
387
Reaction score
167
Location
Sterling Heights, MI
Great, thanks. I have the replacement axle bushings and the MM tool to do the job already in hand! What is a reasonable time frame to complete the entire job? Is 6 hours reasonable?
 
OP
OP
delling3

delling3

Active Member
Joined
Aug 14, 2018
Messages
387
Reaction score
167
Location
Sterling Heights, MI
Thanks for the tip on the bolts. I was simply planning to reuse the originals, but decided the extra expense was worth it.
 

beyondEOD

Member
Joined
Nov 4, 2019
Messages
106
Reaction score
20
Some of my bolts were not safe to reuse. Glad you decided to pick them up.

For anyone else looking at doing this. The Jegs bolts are the correct Size, Grade, and have the same design as the OEMs. If you don't run these buy the OEs from MM.
 
OP
OP
delling3

delling3

Active Member
Joined
Aug 14, 2018
Messages
387
Reaction score
167
Location
Sterling Heights, MI
So, going back to the control arm bolts, I placed an order with JEGS based on beyondEOD's recommendation. Actually ordered front and rear control arm bolts, since I am going to tackle the front after finishing the rear. Unfortunately, the COVID backorder gremlins are at it again, and they are out of stock of the front control arm bolts. How does one decide if existing hardware is reusable? My car has just shy of 100K on the clock, but it has always been pampered - a garage stored So-Cal car with no rust to be found anywhere. When I remove the front control arms, if the bolts aren't visibly damaged, and the threads are good, can I re-use them? I know many bolts in modern cars are designed to be one-use only parts that must never be reused, but I am not aware of that being the case on SN-95 suspension?
 

joe65

Well-Known Member
Joined
Feb 4, 2020
Messages
1,478
Reaction score
1,444
Great, thanks. I have the replacement axle bushings and the MM tool to do the job already in hand! What is a reasonable time frame to complete the entire job? Is 6 hours reasonable?

depends....sounds reasonable unless some bolt gives you some grief. I've also had the whole back end out before to replace the axle housing from 7.5 to 8.8. The way i look at it now is to concentrate on the pieces that make the biggest difference first. Like lower control arms and springs/shocks. I just went to coil overs on mine and so i had to remove the quad shocks. I'm not seeing any adverse effect of not having them. new parts and control arms have so much more bite i'm really kind of amazed at the difference. I did not do the upper control arms yet. I might just go full torque arm set up so those get removed.

anyways, good project! Good luck!

bolts....i would reuse unless they just don't look good and are rusty. Stock bolts are good stuff. If you're not sure, take some pics and run it by everyone here.
 

beyondEOD

Member
Joined
Nov 4, 2019
Messages
106
Reaction score
20
The stock front bolts in mine were reusable. They had minimal corrosion and heck they are big bolts. I already had the Jegs ones anyways so I replaced them.
 
OP
OP
delling3

delling3

Active Member
Joined
Aug 14, 2018
Messages
387
Reaction score
167
Location
Sterling Heights, MI
Thanks. The rear bolts are in transit - it's only the fronts that were back ordered. I will start with the rear, and if then move to the front. If the bolts don't arrive in time I will plan on reusing my existing hardware, and if I find a problem, I guess I will wait!
 
OP
OP
delling3

delling3

Active Member
Joined
Aug 14, 2018
Messages
387
Reaction score
167
Location
Sterling Heights, MI
Guys -

The front is finally finished, and I am on to the back. I have the car on jackstands, the wheels off, the upper and lower control arm pivot bolts are loose, the sway bar off, and the lower shock mounts loose. Still working on getting the front mount for one of the quad shocks to break free (soaking with penetrant overnight).

Following this sequence as suggested earlier:
Remove quads
Remove shocks
Remove springs
Remove lowers
Install lowers
Remove uppers
Install uppers
Install springs
Install shocks
Install quads

Maximum Motorsports recommends doing one side, then the other to prevent the axle from shifting out of position. I have a couple of questions though.

  1. Should I finish one side completely before moving to the other side. Assuming I am starting with the right side of the car, should I get both control arms replaced and the springs and shocks reinstalled before moving to the left?
  2. The forward LCA pivot bolts are a PITA, due to the exhaust making access to the frame rail very tight. I will struggle to extract the bolts with the mufflers in the way. When I reinstall, can the bolts go in from the torque box side, and the nut on the exhaust side of the frame rails? I seems that that shouldn't be an issue, but don't want to overlook anything.
Thanks in advance.
 

DKblue98GT

Well-Known Member
Joined
Dec 19, 2009
Messages
1,406
Reaction score
333
I have always just dropped the whole axle. It's easier to change the axle bushings with the axle out of the car.

Every SN I have worked on has needed new axle bushings.

If you are working by yourself and not changing the bushings it's probably easier to do one side at a time.

That axle is heavy...
 
OP
OP
delling3

delling3

Active Member
Joined
Aug 14, 2018
Messages
387
Reaction score
167
Location
Sterling Heights, MI
Yes, I am changing the bushings and working by myself. I bought the bushing tool from MM, and am going to try and do the bushings without dropping the axle. I’m working on jack stands on the garage floor.
 

apsmith49921

Well-Known Member
Joined
Aug 5, 2020
Messages
1,042
Reaction score
889
Yes, I am changing the bushings and working by myself. I bought the bushing tool from MM, and am going to try and do the bushings without dropping the axle. I’m working on jack stands on the garage floor.
The rear axle gets pretty low without removal. I took a peek at mine last night when I lowered it. After 27k they are still serviceable. But when I get new control arms I'll replace them.


What brand of control arms did you purchase

Sent from my SM-G955U using Tapatalk
 

Warhorse Racing

Active Member
Joined
Apr 3, 2019
Messages
262
Reaction score
248
There are some things to look out for when removing the UCAs and lowering the rear axle. The MM tool will make removal much easier.

When you're installing the new bushings shells, make sure you clean up the holes in the diff housing. You don't want any grit or metal barbs getting in the way of the new bushings going in.

It can be hard to get the UCA bolts to line up with the holes in the bushings; the rear end has a tendency to pivot down in the front. I've found that jacking the differential up by the "dog-bone" gets the rear end into the correct position. You might also have to jack up on one side of the rear end to help get the UCA-to-differential bushing bolts to line up.

If you go to the 6:00 mark in this video, you'll see what I did to install spherical bushings on my Fox. There are subtle differences, but most of the tips pertain to your install.

https://www.youtube.com/watch?v=Lc8aJ4W8CQM&t

Using a drift can also help to align the holes.
 

Latest posts

Forum statistics

Threads
77,414
Messages
1,501,524
Members
14,907
Latest member
CrowdKiller

Members online

No members online now.
Top