The man has vision, thats for sure
You are using an out of date browser. It may not display this or other websites correctly.
You should upgrade or use an alternative browser.
You should upgrade or use an alternative browser.
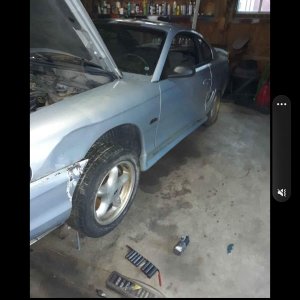
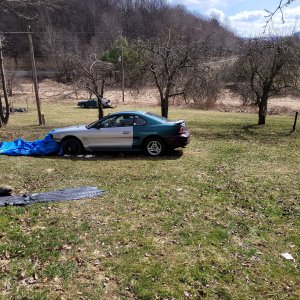
the momstang rebuild begins TOOK A TRIP AROUND THE BLOCK!
- Thread starter ttocs
- Start date
OP
OP
ttocs
Post Whore
right now my vision can't wait to see these two pics put together.

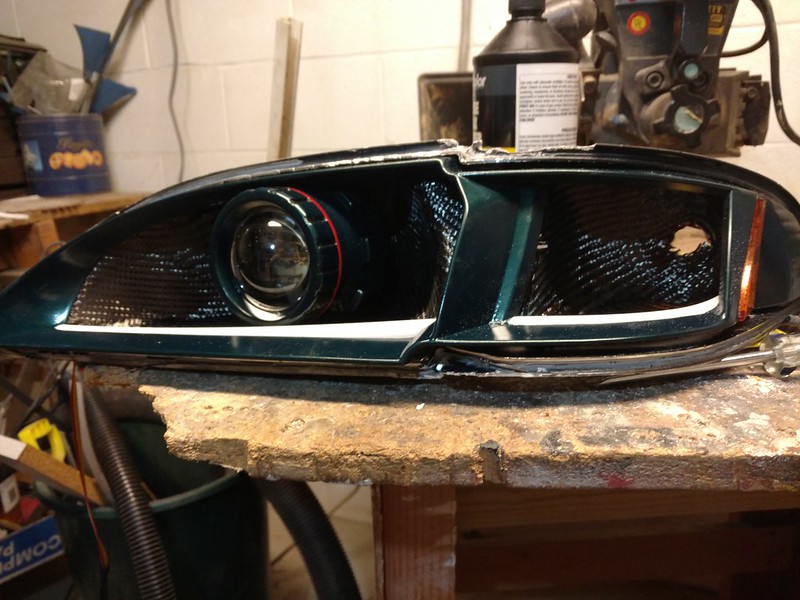
Got some diodes and other little electrical parts today so that I can hopefully finish up the lights wiring and test it out this weekend/today. Once I know its all working then I can install the bumper cover and start the light aiming game that I hope is not too hard, but for some reason I am scared to see how they line up when straight on the body....
Got some diodes and other little electrical parts today so that I can hopefully finish up the lights wiring and test it out this weekend/today. Once I know its all working then I can install the bumper cover and start the light aiming game that I hope is not too hard, but for some reason I am scared to see how they line up when straight on the body....
OP
OP
ttocs
Post Whore
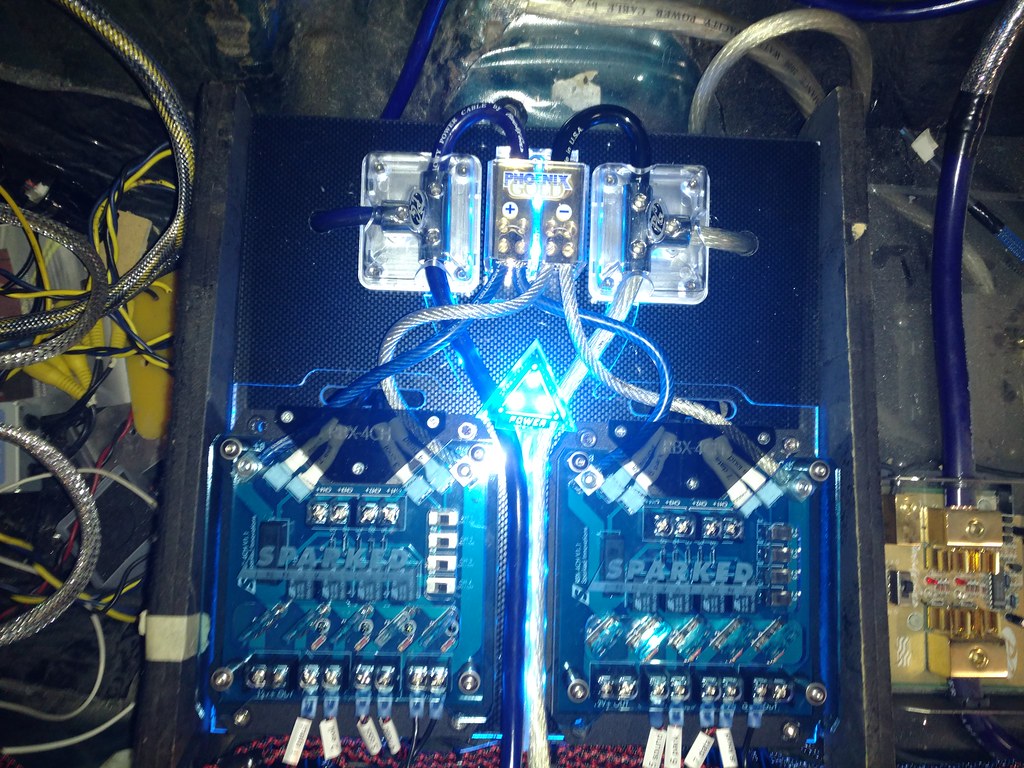
damn has it been that long? All the usual excuses I was sick and didn't get out in the garage for 3 weeks, had my brother in town and then there was a week recovering from the 3 weeks sick. Then there is the other problem, me! What I mean by that is my huge list of future projects that I keep trying to knock out as they come up/available and always seem to get out of hand. This week, lighting... I ran the additional wires for the demon eyes, the turn signals and then realized this is the time to run the wires I am going to use to light up the fender badges. While planning that I also had some interior lighting I have added that needed to be connected/powered and just figured I would do it all since the relays driving the interior and exterior lighting were behind my drivers seat air ride mess I just cleaned up. I thought after arranging things last time that I had plenty of space for a couple small fuse boxes and relays to take care of all of this but after my first look I realized I was going to have to move some things around. I had to move the valve block up a few inches and swap the intake for it to the other side. After that I just needed to be able to have room for the wiring and still be able to get to the fuse boxes. This would be difficult/messy because almost all the wiring comes in from the right side so to make room I raised the fuse boxes up 3/8" so I could run the wires under them. All this took so darn long because of the time to arrange everything so it would work and then just because of the wiring. It became a multistep process as I made each cable/wire by first airline wrapping 2 wires together, then cutting them to length, then I would cover them in techflex, cover each end with a few wraps of electrical tape, then cover them with heat shrink and then finally I could label them(1 label per wire) and then finally crimp the end on them. After all that I was ready to connect the two ends on one side, I still have to run/terminate them on the other side. Oh in addition to all that I have been making hand written schematics of it all to show what I hooked up where to make it easier to diagnose problems later.

I am sure there is more then one but I noticed one problem that is small yet huge while taking the pic that I will need to go back and fix, Find the problem:
I am sure there is more then one but I noticed one problem that is small yet huge while taking the pic that I will need to go back and fix, Find the problem:
Michael Plummer
Active Member
Lower right, there is a wire marked "ground" and it's not hooked up to anything.
OP
OP
ttocs
Post Whore
That is actually the 8 awg wire that connects that ground strap to the chassis. It is connected to the ground lug on the bottom of the terminal block. But you were very close...Lower right, there is a wire marked "ground" and it's not hooked up to anything.
About as neat as you could possibly make 40,000 new wires ")
Michael Plummer
Active Member
1. Is it the blue wire with the exposed bare wire coming out of the terminal that resides on top of the "ground wire in the lower right hand corner.That is actually the 8 awg wire that connects that ground strap to the chassis. It is connected to the ground lug on the bottom of the terminal block. But you were very close...
2. Middle top of the picture there is a quick disconnect connector not connected to anything.
OP
OP
ttocs
Post Whore
1. Is it the blue wire with the exposed bare wire coming out of the terminal that resides on top of the "ground wire in the lower right hand corner.
2. Middle top of the picture there is a quick disconnect connector not connected to anything.
not surprised but you da man! I learned an important lesson in high school LONG long ago (in a galaxy far far away it seems) about leaving just a little bit of copper exposed like that. I was taking an electricity class and we were wiring up house wiring systems with conduit and junction boxes to build 1-2-3 way switch systems to learn on. We finished our system up and tested it out and while it was working suddenly our teacher noticed a bit a bare copper just about the size as in this pic, just barely as big as the tip of a pencil. He called the class around and pointed it out and said that we need to be complete and make sure there were no bare copper areas like this showing. He was pointing at it with his pencil because the spot was just that small when he touched the bare wire, and the bare junction box which made some pretty neat sparks as his pencil exploded and he shat himself. That little bit of copper showing in my pic is minor and when the shelf was mounted in place it would not even show but a piece of heat shrink will make sure its not a problem in the future.
On top of what you pointed out I also decided to insulate the main power lugs on the fuse boxes. I just cut a butt connector in half and was able to thread it down on top of them. I have already learned the hard way from a friend of mine that even little spots like those lugs can find their way to ground. On top of my alternator there is the +12v lug as well as a ground lug next to it. I always knew that they were a 1/2" apart and not to short anything between them but one night with a friend helping he layed my work light with a metal hook right across them and made some sparks. I don't leave lugs uninsulated now and have referred to a couple of those fixes as "david caps" in honor of my friend. In reality it does not take that much more effort to do things right.
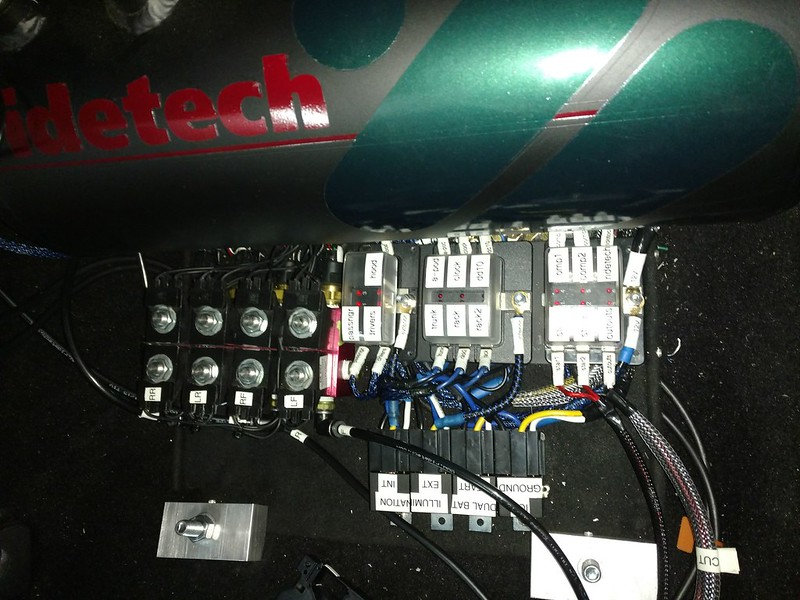
Now with the shelf mounted down those two air lines are in the way so I am going to get some straight fittings instead of the 90s it has on it now.
How’s the driving around in this?!? Have you made anymore laps or anything??
Sent from my iPhone using Tapatalk
Sent from my iPhone using Tapatalk
Musturd
Post Whore
- Joined
- Feb 12, 2011
- Messages
- 10,493
- Reaction score
- 2,255
Loving all the custom touches scott. Glad your still plugging away on it . Hope you’re in good health and all that .
OP
OP
ttocs
Post Whore
its been up and down but I am happy to say a little more up then down. I switched to a different/better quality medicine and its been helping. I think my biggest problem now is that I waste too much time waiting to see if its going to be an ok/bad/good day as I hate dropping everything in the middle of something to run for the restroom. Thanks for the comments and concern.Loving all the custom touches scott. Glad your still plugging away on it . Hope you’re in good health and all that .
Musturd
Post Whore
- Joined
- Feb 12, 2011
- Messages
- 10,493
- Reaction score
- 2,255
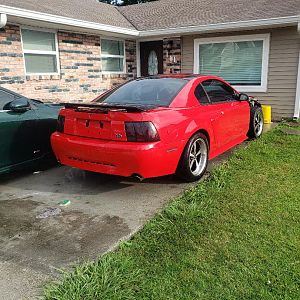
That rear end is looking sweet so many little features you just don’t see on these cars
OP
OP
ttocs
Post Whore
man ya know this project just exploded on me along with being sick and family in town its been 5-6 weeks since i put it on jack stands to make it easier to run the wiring. Today I am running one of my last 2 cables and I discover a leak under the car on the front pass side. I thought it was something brake related which while annoying hopefully would not be too hard to figure out but after some tracing its the supercharger. Looks like its leaking oil out the bottom where the remote oil drain tube connects. Its probably just the temp change expansion/contraction now after its been ran and it needs a 1/8-1/4 turn but I might have to take it off of the mounting bracket to get to it to make that little turn.How’s the driving around in this?!? Have you made anymore laps or anything??
Sent from my iPhone using Tapatalk
OP
OP
ttocs
Post Whore
good news, it was not the vortech. There was a coolant line above it that had a loose fitting and it was leaking down onto the vortech's oil drain hose making me think the fitting at the top of the hose was loose. Just a couple of turns on the coolant fitting and its fixed.
In REALLY good news though I got a letter I had been dreading. Every 2-4 yrs they review your disability case to see if you still qualify. It sucks filling out 8 pages of what/how you live and what you do and then you get to send it in and wait. I have been really happy that with some changes over the past 2 years that the more sever aspects of it that sent me to the hospital have been better controlled to where I feb was my last visit and only 3 times in the past 2 years. I was afraid that they would see it as I was cured but in reality I am still hand cuffed to my restroom more often them I am not. I got the letter today that I was expecting to get an appointment to go talk to a dr but instead they just approved it based on what I sent in. I can't tell you how F'd up it is to be happy to say I am still disabled but I have to take my little victories where they come.
So now just waiting on the mail lady to have some diodes/harnesses I need to finish the wiring portion. The leak is hopefully fixed now and maybe I will see if the cold start tuning needs adjusting. With so much good news this early I am afraid something will change it.
Like you said, it's a weird thing to be happy about but we understand! Happy for you/not happy for you man, well, you understand.
About the car, good stuff on finding the leak. It's getting close now!
About the car, good stuff on finding the leak. It's getting close now!
OP
OP
ttocs
Post Whore
I have been amazingly unproductive lately for one reason or another, not all mine. I have been playing a game with amazon for the past month. A while back I ordered a wire harness kit that came with 1, 2, 3, 4 ,5 pin harnesses that I have been using. For this project I needed 4 - 3 pin harnesses so I grabbed my kit and crimped the pins/sockets on them and realized when i went to grab the harnesses that I was out. No big deal I got them off of amazon so I made another order and they are pretty quick. Two days later I got the package and as I was about to open it I noticed they were 2 pin harnesses, but the bag was labelled 3 pin. Well crap I did the return thing and was amazed how easy it was, but I was not surprised yet still disappointed when I got another bag labelled 3-pin, filled with 2-pin... I got a hold of their tech support to tell them it looks like they got a shipment that has been labelled wrong, they said no problem they would take care of it and make sure they got the right one out to me. 3 days later I got the same wrong bag........ So now I am pissed enough to cut off the pins and waste more then a few of the harnesses left in that kit if I could find a 3-pin locally that would not rape me. Went to 3 places and short of trailer plugs no one sold harnesses separate except oriely's, and they were only $12 each.... I wasn't sure if I wanted to wait again, hoping or bend over and pay the price so I went home to sleep on it. Amazon said they had another one on the way but i was tired of waiting. The next day I went to oriely's but the guy that I talked to the day before was off, and now none of these tools had a clue what a wire harness was. When I told them I needed GM delphi weatherpack harnesses of course they asked me for what vehicle.... Eventually one of them pulled out a catalog thicker then a large phone book and started paging through it randomly while another guy said and I quote,"I don't know what the FFFFF your talkin bout.". After 15 mins of this game, I gave up. I would wait for amazon cursing the whole time. So 4, 5, 6 days later I ask them if they have a tracking number and the response I get is that they just pulled them off the amazon warehouse shelf so now they would send it from the manf, in china. I could not have been more pissed now that both amazon and now the manf had just lied to me so I sent them a responce that had about 4 f-bombs per sentence, and then ordered the weatherpack harnesses. Finally after a month of this crap, I got to test it out.
Sorry to hear about all the trouble with the harnesses man! Glad you got it working though!
OP
OP
ttocs
Post Whore
things all got held up by the fact I needed to do some cleaning up of my wiring and I hate doing that as well as in the location it is the compressed discs in my back only allow for an hour or two at a time. Figuring out 20+ yrs of projects piled up on each other and then some mad troubleshooting with the ecu stuff made one hell of a mess that I had been avoiding successfully for some time now but as you can tell it was getting hard to ignore the electrical vomit...

Some of this mess was tied up in the headlights and I could have rigged some wiring to get it to work to do the next part of the headlight but I really wanted to fix it as much as I wanted to avoid it. The majority of the mess was two switchboxes that I also wanted to replace as a cable they came with made it hard to mount them, as well as a fuse box that needed to be moved. After some searching I finally found a good replacement for the switch boxes and took the time to move the fuse box just inside the console, under the dash on the drivers side.
The switch boxes after some debate I decided to put in the middle of where the back seat use to be. I wanted to have access to them, and they looked kind of cool to start with and there was power wiring already there as well. I took a little extra time to dress it up a little and I think I made a flux capacitor
After that I needed to make a switch panel for the switches to go in the ash tray. I pulled out my handibot and designed a panel that fit in it and lit up with some EL lighting. In case you missed it.
I have to say I impressed myself on this one as there are 3 pieces I machined and they all are held together only by tension, no adhesive is necessary.

Besides learning how to make the switch panel this all took so long because of all the little details from just planning on where the wires were going, wrapping them with techflex(taping/heat shrinking/labeling each end), soldering or crimping harnesses for easy disconnecting all took for ever and then after that I made schematics of where each wire goes, its color/label/ect..... Thankfully it all looks much better now and I am almost ready to install the seat and then I can finally align the head lights.
Some of this mess was tied up in the headlights and I could have rigged some wiring to get it to work to do the next part of the headlight but I really wanted to fix it as much as I wanted to avoid it. The majority of the mess was two switchboxes that I also wanted to replace as a cable they came with made it hard to mount them, as well as a fuse box that needed to be moved. After some searching I finally found a good replacement for the switch boxes and took the time to move the fuse box just inside the console, under the dash on the drivers side.
The switch boxes after some debate I decided to put in the middle of where the back seat use to be. I wanted to have access to them, and they looked kind of cool to start with and there was power wiring already there as well. I took a little extra time to dress it up a little and I think I made a flux capacitor
After that I needed to make a switch panel for the switches to go in the ash tray. I pulled out my handibot and designed a panel that fit in it and lit up with some EL lighting. In case you missed it.
I have to say I impressed myself on this one as there are 3 pieces I machined and they all are held together only by tension, no adhesive is necessary.
Besides learning how to make the switch panel this all took so long because of all the little details from just planning on where the wires were going, wrapping them with techflex(taping/heat shrinking/labeling each end), soldering or crimping harnesses for easy disconnecting all took for ever and then after that I made schematics of where each wire goes, its color/label/ect..... Thankfully it all looks much better now and I am almost ready to install the seat and then I can finally align the head lights.
stingracer
Member
- Joined
- Feb 8, 2009
- Messages
- 170
- Reaction score
- 8
Amazing work!!! Looks fantastic!
Sent from my SM-N950U using Tapatalk
Sent from my SM-N950U using Tapatalk
I really like how everything is going. You're really making a ton of additions, and people don't realize how much stuff goes along with that.