Good job! Those are some nice looking welds you got there.
You are using an out of date browser. It may not display this or other websites correctly.
You should upgrade or use an alternative browser.
You should upgrade or use an alternative browser.
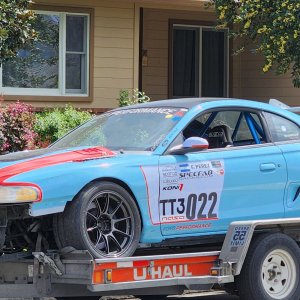
Unorthodoxsn95 (2023 Updates, now with more turbo boost and finally a hood)
- Thread starter 50HSN95
- Start date
Thanks! They are not all supper attractive, but regardless are going to hold well.Good job! Those are some nice looking welds you got there.
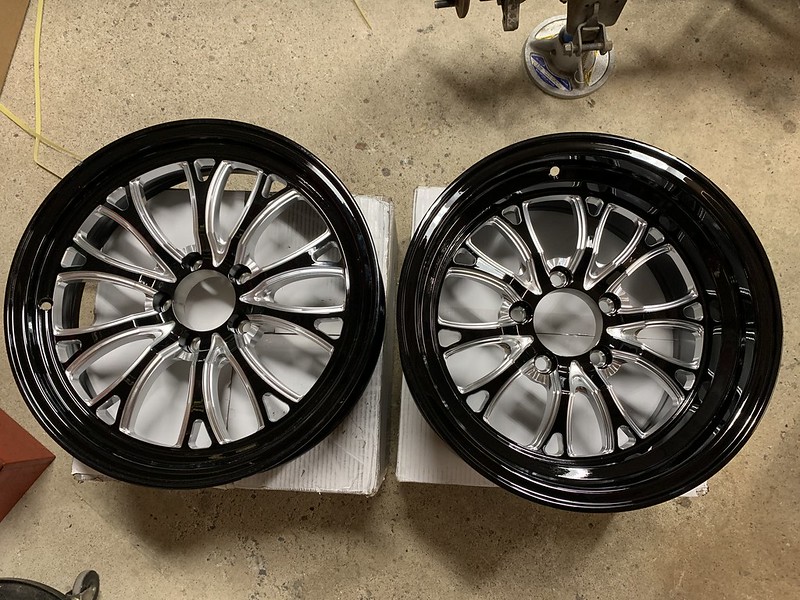
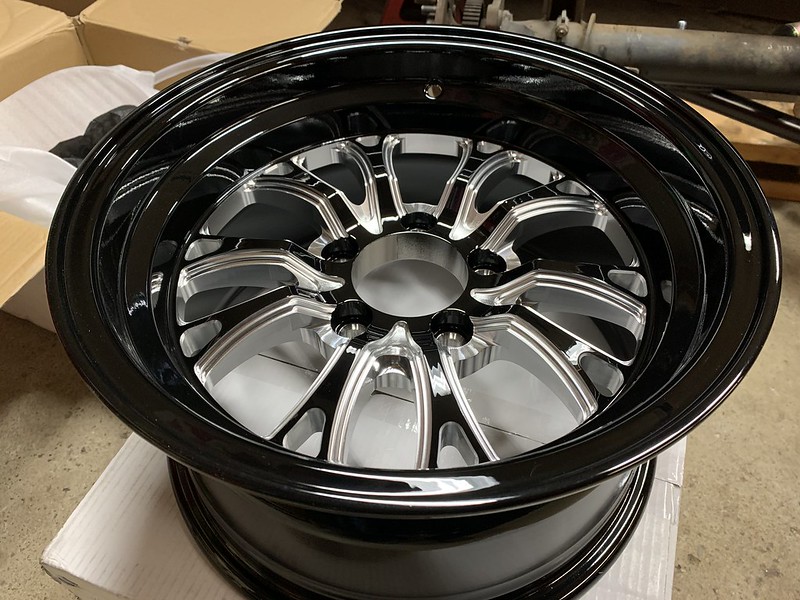
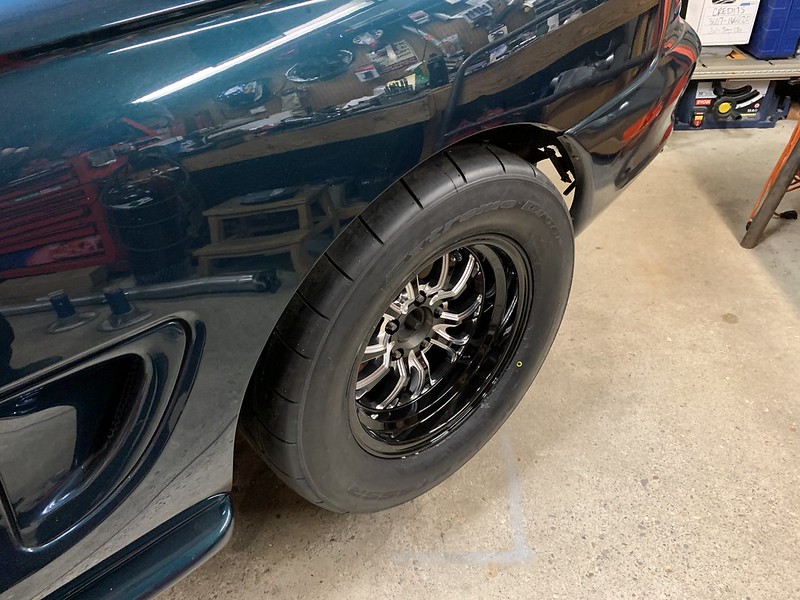
Ordered wheels and tires today. I was torn about what I wanted to use however after seeing the Jegs SSR Spike wheels on 98snakehorse's car I decided I really liked the look of them.
I ordered the SSR Spikes in 17x4.5 in the front with M/T Sportsman 26x6 radials. I ordered the same wheel in a 15x8 variety for the back with Nitto 275/50 15 555R drag radial. I was back and forth about Nitto's vs. M/T's for the back however I ran the 555's in the past and had good luck with them. I know the M/T's are probably a bit stickier, but I had to make a decision on something that was a bit better street mannered.
While it is a fairly common wheel from pics I have seen around online, I have yet to see any 'round these parts so I pulled the trigger. Final large purchase I have to make for the hot rod. Getting closer to driving reality, and approaching 4 years now of not leaving the garage, I need it to be done!
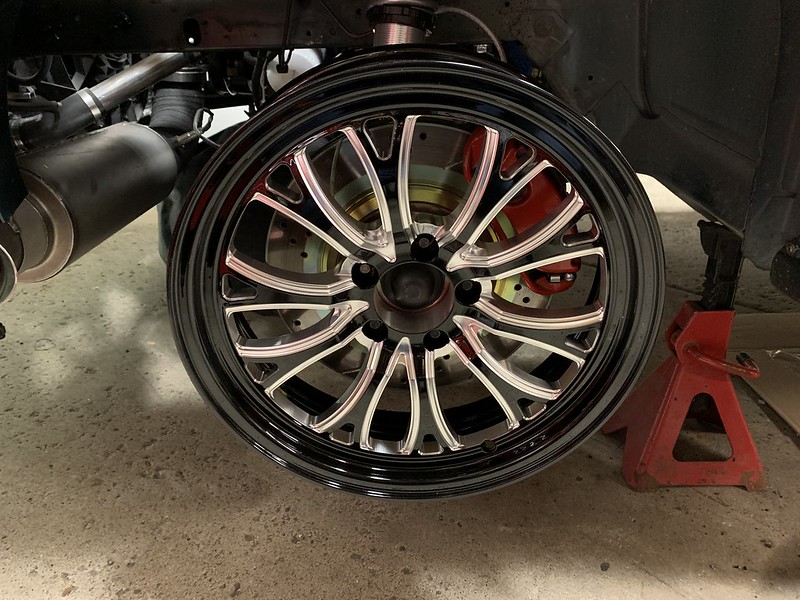
Woot, got some wheels and tires! Excited to see how they will look on the car eventually. If anyone is wondering these Jegs wheels clear Cobra PBR style brakes with no issues in the 17" size.

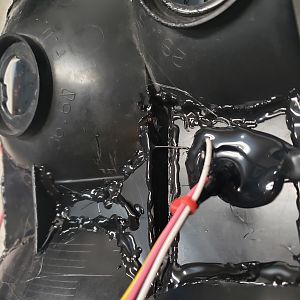
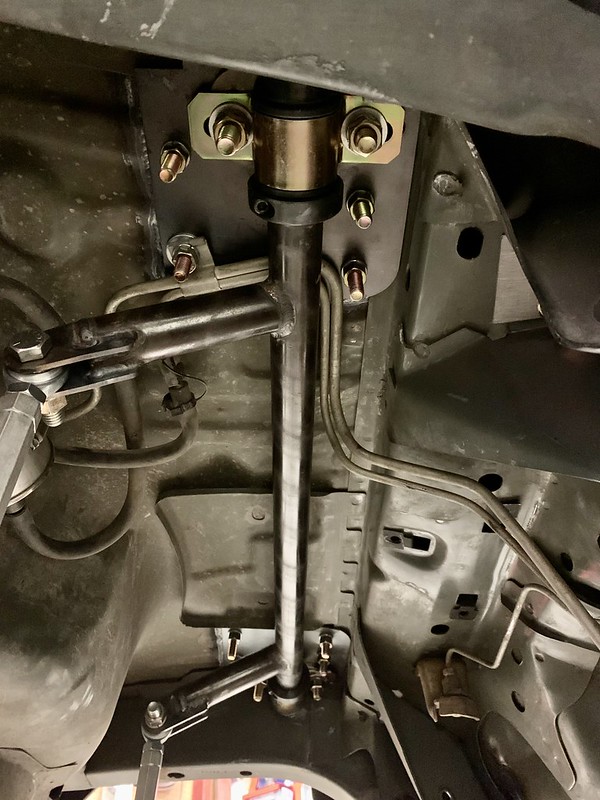
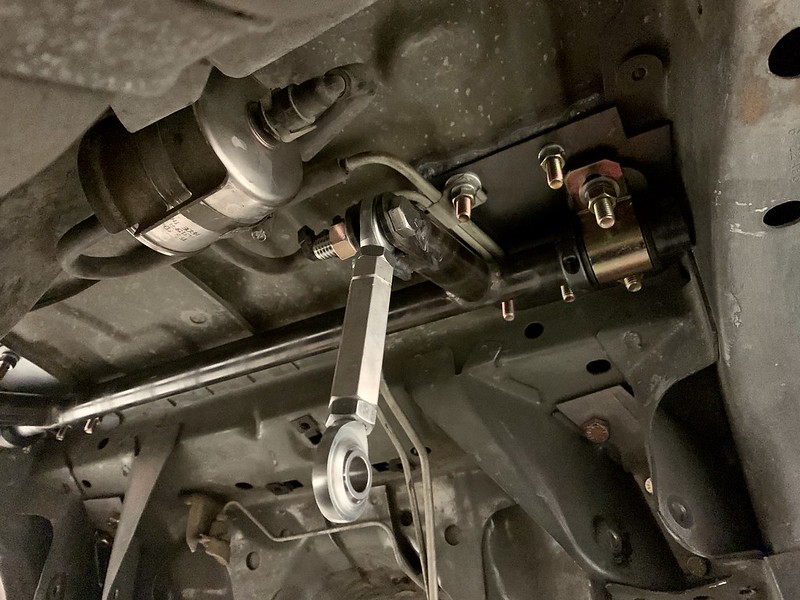
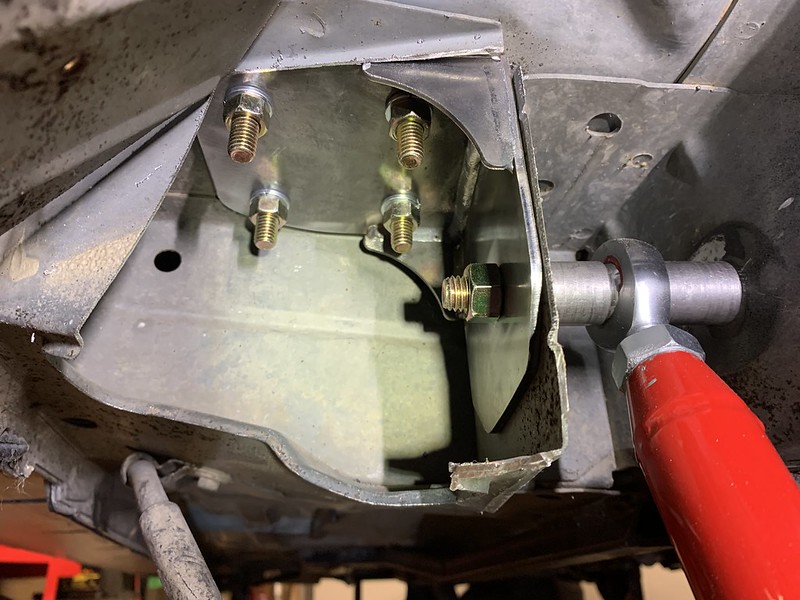
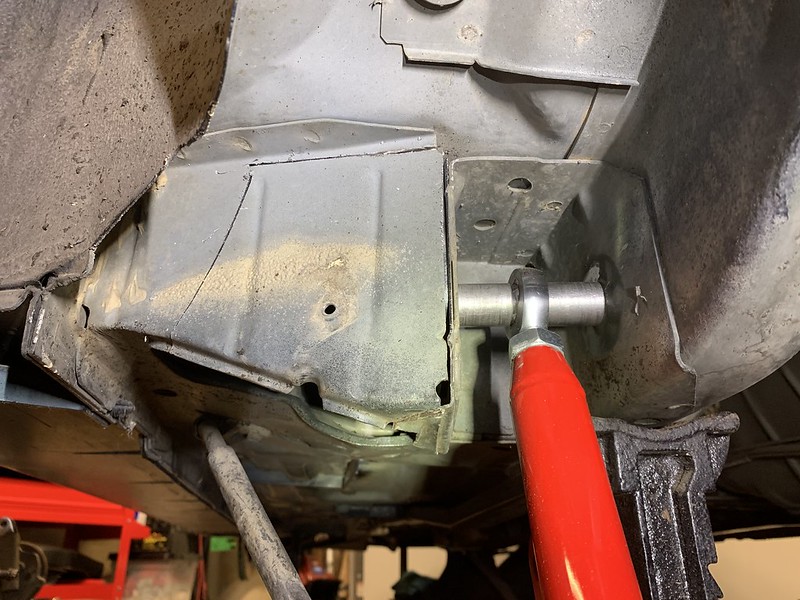
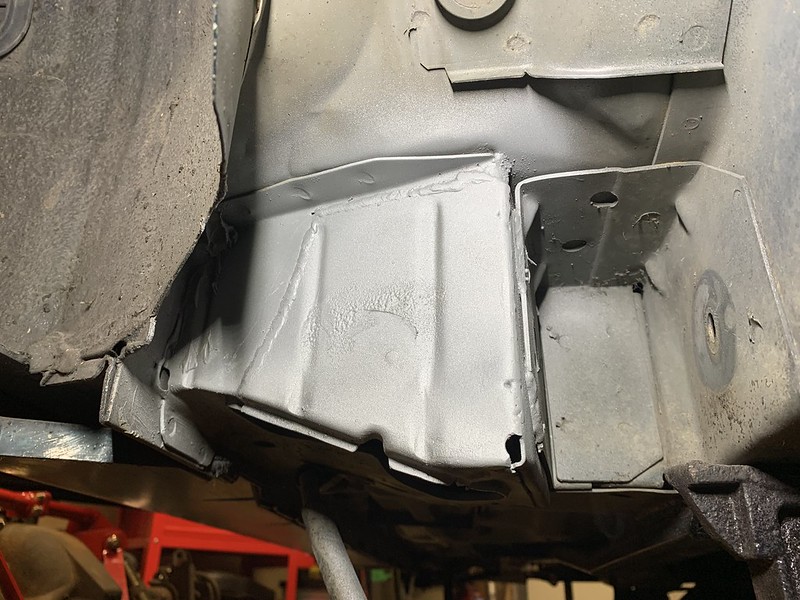
Got a bit more done inside the car and hit a road block with the ARB and the fuel lines. Going to have to move some stuff and make sure the ARB does not interfere with the fuel pressure and return lines through its range of motion. Solved one issue I created myself also, I welded in the upper control arm plates only after I realized the Baseline Suspension ARB mounting plates occupy the same space at the top...oops. Had to do some BFH work and tie the ARB mounting plates into the upper reinforcement plates. One step forward and two back LOL.
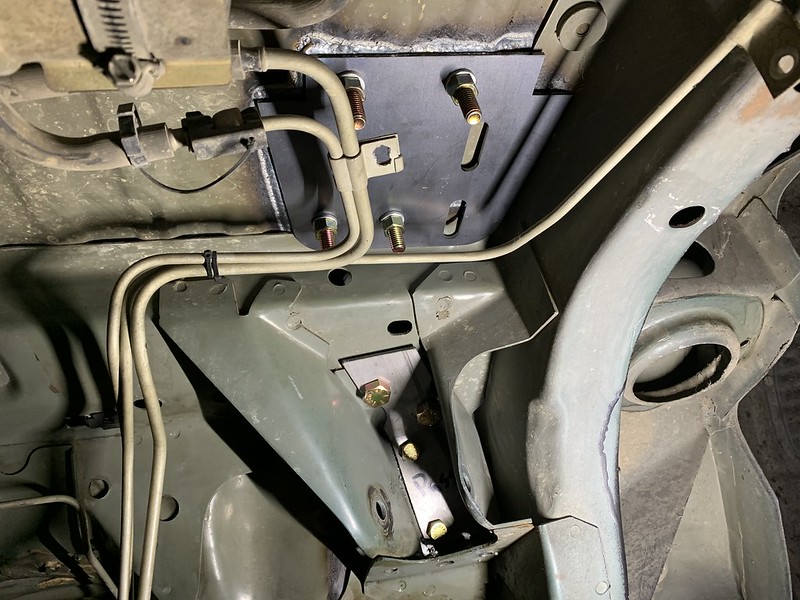
Sorry the welding on this is not the best, my welder was giving me some attitude, and I was being stupid. It is not pretty but it sure as hell is going to hold. Plate underneath still needs to be welded and the slots for the ARB still need to be drilled out. The bushings on the ARB on in the pic of the reared go into the slots on the plates. This is intended to be used on the street also so I'm excited to try it out.
**edited for spelling**
Got a bit more done inside the car and hit a road block with the ARB and the fuel lines. Going to have to move some stuff and make sure the ARB does not interfere with the fuel pressure and return lines through its range of motion. Solved one issue I created myself also, I welded in the upper control arm plates only after I realized the Baseline Suspension ARB mounting plates occupy the same space at the top...oops. Had to do some BFH work and tie the ARB mounting plates into the upper reinforcement plates. One step forward and two back LOL.
Sorry the welding on this is not the best, my welder was giving me some attitude, and I was being stupid. It is not pretty but it sure as hell is going to hold. Plate underneath still needs to be welded and the slots for the ARB still need to be drilled out. The bushings on the ARB on in the pic of the reared go into the slots on the plates. This is intended to be used on the street also so I'm excited to try it out.
**edited for spelling**
Last edited:
Those look real good. I like how they sit and the fact that they clear the brakes.
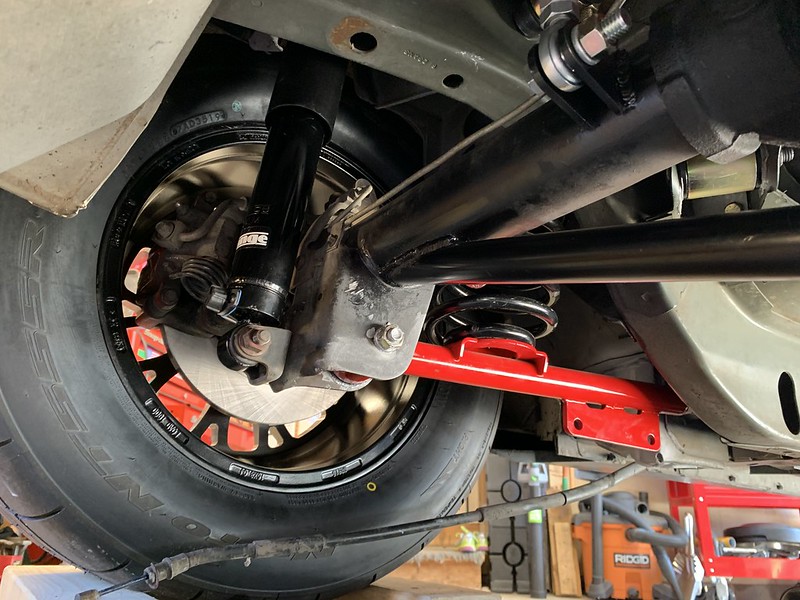
Got my ARB installed yesterday, have a bit over .25" of clearance from the bar to the fuel lines. I'm debating if I'm going to need some more spacers in there. It should be ok, as there is not much motion to the bar at all, but I'll see what it looks like when I get it bolted up and on the ground.
I ended up moving the fuel filter back, and in just a bit. Not using the spare tire well anymore so I clearanced the wheel tub a bit with a BFH to make room for the fuel lines. I cut the fuel filter bracket apart, bent the retainer tab back and just welded it to the bracket. Gave me another inch or so. I did this to make sure the ARB arms did not hit or get close to the filter or fuel lines.
I think at sometime in the future I will replace these lines with braided stainless or a relocated hard line / braided stainless combo.
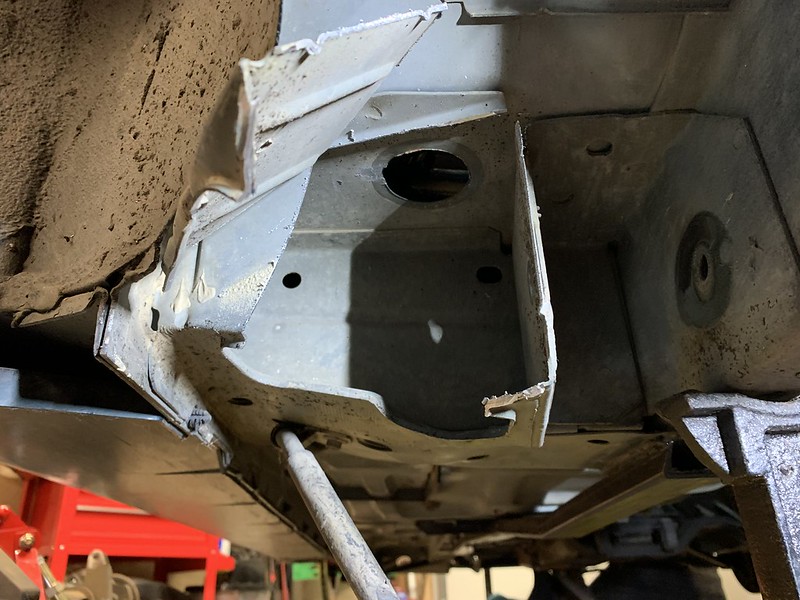
Lower torque box reinforcements in, what a pain. The plates I picked up did not fit in the openings unfortunately, so I decided to just open the side up, install the plates, bolt everything down, and stitch weld the back side of the box back up. They were just not going to fit in the existing holes at all no matter what I did. Not the end of the world though.
 [/url]
And got the rear end in, wheels look nice on the back also!
I think I'm going to remove my existing sub frame reinforcements and bend some roll bar tubing to tie in underneath the car as opposed to the cheap box ones I have on the car. I like the Team Z ones but can make my own a bit cheaper. My neighbor has a pipe bender so that makes live easy.
DKblue98GT
Well-Known Member
- Joined
- Dec 19, 2009
- Messages
- 1,406
- Reaction score
- 333
Those wheels look really good!
Last edited:
Thanks! Pictures are really not doing it justice at all. They have a much better look in person, or at least I believe they do..Those wheels look rally good!
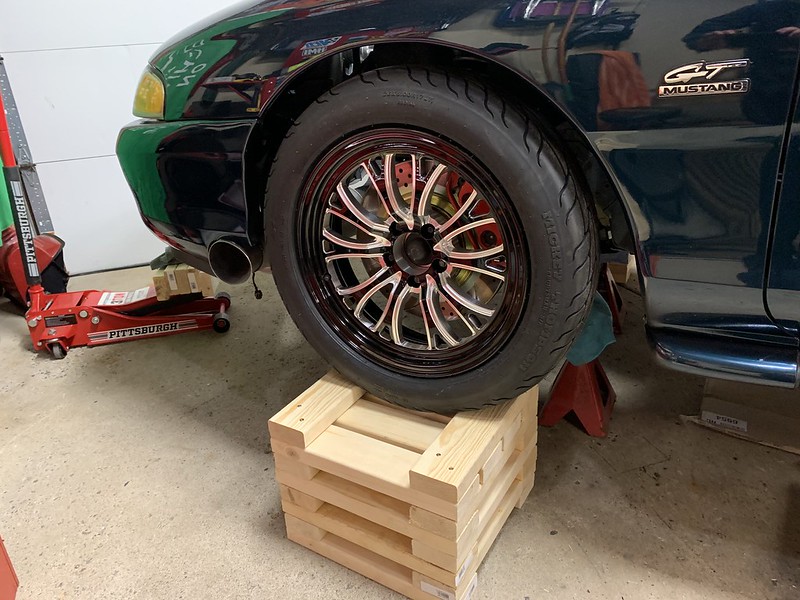
I wanted to start trying to get the rear end straight to the world, and make sure the front K member was square also but needed it a bit higher in the air. I drove over to Home Depot and picked up a dozen 2x4's and a box of screws.
After a lot of time with the saw and the screw gun, boom! Affordable and strong car cribbing! I cut everything outside last night, but came in to finish assembly. I only say that as it was -10 last night here, and after cutting a pile of boards outside in the cold and coming into the 60 degree garage, I realized how spoiled I am with the heater. Love that thing!
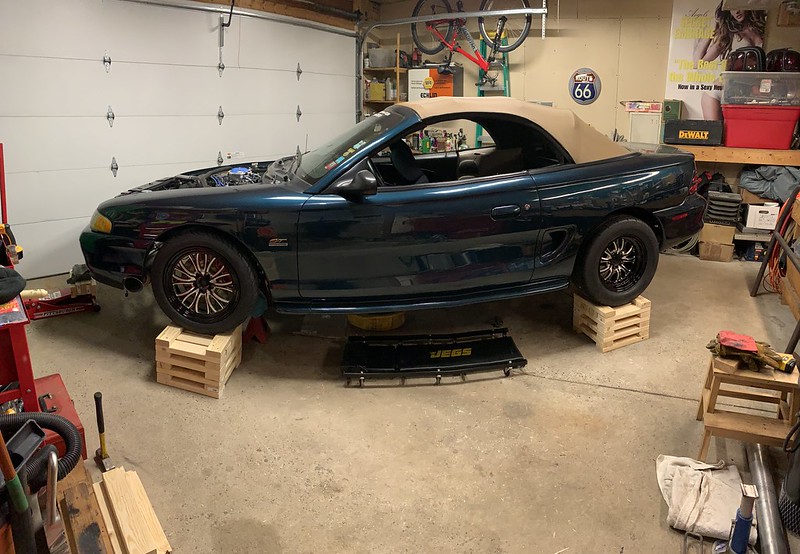
Now I can have the car "on the ground" and see how it will sit. It is still high in the back as they are factory GT springs that still need to be cut (old lowering springs were way too low), the front still has not been adjusted (low still on the pass front side), and there is no interior or cage in it yet. It should come down a bit though when done. After spending some time talking to a few folks, and in an effort to not continue spending money I went with stock springs that will be cut for now. I may switch to Team Z eventually however I'll go this route first and see how it acts out of the hole.
Front should be pretty close to this though:
Rear end parts all fit nicely and everything has plenty of clearance. Sorry for the blown out pic, I had to edit it as I forgot to turn on my flash.
Yes, everything is still loose, and still hanging there for those that see the loose bolts and nuts
")
joe65
Well-Known Member
- Joined
- Feb 4, 2020
- Messages
- 1,478
- Reaction score
- 1,444
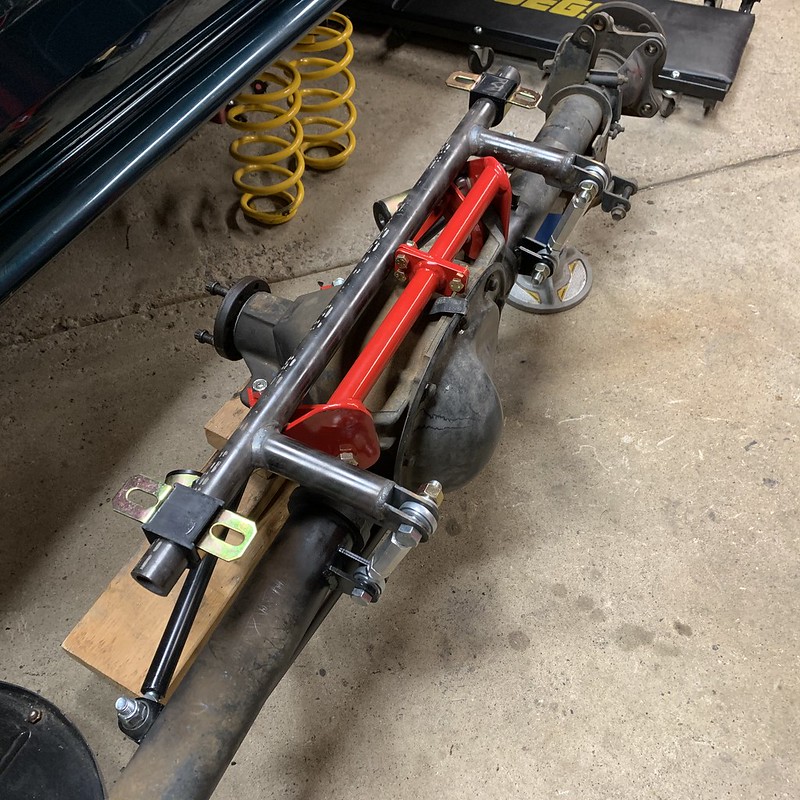
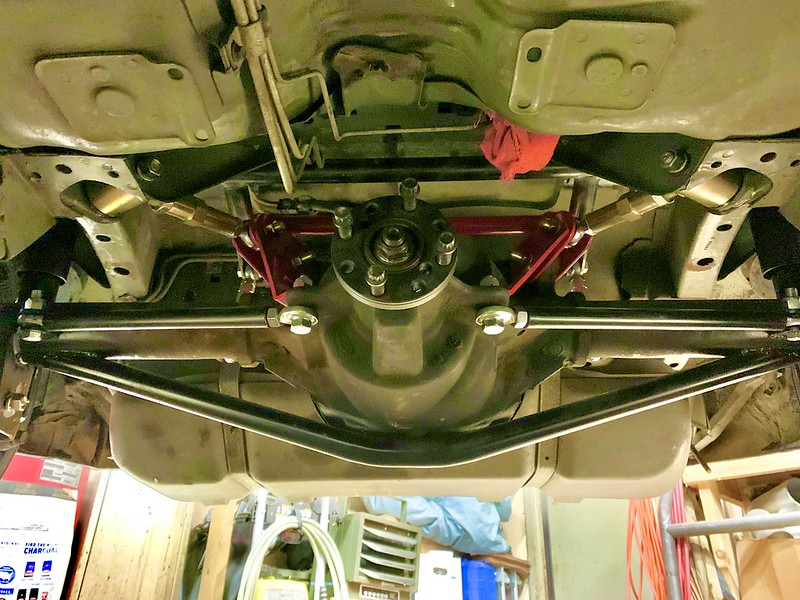
Like your project. just read through it from the beginning! Just because i'm not an expert, looks like that rear end configuration you're using basically works like a panhard and torque arm set up? Doesn't look like that rear end is moving side to side or twisting.
Like your project. just read through it from the beginning! Just because i'm not an expert, looks like that rear end configuration you're using basically works like a panhard and torque arm set up? Doesn't look like that rear end is moving side to side or twisting.
Thank you!
This set up is essentially a modified version of the stock suspension configuration with a change in the location of the upper control arm location/geometry. The Anti Roll Bar (ARB) that is connected to the back side of the rear end, that has the rod ends that go up to the ARB itself flatten out the car, and is really only for drag racing to aid in planting the rear end evenly on the initial launch. This one should be street-able though as it has a bit of give to it with the bushing mount.
On my particular set up no torque arm or PH bar, the remainder of the bars in the picture that loop around the bottom, and come from either side to the snout of the gear housing are only to help keep the rear square during a hard launch.
Hopefully that makes sense.
Honestly at what will be my current power level, probably not needed, but I do plan on going up in power, and only wanted to do the rear end once. The rear suspension is probably capable of holding well over double the power I'll be making, but I'd rather spend the money now and have it right. Now it is done, with good parts, and much more stout than I should ever need.
joe65
Well-Known Member
- Joined
- Feb 4, 2020
- Messages
- 1,478
- Reaction score
- 1,444
gotcha. now what i look at it harder makes sense. Looks like it still works like a 4 link, but stout. You shouldn't be tearing up any upper torque boxes. lol. Does it keep the side to side movement to a minimum then like a pan hard does?
ElrodKTPQ_89
Legend
Liking the updates man, I’m doing a pretty similar rear suspension on my fox but with UPR parts. What mufflers did you wind up putting on? I’m so ready to see how it sounds.
gotcha. now what i look at it harder makes sense. Looks like it still works like a 4 link, but stout. You shouldn't be tearing up any upper torque boxes. lol. Does it keep the side to side movement to a minimum then like a pan hard does?
It should drastically reduce the side to side motion in comparison to the factory parts yes. Now this particular set up is very much geared toward drag racing. This car would probably be a death machine if you were to take and try to toss it into a corner hard. Very different animal than a road course / SCCA / corner carver orientated set up.
If I were corner carving, dumping the stock stuff and going to a TQ arm and PH bad would be my first priority.
Liking the updates man, I’m doing a pretty similar rear suspension on my fox but with UPR parts. What mufflers did you wind up putting on? I’m so ready to see how it sounds.
Thanks! Been a fun project, fought with a bunch of "woops, sh*t those parts work or fit together like I thought they would" and similar such internal conversations.
I want to hear it also! Hoping by the end of the month. It is just one big muffler, Dynomax Ultra Flo 4" in and out. My guess is it should be pretty close to stock volume levels............not
Been a bit, finally got a day to touch the car yesterday.
This whole virus thing has taken most of my tinkering time away. Lately it has been mandatory 12 hour days (6am to 6pm) and helping home schooling my kids. I am not at all going to complain though as my wife and I are still employed, so that we are thankful for.
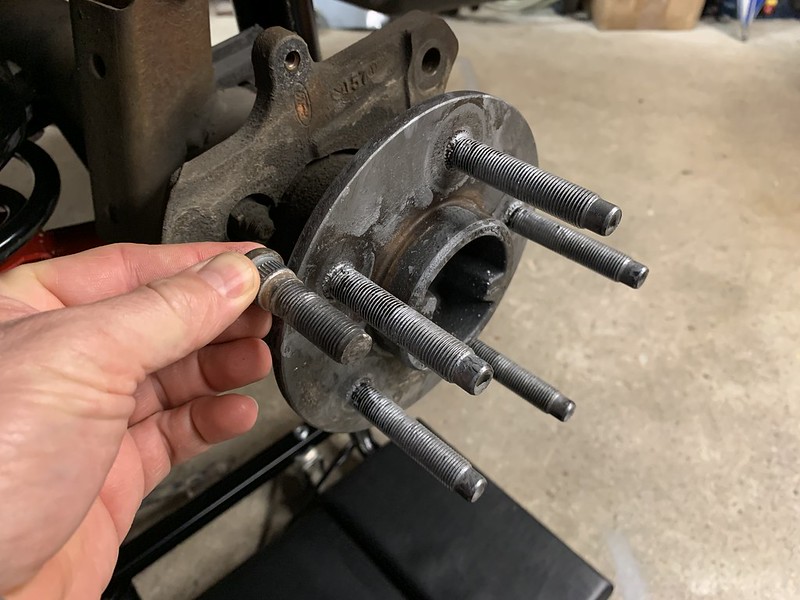
Anyway, got a few things done. Installed new rear wheel studs, removed the tone rings on the axles, re-assembled the rear end, rear brakes re-installed and all of the rear end hardware torqued down. It was rather nice to see that whom ever did the 373's before I got the car did a nice job installing the gears. Near perfect wear pattern and all new clutches in the carrier also.
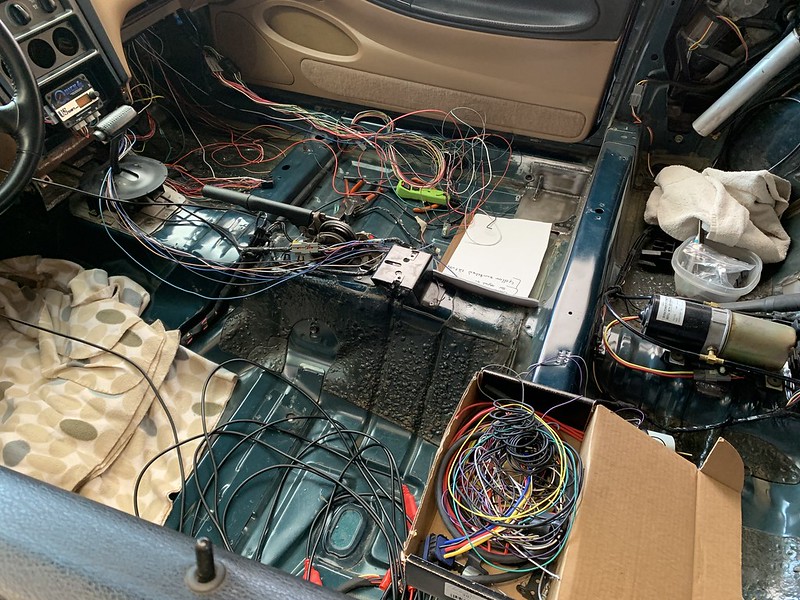
I still have this damn mess to get cleaned up and sorted out, long story short I lost my sheet I had all of my wiring notes written down on and have to go and back track a few wires to make sure everything is where I need it to be. Ya know, to avoid things like........fire. This probably set me back a month or more.
But, seeing her in the sun with these new wheels made me happy. I'm going to pull the struts back out and get some RE Suspension bump rubbers installed to just soften the bottom end of the suspension travel range. I also want to get the front down about another .5" to .75".

This whole virus thing has taken most of my tinkering time away. Lately it has been mandatory 12 hour days (6am to 6pm) and helping home schooling my kids. I am not at all going to complain though as my wife and I are still employed, so that we are thankful for.
Anyway, got a few things done. Installed new rear wheel studs, removed the tone rings on the axles, re-assembled the rear end, rear brakes re-installed and all of the rear end hardware torqued down. It was rather nice to see that whom ever did the 373's before I got the car did a nice job installing the gears. Near perfect wear pattern and all new clutches in the carrier also.
I still have this damn mess to get cleaned up and sorted out, long story short I lost my sheet I had all of my wiring notes written down on and have to go and back track a few wires to make sure everything is where I need it to be. Ya know, to avoid things like........fire. This probably set me back a month or more
.
But, seeing her in the sun with these new wheels made me happy. I'm going to pull the struts back out and get some RE Suspension bump rubbers installed to just soften the bottom end of the suspension travel range. I also want to get the front down about another .5" to .75".
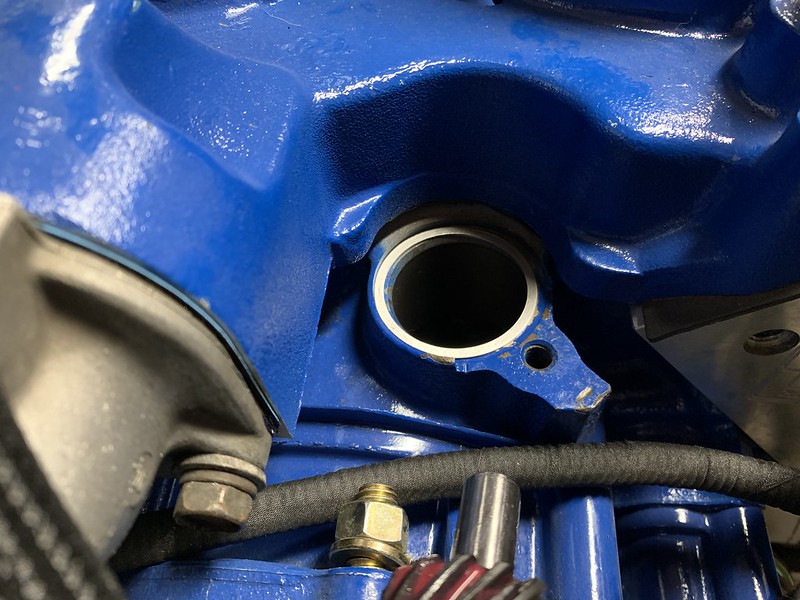
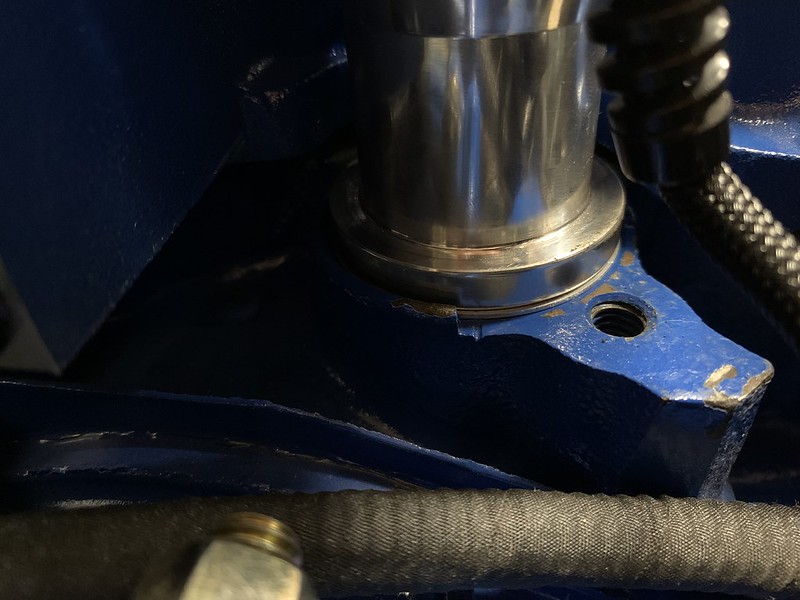
Ran into an issue with my Holley Dual Sync distributor this weekend that I'm glad I noticed, might have caused a lot of damage if I had not.
I was setting up the DS distributor and noticed when tightening the hold down the rotor was really hard to move. After looking close, and then measuring the OE dizzy along side the Holley I figured out that the gear pin hole is a few thousandths lower (in the block) from the seat than the OE dizzy.
Well that is an issue. This difference (I'm sure combined with having the block milled) was causing the gear on the distributor to contact the oil pump shaft boss in the block. Factory clearance needs to be about .010 to .015", from what I could find, between the block and the bottom of the distributor gear. So, with my feeler gauge in hand I got the Holley dizzy to a point where there was no drag and figured out that it needed to come up at least .020" (that was zero clearance).
Problem solving time!
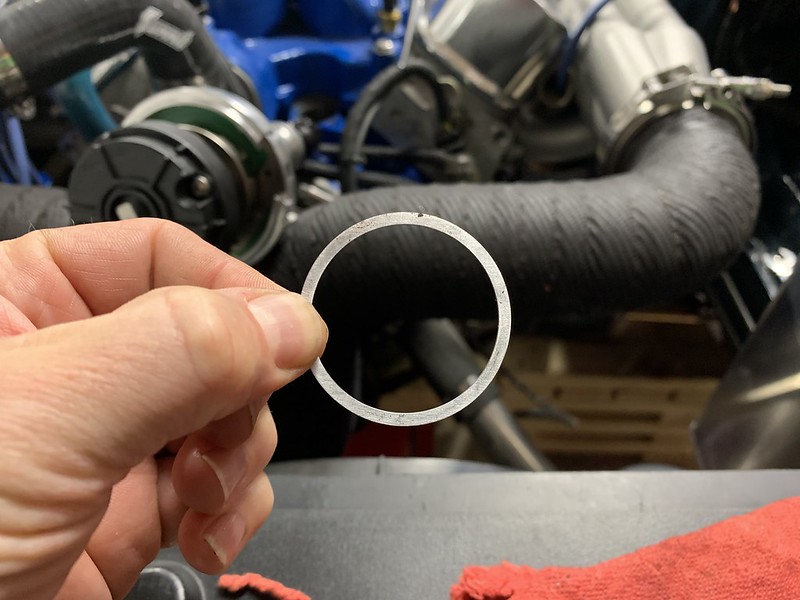
So, as I did not want to take apart, or start drilling into a brand new distributor by re drilling the gear to move it. I shot me neighbor a message (Ford Tech and has pretty much his own machine shop at home) and he suggested milling the gear, or just making a shim to make up the difference. After some thought again about taking apart a brand new distributor I decided on the shim. The dimensions needed to be 1.50 ID and 1.72 OD, not something one would find in a regular shim. Talked to my neighbor and he said he would be happy to cut one for me quick on his lathe. There may be something out there I could have bought, but this was a bit more convenient.
Well, about an hour later, problem solved! He made me a nice .035" aluminum spacer and life was good! It is pretty awesome having car peeps that close to home
On a side note, my neighbor is building a pro touring Chevrolet C10 that has a flat plane VooDoo motor and a T56 behind it. Yeah, he got a damaged VooDoo core from his work for dirt cheap. This truck is on a whole nother scale of epicness!
Anywho, here is the shim he whipped up for me:
I was setting up the DS distributor and noticed when tightening the hold down the rotor was really hard to move. After looking close, and then measuring the OE dizzy along side the Holley I figured out that the gear pin hole is a few thousandths lower (in the block) from the seat than the OE dizzy.
Well that is an issue. This difference (I'm sure combined with having the block milled) was causing the gear on the distributor to contact the oil pump shaft boss in the block. Factory clearance needs to be about .010 to .015", from what I could find, between the block and the bottom of the distributor gear. So, with my feeler gauge in hand I got the Holley dizzy to a point where there was no drag and figured out that it needed to come up at least .020" (that was zero clearance).
Problem solving time!
So, as I did not want to take apart, or start drilling into a brand new distributor by re drilling the gear to move it. I shot me neighbor a message (Ford Tech and has pretty much his own machine shop at home) and he suggested milling the gear, or just making a shim to make up the difference. After some thought again about taking apart a brand new distributor I decided on the shim. The dimensions needed to be 1.50 ID and 1.72 OD, not something one would find in a regular shim. Talked to my neighbor and he said he would be happy to cut one for me quick on his lathe. There may be something out there I could have bought, but this was a bit more convenient.
Well, about an hour later, problem solved! He made me a nice .035" aluminum spacer and life was good! It is pretty awesome having car peeps that close to home
On a side note, my neighbor is building a pro touring Chevrolet C10 that has a flat plane VooDoo motor and a T56 behind it. Yeah, he got a damaged VooDoo core from his work for dirt cheap. This truck is on a whole nother scale of epicness!
Anywho, here is the shim he whipped up for me:
That is pretty awesome to have a fellow gear head next door. The c10 with a voodoo motor will be awesome!!!! I get so tired of always seeing guys dropping bow ties under the hoods of fords so seeing the reverse will be really awesome!!!!
Sent from my iPhone using Tapatalk
Sent from my iPhone using Tapatalk
Yeah, that thing is going to be wicked! Noticed Saturday also that my new neighbor across the street that just moved in has a super clean Fox in his garage. I'll have to get to know him. Turning into a pleasant car guy neighborhood, love it!
Similar threads
- Replies
- 57
- Views
- 5K
- Replies
- 6
- Views
- 805
- Replies
- 6
- Views
- 709