Forums
New posts
Search forums
What's new
New posts
New media
New media comments
New profile posts
Latest activity
Media
New media
New comments
Search media
Members
Current visitors
New profile posts
Search profile posts
Log in
Register
What's new
Search
Search
Search titles only
By:
New posts
Search forums
Menu
Log in
Register
Install the app
Install
Forums
TECH
Tech Articles, How-To's & Write Ups
DIY: Change the Look of Your Instrument Cluster Bezel
JavaScript is disabled. For a better experience, please enable JavaScript in your browser before proceeding.
You are using an out of date browser. It may not display this or other websites correctly.
You should upgrade or use an
alternative browser
.
Reply to thread
Message
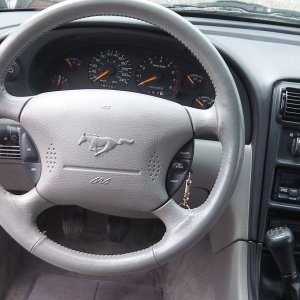
<blockquote data-quote="B.mad" data-source="post: 1431976" data-attributes="member: 19482"><p>If you are looking for some spice to your life, or your instrument cluster, check out the DIY below.</p><p></p><p>Full link: <a href="https://maddmotorsportsdesign.blog/2017/10/05/wrapped-gauge-bezel-sn95/" target="_blank">https://maddmotorsportsdesign.blog/2017/10/05/wrapped-gauge-bezel-sn95/</a> </p><p></p><p>However, if you prefer to purchase one already made, Carbon Driven has an overlay made out of real carbon fiber. It is available in both <a href="http://www.carbondriven.com/product-p/cd-cfmus037.htm" target="_blank">silver</a> and <a href="http://www.carbondriven.com/product-p/cd-cfmus011.htm" target="_blank">black</a> carbon. The color are hyperlinks, so be sure to click on them. </p><p></p><p>Install: <a href="https://maddmotorsportsdesign.blog/2017/10/20/carbon-fiber-gauge-cluster-and-led/" target="_blank">https://maddmotorsportsdesign.blog/2017/10/20/carbon-fiber-gauge-cluster-and-led/</a></p><p></p><p></p><p>You can wrap it in any print or color you want. Personally, I decided to use carbon fiber. </p><p></p><p>Tools:</p><p></p><ul> <li data-xf-list-type="ul">Knife (You can use any box cutter type blade)</li> <li data-xf-list-type="ul">Wrap of our choice. Carbon Fiber vinyl was a stiff material to work with, which made it harder. However, not all vinyl is stiff.</li> <li data-xf-list-type="ul">Heat Gun (You can get one from Harbor Freight for like $10, or you can borrow someone's blow dyer. However, heat gun is recommended)</li> <li data-xf-list-type="ul">Squeegee card or credit card</li> <li data-xf-list-type="ul">Dremel is recommended, but Flat Head screw driver will work</li> </ul><p></p><ol> <li data-xf-list-type="ol">First thing is first, you will have to remove the gauge cluster from the dash.<a href="https://www.flickr.com/photos/xdxpx/26533994462/in/datetaken/" target="_blank"><img src="https://farm2.staticflickr.com/1512/26533994462_565ddb7bb8_z.jpg" alt="" class="fr-fic fr-dii fr-draggable " style="" /></a><a href="https://www.flickr.com/photos/xdxpx/26353729710/in/datetaken/" target="_blank"><img src="https://farm2.staticflickr.com/1595/26353729710_f6cc37e157_z.jpg" alt="" class="fr-fic fr-dii fr-draggable " style="" /></a></li> <li data-xf-list-type="ol">Once that is removed, you will need to separate the bezel from the cluster.<a href="https://www.flickr.com/photos/xdxpx/26561602361/in/datetaken/" target="_blank"><img src="https://farm2.staticflickr.com/1698/26561602361_aa248a8683_z.jpg" alt="" class="fr-fic fr-dii fr-draggable " style="" /></a></li> <li data-xf-list-type="ol">The next thing is a bit harder, because you will need to separate the plastic lens from the bezel. If you have a Dremel, you will be able to cut where the plastic was glued and it will come off. Or if you are careful and patient enough, you can pry it open with a flat head screw driver. It will crack the plastic if you're not careful enough, so watch out. DO NOT HEAT IT UP. It will melt. When you put the lens back on, you can add some silicone to the edges and glue it back, or you can just slap it on like I did. It does not move, and you cannot tell that it isn't glued on.<a href="https://www.flickr.com/photos/xdxpx/26561591131/in/datetaken/" target="_blank"><img src="https://farm2.staticflickr.com/1646/26561591131_14d30753f7_z.jpg" alt="" class="fr-fic fr-dii fr-draggable " style="" /></a><a href="https://www.flickr.com/photos/xdxpx/26021398194/in/datetaken/" target="_blank"><img src="https://farm2.staticflickr.com/1542/26021398194_d91e8e92ca_z.jpg" alt="" class="fr-fic fr-dii fr-draggable " style="" /></a></li> <li data-xf-list-type="ol">When applying the vinyl, you will need to be careful because the bezel is not flat. Try and use only one piece, if you have to do two pieces, use the second piece on the bottom of the bezel. Make sure that the surface is cleaned. You will need to lightly heat up the vinyl so that it does not leave bubbles or wrinkles. You can apply and remove, but when you do, it will wrinkle and you'll need to apply heat to remove the wrinkles. The card will help get into the edges and take out some bubbles.<a href="https://www.flickr.com/photos/xdxpx/26533924112/in/datetaken/" target="_blank"><img src="https://farm2.staticflickr.com/1680/26533924112_0cd0be6b80_z.jpg" alt="" class="fr-fic fr-dii fr-draggable " style="" /></a></li> <li data-xf-list-type="ol">Since the cluster was out, I took the opportunity to swap out the cluster lights with LED's. I bought a pack of 10 off of Ebay for a couple of bucks. To this day, they still work with no issues. You will need size 194 bulbs. You can use any color, I used blue. <a href="https://www.flickr.com/photos/xdxpx/26021394924/in/datetaken/" target="_blank"><img src="https://farm2.staticflickr.com/1676/26021394924_5e27c68863_z.jpg" alt="" class="fr-fic fr-dii fr-draggable " style="" /></a></li> <li data-xf-list-type="ol">Final:<a href="https://www.flickr.com/photos/xdxpx/26533920872/in/datetaken/" target="_blank"><img src="https://farm2.staticflickr.com/1705/26533920872_f21d1c718e_z.jpg" alt="" class="fr-fic fr-dii fr-draggable " style="" /></a><a href="https://www.flickr.com/photos/xdxpx/26533918262/in/datetaken/" target="_blank"><img src="https://farm2.staticflickr.com/1558/26533918262_a1ea3e1578_z.jpg" alt="" class="fr-fic fr-dii fr-draggable " style="" /></a><a href="https://www.flickr.com/photos/xdxpx/26561518631/in/datetaken/" target="_blank"><img src="https://farm2.staticflickr.com/1463/26561518631_b40da0b671_z.jpg" alt="" class="fr-fic fr-dii fr-draggable " style="" /></a></li> </ol><p><strong>Disclaimer:</strong> Madd Motorsports is not responsible for any injuries, any damage whatsoever, or for incorrect installation. This is a guide meant to help, it is in no way guaranteed.</p></blockquote><p></p>
[QUOTE="B.mad, post: 1431976, member: 19482"] If you are looking for some spice to your life, or your instrument cluster, check out the DIY below. Full link: [URL]https://maddmotorsportsdesign.blog/2017/10/05/wrapped-gauge-bezel-sn95/[/URL] However, if you prefer to purchase one already made, Carbon Driven has an overlay made out of real carbon fiber. It is available in both [URL="http://www.carbondriven.com/product-p/cd-cfmus037.htm"]silver[/URL] and [URL="http://www.carbondriven.com/product-p/cd-cfmus011.htm"]black[/URL] carbon. The color are hyperlinks, so be sure to click on them. Install: [URL]https://maddmotorsportsdesign.blog/2017/10/20/carbon-fiber-gauge-cluster-and-led/[/URL] You can wrap it in any print or color you want. Personally, I decided to use carbon fiber. Tools: [LIST] [*]Knife (You can use any box cutter type blade) [*]Wrap of our choice. Carbon Fiber vinyl was a stiff material to work with, which made it harder. However, not all vinyl is stiff. [*]Heat Gun (You can get one from Harbor Freight for like $10, or you can borrow someone's blow dyer. However, heat gun is recommended) [*]Squeegee card or credit card [*]Dremel is recommended, but Flat Head screw driver will work [/LIST] [LIST=1] [*]First thing is first, you will have to remove the gauge cluster from the dash.[URL="https://www.flickr.com/photos/xdxpx/26533994462/in/datetaken/"][IMG]https://farm2.staticflickr.com/1512/26533994462_565ddb7bb8_z.jpg[/IMG][/URL][URL="https://www.flickr.com/photos/xdxpx/26353729710/in/datetaken/"][IMG]https://farm2.staticflickr.com/1595/26353729710_f6cc37e157_z.jpg[/IMG][/URL] [*]Once that is removed, you will need to separate the bezel from the cluster.[URL="https://www.flickr.com/photos/xdxpx/26561602361/in/datetaken/"][IMG]https://farm2.staticflickr.com/1698/26561602361_aa248a8683_z.jpg[/IMG][/URL] [*]The next thing is a bit harder, because you will need to separate the plastic lens from the bezel. If you have a Dremel, you will be able to cut where the plastic was glued and it will come off. Or if you are careful and patient enough, you can pry it open with a flat head screw driver. It will crack the plastic if you're not careful enough, so watch out. DO NOT HEAT IT UP. It will melt. When you put the lens back on, you can add some silicone to the edges and glue it back, or you can just slap it on like I did. It does not move, and you cannot tell that it isn't glued on.[URL="https://www.flickr.com/photos/xdxpx/26561591131/in/datetaken/"][IMG]https://farm2.staticflickr.com/1646/26561591131_14d30753f7_z.jpg[/IMG][/URL][URL="https://www.flickr.com/photos/xdxpx/26021398194/in/datetaken/"][IMG]https://farm2.staticflickr.com/1542/26021398194_d91e8e92ca_z.jpg[/IMG][/URL] [*]When applying the vinyl, you will need to be careful because the bezel is not flat. Try and use only one piece, if you have to do two pieces, use the second piece on the bottom of the bezel. Make sure that the surface is cleaned. You will need to lightly heat up the vinyl so that it does not leave bubbles or wrinkles. You can apply and remove, but when you do, it will wrinkle and you'll need to apply heat to remove the wrinkles. The card will help get into the edges and take out some bubbles.[URL="https://www.flickr.com/photos/xdxpx/26533924112/in/datetaken/"][IMG]https://farm2.staticflickr.com/1680/26533924112_0cd0be6b80_z.jpg[/IMG][/URL] [*]Since the cluster was out, I took the opportunity to swap out the cluster lights with LED's. I bought a pack of 10 off of Ebay for a couple of bucks. To this day, they still work with no issues. You will need size 194 bulbs. You can use any color, I used blue. [URL="https://www.flickr.com/photos/xdxpx/26021394924/in/datetaken/"][IMG]https://farm2.staticflickr.com/1676/26021394924_5e27c68863_z.jpg[/IMG][/URL] [*]Final:[URL="https://www.flickr.com/photos/xdxpx/26533920872/in/datetaken/"][IMG]https://farm2.staticflickr.com/1705/26533920872_f21d1c718e_z.jpg[/IMG][/URL][URL="https://www.flickr.com/photos/xdxpx/26533918262/in/datetaken/"][IMG]https://farm2.staticflickr.com/1558/26533918262_a1ea3e1578_z.jpg[/IMG][/URL][URL="https://www.flickr.com/photos/xdxpx/26561518631/in/datetaken/"][IMG]https://farm2.staticflickr.com/1463/26561518631_b40da0b671_z.jpg[/IMG][/URL] [/LIST] [B]Disclaimer:[/B] Madd Motorsports is not responsible for any injuries, any damage whatsoever, or for incorrect installation. This is a guide meant to help, it is in no way guaranteed. [/QUOTE]
Insert quotes…
Verification
Post reply
Random media
Latest posts
Car miss firing under load
Latest: cobrajeff96
40 minutes ago
General Tech
Hci or vortech or any other ideas
Latest: 95Five0
Today at 3:28 PM
94-95 5.0 - Specific
Wheel and tire specs?
Latest: SsgDoc94
Today at 3:27 PM
Suspension and Brakes
Complete sn95 5.0 OEM exhaust system for sale in davenport iowa.
Latest: shovel
Today at 12:50 PM
94-95 5.0 - Specific
What Did You Do To Your Car Today?
Latest: NEW EDG
Today at 11:10 AM
The Garage
Share this page
Reddit
Pinterest
Tumblr
WhatsApp
Email
Share
Link
Forum statistics
Threads
78,555
Messages
1,536,119
Members
16,201
Latest member
jgib8795
Members online
GTamas
Forums
TECH
Tech Articles, How-To's & Write Ups
DIY: Change the Look of Your Instrument Cluster Bezel
Top