Forums
New posts
Search forums
What's new
New posts
New media
New media comments
New profile posts
Latest activity
Media
New media
New comments
Search media
Members
Current visitors
New profile posts
Search profile posts
Log in
Register
What's new
Search
Search
Search titles only
By:
New posts
Search forums
Menu
Log in
Register
Install the app
Install
Forums
Multimedia & Entertainment
Build Ups & Projects
2slo95fiveOhs 1994 GT rebuild...UPDATE 5-2! Forged shortblock, fuel upgrades!
JavaScript is disabled. For a better experience, please enable JavaScript in your browser before proceeding.
You are using an out of date browser. It may not display this or other websites correctly.
You should upgrade or use an
alternative browser
.
Reply to thread
Message
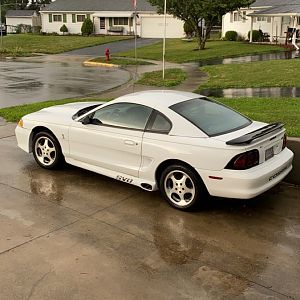
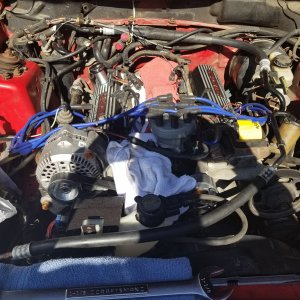
<blockquote data-quote="2slo95fiveoh" data-source="post: 1130845" data-attributes="member: 8966"><p>Another thing I have been wanting to do for a while is shorten the length of my spark plug wires. I have always used Ford Racings 9mm wire set on every 5.0 I've owned, and other than burning one on the exhuast several years back, I haven't had any problems with them.</p><p>So I tracked down some 9mm terminal ends (Accel) and a really nice quality igntion wire crimper (Taylor), both from Summit Racing.</p><p>I love this effin crimper. This thing does everything I need for ignition wires. It cuts the insulation off, crimps the terminals together, and it's ratcheting, so you don't have to do the "Push a pair of pliers together while hunched over" trick.</p><p></p><p>What I started with (WAY too much slack for me..):</p><p><img src="http://i444.photobucket.com/albums/qq163/Mustang1619/Mobile%20Uploads/20130314_171301_zps5154540e.jpg" alt="" class="fr-fic fr-dii fr-draggable " style="" /></p><p></p><p>Cut to length:</p><p><img src="http://i444.photobucket.com/albums/qq163/Mustang1619/Mobile%20Uploads/20130314_173259_zpsc0df487b.jpg" alt="" class="fr-fic fr-dii fr-draggable " style="" /></p><p></p><p>Using the crimper tool, cut the insulation off:</p><p><img src="http://i444.photobucket.com/albums/qq163/Mustang1619/Mobile%20Uploads/20130314_173329_zps4de3d02c.jpg" alt="" class="fr-fic fr-dii fr-draggable " style="" /></p><p></p><p>Bare wire exposed:</p><p><img src="http://i444.photobucket.com/albums/qq163/Mustang1619/Mobile%20Uploads/20130314_173418_zps993315d6.jpg" alt="" class="fr-fic fr-dii fr-draggable " style="" /></p><p></p><p>Fold the wire over and lightly pinch the terminal end with a pair of regular pliers:</p><p><img src="http://i444.photobucket.com/albums/qq163/Mustang1619/Mobile%20Uploads/20130314_173503_zpsd349cb63.jpg" alt="" class="fr-fic fr-dii fr-draggable " style="" /></p><p></p><p>Use Handy-dandy crimper tool to fully crimp terminal end around wire:</p><p><img src="http://i444.photobucket.com/albums/qq163/Mustang1619/Mobile%20Uploads/20130314_173533_zpsbf7b5ad0.jpg" alt="" class="fr-fic fr-dii fr-draggable " style="" /></p><p></p><p>The result:</p><p><img src="http://i444.photobucket.com/albums/qq163/Mustang1619/Mobile%20Uploads/20130314_173652_zpsee9464ac.jpg" alt="" class="fr-fic fr-dii fr-draggable " style="" /></p><p></p><p>After doing the rest of them, this is the final product (much cleaner):</p><p><img src="http://i444.photobucket.com/albums/qq163/Mustang1619/Mobile%20Uploads/20130314_175532_zps21a3d00d.jpg" alt="" class="fr-fic fr-dii fr-draggable " style="" /></p><p></p><p>Various length comparison for the amount of wire I removed. #8, as you can see, had a ridiculous amount of extra:</p><p><img src="http://i444.photobucket.com/albums/qq163/Mustang1619/Mobile%20Uploads/20130314_182930_zps3cadbe06.jpg" alt="" class="fr-fic fr-dii fr-draggable " style="" /></p><p></p><p>A while ago I finally got the initiative to go through the warranty process with Mishimoto to get my radiator replaced (I bought the previous one WAY back in 2008). The whole process was pretty painless. I didn't have the original reciept, so I called American Muscle (who I got it from), and they emailed me a copy of the reciept right away. The replacement radiator was delivered a few short days after I emailed all the paperwork..</p><p>I had heard that they redesigned the radiators and the way they were mounted.. that sure is an understatement!</p><p>The replacement looks so much more solid and durable. I'm anxious to see how the cooling is with this sucka.</p><p><img src="http://i444.photobucket.com/albums/qq163/Mustang1619/Mobile%20Uploads/20130314_192455_zps8e3268ea.jpg" alt="" class="fr-fic fr-dii fr-draggable " style="" /></p><p></p><p>Installed: (I definitely forgot how much room it takes up..)</p><p><img src="http://i444.photobucket.com/albums/qq163/Mustang1619/Mobile%20Uploads/20130314_193505_zps43070ef8.jpg" alt="" class="fr-fic fr-dii fr-draggable " style="" /></p><p></p><p>Thats about all I got done today. Early next week (Spring break, so no school to worry about) I plan on installing the upper and lower radiator hoses, cooling fan, front bumper, headlights, wiring the line lock, and adjusting the front coilover height. Then bolting the wheels on it, and driving it out of the garage (onto the driveway) to check out how it looks in the sun.</p><p></p><p>Questions/Comments welcome.</p></blockquote><p></p>
[QUOTE="2slo95fiveoh, post: 1130845, member: 8966"] Another thing I have been wanting to do for a while is shorten the length of my spark plug wires. I have always used Ford Racings 9mm wire set on every 5.0 I've owned, and other than burning one on the exhuast several years back, I haven't had any problems with them. So I tracked down some 9mm terminal ends (Accel) and a really nice quality igntion wire crimper (Taylor), both from Summit Racing. I love this effin crimper. This thing does everything I need for ignition wires. It cuts the insulation off, crimps the terminals together, and it's ratcheting, so you don't have to do the "Push a pair of pliers together while hunched over" trick. What I started with (WAY too much slack for me..): [IMG]http://i444.photobucket.com/albums/qq163/Mustang1619/Mobile%20Uploads/20130314_171301_zps5154540e.jpg[/IMG] Cut to length: [IMG]http://i444.photobucket.com/albums/qq163/Mustang1619/Mobile%20Uploads/20130314_173259_zpsc0df487b.jpg[/IMG] Using the crimper tool, cut the insulation off: [IMG]http://i444.photobucket.com/albums/qq163/Mustang1619/Mobile%20Uploads/20130314_173329_zps4de3d02c.jpg[/IMG] Bare wire exposed: [IMG]http://i444.photobucket.com/albums/qq163/Mustang1619/Mobile%20Uploads/20130314_173418_zps993315d6.jpg[/IMG] Fold the wire over and lightly pinch the terminal end with a pair of regular pliers: [IMG]http://i444.photobucket.com/albums/qq163/Mustang1619/Mobile%20Uploads/20130314_173503_zpsd349cb63.jpg[/IMG] Use Handy-dandy crimper tool to fully crimp terminal end around wire: [IMG]http://i444.photobucket.com/albums/qq163/Mustang1619/Mobile%20Uploads/20130314_173533_zpsbf7b5ad0.jpg[/IMG] The result: [IMG]http://i444.photobucket.com/albums/qq163/Mustang1619/Mobile%20Uploads/20130314_173652_zpsee9464ac.jpg[/IMG] After doing the rest of them, this is the final product (much cleaner): [IMG]http://i444.photobucket.com/albums/qq163/Mustang1619/Mobile%20Uploads/20130314_175532_zps21a3d00d.jpg[/IMG] Various length comparison for the amount of wire I removed. #8, as you can see, had a ridiculous amount of extra: [IMG]http://i444.photobucket.com/albums/qq163/Mustang1619/Mobile%20Uploads/20130314_182930_zps3cadbe06.jpg[/IMG] A while ago I finally got the initiative to go through the warranty process with Mishimoto to get my radiator replaced (I bought the previous one WAY back in 2008). The whole process was pretty painless. I didn't have the original reciept, so I called American Muscle (who I got it from), and they emailed me a copy of the reciept right away. The replacement radiator was delivered a few short days after I emailed all the paperwork.. I had heard that they redesigned the radiators and the way they were mounted.. that sure is an understatement! The replacement looks so much more solid and durable. I'm anxious to see how the cooling is with this sucka. [IMG]http://i444.photobucket.com/albums/qq163/Mustang1619/Mobile%20Uploads/20130314_192455_zps8e3268ea.jpg[/IMG] Installed: (I definitely forgot how much room it takes up..) [IMG]http://i444.photobucket.com/albums/qq163/Mustang1619/Mobile%20Uploads/20130314_193505_zps43070ef8.jpg[/IMG] Thats about all I got done today. Early next week (Spring break, so no school to worry about) I plan on installing the upper and lower radiator hoses, cooling fan, front bumper, headlights, wiring the line lock, and adjusting the front coilover height. Then bolting the wheels on it, and driving it out of the garage (onto the driveway) to check out how it looks in the sun. Questions/Comments welcome. [/QUOTE]
Insert quotes…
Verification
Post reply
Random media
Latest posts
Wheel and tire specs?
Latest: shovel
22 minutes ago
Suspension and Brakes
A
1995 crank but no start situation
Latest: Armand
Today at 10:19 AM
94-95 5.0 - Specific
Missing cover behind flywheel
Latest: 96blak54
Today at 9:19 AM
96-04 - 2V Specific
B
Car miss firing under load
Latest: bobcat
Today at 9:09 AM
General Tech
96blak54 2001 Cobra
Latest: Snorky
Today at 6:49 AM
Build Ups & Projects
Share this page
Reddit
Pinterest
Tumblr
WhatsApp
Email
Share
Link
Forum statistics
Threads
78,556
Messages
1,536,155
Members
16,201
Latest member
jgib8795
Members online
ttocs
GTamas
RossA81
Forums
Multimedia & Entertainment
Build Ups & Projects
2slo95fiveOhs 1994 GT rebuild...UPDATE 5-2! Forged shortblock, fuel upgrades!
Top

![IMG_20140524_152057360_HDR[1]](/data/xfmg/thumbnail/0/66-1b90088565df25d76ff5bd73b7f47142.jpg?1623783787)