lutter94
Well-Known Member
So I bought some Mac white face gauges, and the needles looked bad with the white background.
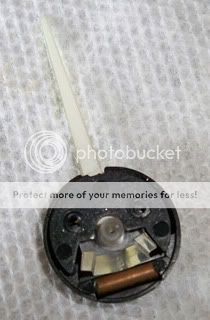
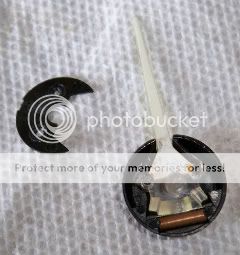
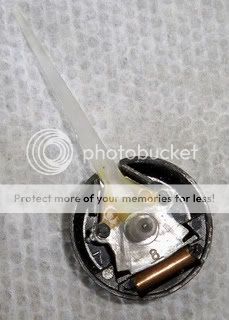
Step 1: You need to take your needles off the gauges. I recently bought a Mac White Face Gauge kit, so it came with a couple little tools; however, you can use a fork. Use anything as long as you can put smooth even pressure on opposing sides on the back. After you get them off you can see that there is only paint on the back side of the needle, covered by a coat of white. If you paint over the front of the needles, they won't light up at night. To do it right you need to sand the paint off the back side. But first you need to take off the little black plastic cover off the back side. There are two small pins that hold it on, I used a knife and pryed it off (see pic). The pins will stay with the needle and I was able to pop them back on after they were painted.
After you can see the whole back side of the needle, take some sand paper (I used 400 grit because that's what I had around, other grits may work better or worse) mine seemed to work well, and sand off the paint. It takes some time, but you'll eventually get it all off.
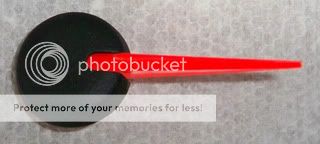
After all the paint is off, take your paint (I used testers florescent red, I bought the fluorescent paint kit from testers, I was going to use the fluorescent orange, but got the bottles mixed up) and paint the back side. Keep the sides of your needles clean, you can wipe the paint off with a knife after it dries a little bit. If you have some paint on it when it's done, just take a rag with paint thinner and wipe the side of it down.
I Recommend that after you paint the needle put a coat of white paint on it. It acts like a primer, it keeps the paint bright and slows down the fading.
I forgot to take a pic of the white on the back of the needle but you get the idea.
When they are all painted, pop the plastic covers back on put them back on the gauges. YOUR DONE!..don't forget to calibrate your gauges, whichever way you chose to do it. Anyone with there preferred way to calibrate their gauges feel free to post it in this thread

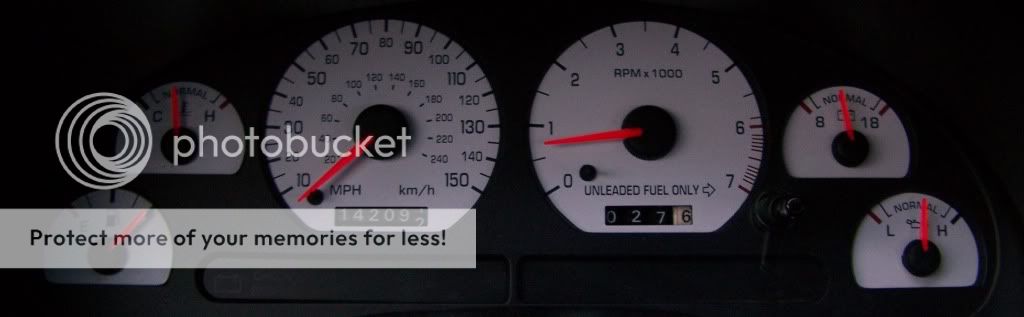
Gotta admit it looks better than stock......
Step 1: You need to take your needles off the gauges. I recently bought a Mac White Face Gauge kit, so it came with a couple little tools; however, you can use a fork. Use anything as long as you can put smooth even pressure on opposing sides on the back. After you get them off you can see that there is only paint on the back side of the needle, covered by a coat of white. If you paint over the front of the needles, they won't light up at night. To do it right you need to sand the paint off the back side. But first you need to take off the little black plastic cover off the back side. There are two small pins that hold it on, I used a knife and pryed it off (see pic). The pins will stay with the needle and I was able to pop them back on after they were painted.
After you can see the whole back side of the needle, take some sand paper (I used 400 grit because that's what I had around, other grits may work better or worse) mine seemed to work well, and sand off the paint. It takes some time, but you'll eventually get it all off.
After all the paint is off, take your paint (I used testers florescent red, I bought the fluorescent paint kit from testers, I was going to use the fluorescent orange, but got the bottles mixed up) and paint the back side. Keep the sides of your needles clean, you can wipe the paint off with a knife after it dries a little bit. If you have some paint on it when it's done, just take a rag with paint thinner and wipe the side of it down.
I Recommend that after you paint the needle put a coat of white paint on it. It acts like a primer, it keeps the paint bright and slows down the fading.
I forgot to take a pic of the white on the back of the needle but you get the idea.
When they are all painted, pop the plastic covers back on put them back on the gauges. YOUR DONE!..don't forget to calibrate your gauges, whichever way you chose to do it. Anyone with there preferred way to calibrate their gauges feel free to post it in this thread
Gotta admit it looks better than stock......

") I've seen quite a few differing version of how to put them back on so I wasn't about to take them off without getting some good answers on that one. Thanks, ttocs.
I've seen quite a few differing version of how to put them back on so I wasn't about to take them off without getting some good answers on that one. Thanks, ttocs.