are the pics working for everyone or is that patch thingy I did a while back still working?
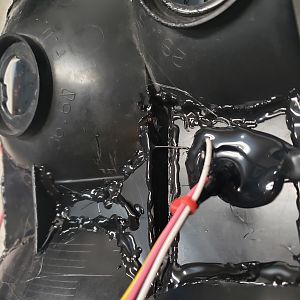
I had to change my starter kill and this will be a good chance to show a use for relays that almost anyone can use. If you do not know what a starter kill it its just relay that is wired up so that it can disconnect the wire that supplies power to the starter. Alarms have one included but you can still add a relay and then wire it to a hidden switch, or even to an existing one that you can that turn off when you do not want people to start your car. My previous starter kill was wired up to the cigarette lighter so when I wanted to kill it all I had to do was pull out or even just pop it out so that it was pushed in(as though lighting it). So by leaving the car in a state that was completely normal it would not start and needless to say most people will not check the lighter when the car will not start. Now the first rule of the starter kill is DO NOT TELL ANYONE WHERE IT IS. The 2nd rule is to only tell people where it is, after its gone. Needless to say today if my car does not start, well the cig lighter is missing now too after the switch plate I installed there so feel free to check it now. I found a really cool way to integrate it this time that I will show a little of how it works but not where it is.
first part of your starter kill is figuring out what you want. Using my cig lighter as an example, you can swap in any switch you want as long as it has either power or ground on it when activated. Ground is normally preferred just because if it gets shorted you don't blow anything but if it has a + output it can be used as well. To use my cig lighter there are two wires going to it and it is just a big ugly switch that makes connection when its pushed in. I cut the wire that comes out of the center(normally a +12v constant) and wired that to pin 85 on the relay. Now with that center wire cut because the cig lighter is already grounded(the 2nd wire of the 2 that go to it), when its pushed in the wire we cut will show a ground on it and ground pin 85 on the relay.
more info and pics to come...