2000 GT Convertible cleanup

OP
OP
M

Mustang5L5

Active Member
Joined
Aug 1, 2023
Messages
613
Reaction score
664
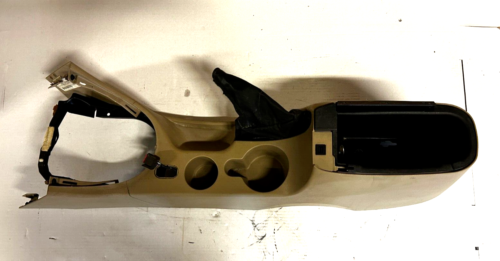
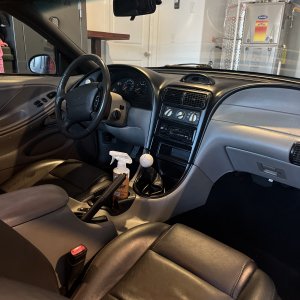
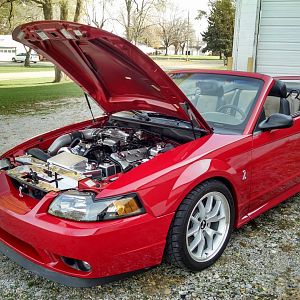
I think after i wrap up the suspension, i'm going to refocus back on the interior. Since it's winter i have time to pull it all out and clean/dye it the way i want it to be. I also think i've commited to the 01+ console swap and DD conversion. Like i said before, i loved my 2003 GT and the 01+ style Mustang in general. If you noticed, i am adding 01+ specific parts. The two single din radios doesn't appeal to me and i'd like a touchscreen with carplay. So DD swap and 01+ console.

Started by picking up an 03/04 interior upgrade package silver bezel. I'll grab the LMR dye for my original shifter bezel so i can leave the original traction control button where it is. I will rewire the fogs and defrost switch to the 01+ style.

1698086699186.png
 

Stringshaker

New Member
Joined
Jul 16, 2023
Messages
23
Reaction score
5
Thanks for all the great photo's and text.
You've done a great job bringing this New Edge back to life
You got a great deal on that one!

I wish I had done my home work and bought a car in better mechanical condition so I could sped more time and money refurbishing it's appearance.
I will get to it eventually.

Will being looking forward to future post's.
 
OP
OP
M

Mustang5L5

Active Member
Joined
Aug 1, 2023
Messages
613
Reaction score
664
Installed a set of '01-04 side scoops.

Still debating on the hood scoop. I have it, but the car does have a unique look without it right now. I'm 50/50 on if i put it on...but I prob will.

1698679534067.png


Good weather almost gone. Another few weeks and car goes into the garage for the suspension work and interior work. Stay tuned.
 

badass98svt

Well-Known Member
Joined
Jan 11, 2006
Messages
4,172
Reaction score
1,873
Always interesting to watch you make progress with your cars, Mike. I vote yay on the hood scoop.
 
OP
OP
M

Mustang5L5

Active Member
Joined
Aug 1, 2023
Messages
613
Reaction score
664
Got around to stripping parts off

IMG_6145.jpeg
IMG_6144.jpeg


All going in the junk pile except for the spindles of course. Bushings and balljoint boots trashed at 70k miles. Balljoint was right but the boot was torn and grease oozing out. Only a matter of time

IMG_6147.jpegIMG_6141.jpeg
 
OP
OP
M

Mustang5L5

Active Member
Joined
Aug 1, 2023
Messages
613
Reaction score
664
Driver's side front and rears all done. No real surprises. My rear upper arms bushings look a bit torn so going to put that on the list to replace.

Worked on the pass side front which was the final side to so. Ran into a bit of a surprise. The spring was rusted INTO the control arm. I couldn't free it. I had to loosen the control arm bolts and drop the arm down as far as I could to free the top of the spring. Sketchy as hell.

1699887646959.png


Got it out this way. But this is one piece. I can't free it!

1699887682730.png

Balljoint and bushings were trash. No play in the balljoint, but it was only a matter of time.

Where I am at for now. Need to blast and paint the spindle like the other side, and install the MM caster camber plates. SHould have this buttoned up shortly and the car back on the ground. Also waiting on tie rod inner and outer to ship. But this was a pretty quick job doing all 4 springs and redoing the front suspension

1699887781253.png
 
OP
OP
M

Mustang5L5

Active Member
Joined
Aug 1, 2023
Messages
613
Reaction score
664
Also picked up a convertible parade boot. Seems it has been stored for years because it has some bends I can't get to flatten. I may need ot wait for a nice hot sunny day and let the sun help flatten it.

This one is a 01-04 style boot, so not the correct 94-00 style I need. I'll have to add some snaps to the plastic quarter panels if i choose to keep it.

Right now it's in the 30's here, so this won't be getting used anyway.

1699887926056.png
 
OP
OP
M

Mustang5L5

Active Member
Joined
Aug 1, 2023
Messages
613
Reaction score
664
Eibach Pro-kit/Ford “G” springs installed


Before
IMG_6319.jpeg

And after

IMG_6323.jpeg

I found the front dropped about 3/4”and the rear about 1”. Initially the front didn’t drop enough so I removed the upper isolator on the front spring. Got it around where I need it to be.

Just need to torque the control arm bolts at ride height now and I’m done. Time to align.
 

joemomma

Well-Known Member
Joined
Dec 9, 2020
Messages
1,263
Reaction score
767
It may settle a bit still. Mine dropped another 1/4" or so after a couple days when I installed the Sportlines.
 
OP
OP
M

Mustang5L5

Active Member
Joined
Aug 1, 2023
Messages
613
Reaction score
664
It's been about a week. I still haven't torqued the front control arms yet. Working on the rear brakes as we speak and then i'll do a few short test drives again and then park it and torque the control arms. I just have them snugged up but loose enough for the sleeves to still pivot so they are not adding to spring rate...yet. I wouldn't mind if the front came down another 1/4". Wasn't trying to slam the car, so i'm fine with the subtle drop. The stock 4x4 look was just terrible.

I found someone did a brake job on the rear of this car and didn't spin the rear pistons so the notches were at 12 and 6 o-clock. Because of this, the inner pad sat cocked and didn't make full contact with the rotor. Brakes always felt soft/weird, so happy I found this. Also taking the time to paint up the caliiper and rotor and clean up other parts here. Waiting on new pads in the main because these were angled due to the improper installation.
 
OP
OP
M

Mustang5L5

Active Member
Joined
Aug 1, 2023
Messages
613
Reaction score
664
Freshened up the rear brakes to match the fronts. New pads, painted the calipers red to match and just cleaned and lubed everything up.

Focuses on the interior a bit. One thing that bugged me when i got this car was how dirty it was. Owner didn't really care for it, and then it sat for a year and got a little moldy. It cleaned up well, but was never good enough for my tastes.

Here's a perfect example.
1701097074773.png

This is where the pass airbag sat. I removed it and oyu can see how the dash is clean and spotless under, but the exposed dash has darkness deep in the texture. I've tried multiple things but cant seem to get this out.

So...i decided to buy the LMR dye and refresh everything
 
OP
OP
M

Mustang5L5

Active Member
Joined
Aug 1, 2023
Messages
613
Reaction score
664
Door panels. Lots of dirt just caked in here.

1701097267596.png

Hit the panel with some Mold Armor and it did remove some of the grime, but a lot is still in the texture. Yes, i'm cleaning this in my shower. About the 3rd or 4th time i've tried to get this panel fully clean

1701097316543.png


So i prepped it and used the LMR/SEM dye. Color match is very good! The lighting changes the color in person, but the result is a very OEM looking, clean color.

Added the silver Interior Upgrade Package door pins as well.

1701097380068.png
 
Last edited:
OP
OP
M

Mustang5L5

Active Member
Joined
Aug 1, 2023
Messages
613
Reaction score
664
Only received one key when i bought the vehicle.

So i purchased two replacements, had them cut and programmed them myself using ForScan.

Now i have 3 working keys! Total cost $45

1701097467827.png
 
Last edited:
OP
OP
M

Mustang5L5

Active Member
Joined
Aug 1, 2023
Messages
613
Reaction score
664
Stripped out a lot of the interior except for the dash. Everything removed got dyed outside of the car.

You can see the dirt on the dash under where the airbag sits. Always made the interior look dirty and browner than it should be. You can also see the fading on the original carpet with the console removed. More on that later.

Unsure if i'll pull the driver's airbag and wheel. I prob should

1701097598147.png


The Dark Parchment portion of the dash cleaned up well so I won't be redying that, so I chose to mask off and paint the dash in place.

It's like prepping for surgery.

1701097674334.png


And after a few light coats
1701097700468.png
 
Last edited:
OP
OP
M

Mustang5L5

Active Member
Joined
Aug 1, 2023
Messages
613
Reaction score
664
Finished result for the pass side.

1701097742460.png

The door cups are the aftermarket ones. I was going to paint my originals dark parchment, but decided to try these out. I know folks say they fit poorly and pop out, but these are nice and tight and fit pretty good. They are molded in the correct color, and since it's a high wear area I preferred that. The orginal cups on 99-00's is the lighter medium parchment color, and I thought going to dark parchment here like the 01-04 cars was a nice touch.


Next up is the drivers side. Once this is done, the seats and carpet will get pulled.

I have OEM NOS carpet that is going in. Going to order some Parchment Floor Mats from ACC shortly, and a kit to recover the seats. This should really freshen up the interior pretty well as the front seats and the faded carpet were really the biggest detractor from it.


Still haven't found a parchment 01-04 Console. I can find plenty of Med Graphite and Dark CHarcoal consoles, but I don't really want to dye a high wear item like that a lighter color. I'd rather find a parchment console, and freshen that up with the dye. If any wear occurs, it will be hard to see because the original color under is very close. At least that's my thought logic here.
 
Last edited:

badass98svt

Well-Known Member
Joined
Jan 11, 2006
Messages
4,172
Reaction score
1,873
Wow Mike, you aren't wasting any time getting started. Looks fantastic, just as I'd expect from you.

Funny about the consoles, when I was searching for mine, all I could find was parchment.

Saw this one on eBay. Same price as I paid for mine.


Latest posts

Forum statistics

Threads
77,553
Messages
1,504,822
Members
15,019
Latest member
Srchop16

Members online

Top