MustangChris
Mythic Level
Well, This is kinda like my "build thread." I will keep you all updated on my week long project with pictures, so if you like how my ride turns out, you are welcome to try some of my techniques... It's kinda like watching porn, expect with cars...
Stay tuned for updates, as it LITTERALLY take me *DAYS* to clean the exterior of my car. I did the interior this weekend because of the rain... that only took me 3 days") lol!
lol!
Here is my process:
Step #1:
Wash - Complete.
I use Miguires Gold Class Wash and Shampoo.
I use a large brush and a single had spunggy.
I use (on a *COLD* motor, with plastic bags over the coils, distributor, batter, alternator, open wires, intake filters, etc.) engine degreaser on the engine bay. Particularly back by the firewall... *DO THIS ONLY WITH A RUNNING HOSE NEARBY TO SPRAY IT OFF ANY PAINTED SURFACES!!!*
Remove the bags and pull your car into the garage.
Shammeemeee the car, after driving the car a TINY bit, it will help break the water-surface-tension and alot of the "hidden" water will fall out of its hiding places ready to get wiped clean.
Step #2:
Disassembly - Complete.
Removed: Spare tire, jack, tire iron, tail lights, head lights, corner lights, spoiler, strut tower, intake plumbing, chrome accents.
Step #3:
Clay bar- complete.
I used Miguires clay bar kit this time, but i prefer Mother's clay bar kit. The lube is much higher quality (IMO.)
you can see that the shine from the previous wax is gone, but the clear coat is still in tact and ready to shine.
For those who dont know (i want this to be an educational thread as well) clay baring is a process of spraying a lubricant onto the paint, then dragging a chunk of clay across the paint. It pulls off the large grime and even the invisible grime. You can HEAR the clay bar working. I go out of my way to clay bar three times a year. Once before winter, once after winter, and once in summer time.
A few pointers for clay bar noobies:
Wear rubber/ latex gloves. This will keep the oils from you skin off the clay and off your car.
Use plenty of lube. Ask your girlfriend. its a good idea.
Take your time, *listen* to the clay, you can hear it when its working and when the part of the car you're clay-ing is clean.
Fold, bend, tear, roll, and re-work the clay often, i do it after every "chunk" of the car (1/2 the hood for example.) This will keep the clay pourous (therefore there will be room for the dirt to "go,") clean, and easy to use.
buy a new clay bar at least once a year.
Step #4:
"The Break dancer"
This step will go against everything that many of you find logical... Jack up your car and remove the wheels. I also remove the center caps. place the car on floor jacks
Step #5:
the dirty job.... I use 2 buckets. 1 full of Miguires soap, and 1 with clean water. i wash the wheel wells and the undercarrige witht he soapy water, then rinse it with the clear water. Your garage will get wet (oh, pull your car into the garage after you wash it so a birdy dont poo on it.) so do this towards the end of day #1, so on day #2 it will be dry
Step #6:
Tar and Sap remover. I use Turtle Wax Tar, bug and wax remover to take off any MAJOR stuff... I use it on 100% of the undercarrige of the body that is painted. This acts as a wax. Wax on, let dry, buff off.
Step #7:
Abrasive Compound
I use Miguires "Deep cleaner" It is step #1 in a 3 step process
Tips: do not let the product dry (unless otherwise stated on the instructions.) this stuff is meant to litterally pull off the microscopic top layer of your clear coat. Its like "wet sanding" in a much gentler way... hense the name "abrasive" You cant really mess this up, just wax on... wax off quickly.
Step #8:
Scratch and ding repair
This is when you go around the car and use touch up paint to fill any scratches or chips.
I also use Nu Finish scratch remover to take out some of the surface scratches. Im roughly 70% satisfied with this product. It acts as a wax. Wax on, let dry, buff off.
Step #9:
Perform steps 6 and 7 and 8 on the bottom of the kicker-pannels, under the front bumper, under the fenders, and below the rear bumper (the painted undercarrige.)
Step #10:
Polish
I use Miguires polish (step #2 of 3) same rules as before... apply, but dont let it dry. This fills all the microsocpic surface scratches that you dont really know are there, but they are. These small scratches hold dirt, debris, and reflect light in odd directions, thus removing the shine. by filling in these scratches you are preventing dirt from getting on the paint and allowing light to reflect off your clear coat more properly. I apply this to the painted undercarrige as well.
Step #11:
Wax. I use Miguires Caranannbua Wax. (Step #3 of 3) this acts just like a wax, So i wax the ENTIRE CAR (including the undercarrige) and let it dry. Then i buff off. I prefer to apply my products with the buffer machine, but i prefer to remove my products by hand in order to pay attention to detail incase something needs more attention...
Step #12:
The Brakes. I use CNC Brake Clean to spray clean teh entire brake surface on all four brakes. I use a piece of cardboard to catch the run off.
step #13:
After disassembling the wheels, wash them with miguires auto wash and shampoo... then apply whatever products be needed... for Alloy (pony) wheels, i use Miguires "All Wheel" cleaner. For chrome I use "all wheel cleaner" and Miguiers "billet wheel compond" along with a final hit of "Bullet." For painted wheels I use Turtle Wax Tar and Bug remover (EXCELLANT PRODUCT FOR PAINTED WHEELS!!! KEEPS BRAKE DUST OFF!) Take your time on the wheels, effort pays off in this department. I clean both the inside and outside of the wheels and use a plastic razor blade when needed to remove major road gunk.
Step #14:
The tires. I use Miguires Tire Shine in the ariosole (sp?) can. It smells like cherrys, has a nozzle to adjust the amount of spray, and it smells like cherries... for some reason teh label says not to smell it.. I apply it to both sides of the tires to help protect them and keep them healthy
Step #15:
The extra parts. Wash the spoiler with the same processes applied above. (steps 1-11. .. .) wash teh spare tire (and check its air pressure) using steps 13 and 14. we will get to the lights later...
Step #16:
Chrome and metal.
I use Eagle 1 Billet polish in a can. It is just like Flitz, but cheeper. It works great. I use it on chrome, stainless steel, and exposed metal. Rmember: go WITH the grain when working on metals. This works great for tail pipes, buillet shifter handles, and under hood dress up. I suggest using a 100% terry cloth (miguires) to wipe off any excess.
Step #17: black trim.
Use Mother'S back to Black (looks like man jizz) and a combination of armoral to resore ALL the plastic components to their original luster. I use back to black on teh exterior (and i apply moderate pressure on the window strips) and after it dries, i apply armoral on top of it to seal it and protect it from teh weather. Dont forget your cowl, your weather stripping, your antenna, and your headlight rubber.
I use the spray bottle of armor all and a demnum (sp? like jeans) cloth to apply armoral to the wheel wells. It keeps them cleaner longer, and makes them easier to clean the rest of the time.
Step #18:
semi-re-assembly.
Put your CLEAN wheels onto your CLEAN brakes and lower your car. dont get super excited. we arent done yet.
Step #19:
windows. .. . I use SafeLight AutoGlass spray cleaner. It foams up, comes off clean, and works well. use it on the mirrors and feel free to use it on the lights as well.
Step #20:
Use a soft cleanser (I use "Bullett") to wash the painted surfaces INSIDE your trunk, under your hood, and inside the car.
Step #20:
vacuum your trunk. Place your CLEAN spare into your CLEAN trunk. tidy it up and cover it back up. Vacuum the trunk liner as well.
Armoral your hood-lifters and rear window weather stripping.
Step #21:
Put your CLEAN spoiler on your CLEAN Deck Lid.
Step #22: the lights.
These are always a headache. Wash teh assembly with miguires car wash and shampoo. Rinse clean. avoid the sockets where the bulbs go in. Use Miguires Plast-x on the lenses. This acts like a wax. Wax on, let dry, buff off. Apply Rain-x to the lenses. Wash, clean, polish, and wax the tail light painted surfaces. Reassemble.
Step #23:
Disassembly ... again. Take out your back seats (two latches in teh center of each chair) and take out the front seats (4 bolts total.) Also remove your shifter boot (pull Straight up on the outer edge of the consol holding the shifter boot on)
#24:
vacuum under teh back seat area. Pick up loose change, used condoms, and any old candy that might have fallen back there... DO NOT EAT THE CANDY!!! re-set the insulation if it has come un-done.
#25:
vacuum the carpet.
I use "Spot shot" to remove stains.
Vacuum the "speaker box" under the back window.
Dont forget to vacuum the roof.
#26:
Vacuum teh seats (leather too)
I use "spot shot to remove stains on cloth seats, and clean water to wash the leather best i can on "noticable" problem areas. I then hit leather with Armoral Leather Conditioner.
#27:
reassemble
#28:
I use armoral cleansing wipes to CLEAN all the plastic parts in teh interior. This includes belt buckles, steering wheel, dash, and kicker pannels.
I use Armoral original protectant after the cleanser has dried. I use "Low shine" on the top of the dash to reduce glare. #1 place missed: the back of the seats on cloth seats... That is plastic... Hit it with the armoral. Also, dont forget teh "foot pad" on teh drivers side carpet. Use the leather wipes on your shifter boot and reassemble that unit after vacumming under where it sits (top of tranny)
Use miguires Plast-x on teh dome light and gauge cluster.
#29:
windows... same spray... just on the inside, and on all 3 mirrors inside.
#30:
rain ex the outside windows. Spray it ON THE RAG, not onto the glass. you DONT want that stuff on your freshly waxed paint. Rain-x your lights too, if you havent already. I also clean and rain-x my rear-bumper-reflectors.
#31:
the underhood. Use armoral cleanser to hit the black plastics. then hit it all with Armoral Protectant. Use the flitz on teh chrome parts, and the turtle wax tar and bug remover on the painted parts (painted intake, painted timing cover, etc.)
Clean your M.A.F. and I.A.T. sensors with CNC mass air flow cleaner. since its all taken apart anyways... replace your air filter. repair open or exposed wires.
#32:
re assemble
#33:
Pull the car out onto the street (try and hit the curb moderatly hard when pulling out, as to dis-lodge any hiding water) get out of the car as you let it warm up. Look for any water that fell out and rolled down the paint. Wipe it off with a clean sham-wow.... now, get the camera and go cruise and start taking some pictures...
after this detail job, even your mechanics under your car will ask what your secret is...
everything i use (with the exception of Bullet) can be purchased at your local auto parts store.
I also suggest a "New Car Smell" air freshner tree for around your mirror, but thats personal preference.
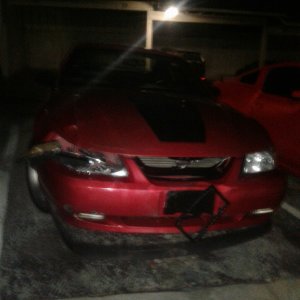
Here are my before pictures. It rained all weekend, so i was sure to get teh ride nice and dirty ;-)
<img src="http://c4.ac-images.myspacecdn.com/images02/56/l_a4e3c9c114ea40c383f05cb505949e9f.jpg">
you can see the condition of the paint is in pretty good condition.... it just needs some love.
<img src="http://c2.ac-images.myspacecdn.com/images02/15/l_1d4fba06d847455da33b6f561ed3dea1.jpg">
filthy windows
<img src="http://c1.ac-images.myspacecdn.com/images02/55/l_38ebe46242da44ca83ea7c98cb7c1578.jpg">
These are supposed to be CHROME valve covers. LOL! notice the oil in the bolt vallies.
<img src="http://c4.ac-images.myspacecdn.com/images02/8/l_17dbed0782694074b71c8e63f1f2873b.jpg">
look at the lack of luster in the black plastic and chrome parts.... its been a while. lol.
I will post more pictures soon. as progress continues...
Stay tuned for updates, as it LITTERALLY take me *DAYS* to clean the exterior of my car. I did the interior this weekend because of the rain... that only took me 3 days
lol!Here is my process:
Step #1:
Wash - Complete.
I use Miguires Gold Class Wash and Shampoo.
I use a large brush and a single had spunggy.
I use (on a *COLD* motor, with plastic bags over the coils, distributor, batter, alternator, open wires, intake filters, etc.) engine degreaser on the engine bay. Particularly back by the firewall... *DO THIS ONLY WITH A RUNNING HOSE NEARBY TO SPRAY IT OFF ANY PAINTED SURFACES!!!*
Remove the bags and pull your car into the garage.
Shammeemeee the car, after driving the car a TINY bit, it will help break the water-surface-tension and alot of the "hidden" water will fall out of its hiding places ready to get wiped clean.
Step #2:
Disassembly - Complete.
Removed: Spare tire, jack, tire iron, tail lights, head lights, corner lights, spoiler, strut tower, intake plumbing, chrome accents.
Step #3:
Clay bar- complete.
I used Miguires clay bar kit this time, but i prefer Mother's clay bar kit. The lube is much higher quality (IMO.)
you can see that the shine from the previous wax is gone, but the clear coat is still in tact and ready to shine.
For those who dont know (i want this to be an educational thread as well) clay baring is a process of spraying a lubricant onto the paint, then dragging a chunk of clay across the paint. It pulls off the large grime and even the invisible grime. You can HEAR the clay bar working. I go out of my way to clay bar three times a year. Once before winter, once after winter, and once in summer time.
A few pointers for clay bar noobies:
Wear rubber/ latex gloves. This will keep the oils from you skin off the clay and off your car.
Use plenty of lube. Ask your girlfriend. its a good idea.
Take your time, *listen* to the clay, you can hear it when its working and when the part of the car you're clay-ing is clean.
Fold, bend, tear, roll, and re-work the clay often, i do it after every "chunk" of the car (1/2 the hood for example.) This will keep the clay pourous (therefore there will be room for the dirt to "go,") clean, and easy to use.
buy a new clay bar at least once a year.
Step #4:
"The Break dancer"
This step will go against everything that many of you find logical... Jack up your car and remove the wheels. I also remove the center caps. place the car on floor jacks
Step #5:
the dirty job.... I use 2 buckets. 1 full of Miguires soap, and 1 with clean water. i wash the wheel wells and the undercarrige witht he soapy water, then rinse it with the clear water. Your garage will get wet (oh, pull your car into the garage after you wash it so a birdy dont poo on it.) so do this towards the end of day #1, so on day #2 it will be dry
Step #6:
Tar and Sap remover. I use Turtle Wax Tar, bug and wax remover to take off any MAJOR stuff... I use it on 100% of the undercarrige of the body that is painted. This acts as a wax. Wax on, let dry, buff off.
Step #7:
Abrasive Compound
I use Miguires "Deep cleaner" It is step #1 in a 3 step process
Tips: do not let the product dry (unless otherwise stated on the instructions.) this stuff is meant to litterally pull off the microscopic top layer of your clear coat. Its like "wet sanding" in a much gentler way... hense the name "abrasive" You cant really mess this up, just wax on... wax off quickly.
Step #8:
Scratch and ding repair
This is when you go around the car and use touch up paint to fill any scratches or chips.
I also use Nu Finish scratch remover to take out some of the surface scratches. Im roughly 70% satisfied with this product. It acts as a wax. Wax on, let dry, buff off.
Step #9:
Perform steps 6 and 7 and 8 on the bottom of the kicker-pannels, under the front bumper, under the fenders, and below the rear bumper (the painted undercarrige.)
Step #10:
Polish
I use Miguires polish (step #2 of 3) same rules as before... apply, but dont let it dry. This fills all the microsocpic surface scratches that you dont really know are there, but they are. These small scratches hold dirt, debris, and reflect light in odd directions, thus removing the shine. by filling in these scratches you are preventing dirt from getting on the paint and allowing light to reflect off your clear coat more properly. I apply this to the painted undercarrige as well.
Step #11:
Wax. I use Miguires Caranannbua Wax. (Step #3 of 3) this acts just like a wax, So i wax the ENTIRE CAR (including the undercarrige) and let it dry. Then i buff off. I prefer to apply my products with the buffer machine, but i prefer to remove my products by hand in order to pay attention to detail incase something needs more attention...
Step #12:
The Brakes. I use CNC Brake Clean to spray clean teh entire brake surface on all four brakes. I use a piece of cardboard to catch the run off.
step #13:
After disassembling the wheels, wash them with miguires auto wash and shampoo... then apply whatever products be needed... for Alloy (pony) wheels, i use Miguires "All Wheel" cleaner. For chrome I use "all wheel cleaner" and Miguiers "billet wheel compond" along with a final hit of "Bullet." For painted wheels I use Turtle Wax Tar and Bug remover (EXCELLANT PRODUCT FOR PAINTED WHEELS!!! KEEPS BRAKE DUST OFF!) Take your time on the wheels, effort pays off in this department. I clean both the inside and outside of the wheels and use a plastic razor blade when needed to remove major road gunk.
Step #14:
The tires. I use Miguires Tire Shine in the ariosole (sp?) can. It smells like cherrys, has a nozzle to adjust the amount of spray, and it smells like cherries... for some reason teh label says not to smell it.. I apply it to both sides of the tires to help protect them and keep them healthy
Step #15:
The extra parts. Wash the spoiler with the same processes applied above. (steps 1-11. .. .) wash teh spare tire (and check its air pressure) using steps 13 and 14. we will get to the lights later...
Step #16:
Chrome and metal.
I use Eagle 1 Billet polish in a can. It is just like Flitz, but cheeper. It works great. I use it on chrome, stainless steel, and exposed metal. Rmember: go WITH the grain when working on metals. This works great for tail pipes, buillet shifter handles, and under hood dress up. I suggest using a 100% terry cloth (miguires) to wipe off any excess.
Step #17: black trim.
Use Mother'S back to Black (looks like man jizz) and a combination of armoral to resore ALL the plastic components to their original luster. I use back to black on teh exterior (and i apply moderate pressure on the window strips) and after it dries, i apply armoral on top of it to seal it and protect it from teh weather. Dont forget your cowl, your weather stripping, your antenna, and your headlight rubber.
I use the spray bottle of armor all and a demnum (sp? like jeans) cloth to apply armoral to the wheel wells. It keeps them cleaner longer, and makes them easier to clean the rest of the time.
Step #18:
semi-re-assembly.
Put your CLEAN wheels onto your CLEAN brakes and lower your car. dont get super excited. we arent done yet.
Step #19:
windows. .. . I use SafeLight AutoGlass spray cleaner. It foams up, comes off clean, and works well. use it on the mirrors and feel free to use it on the lights as well.
Step #20:
Use a soft cleanser (I use "Bullett") to wash the painted surfaces INSIDE your trunk, under your hood, and inside the car.
Step #20:
vacuum your trunk. Place your CLEAN spare into your CLEAN trunk. tidy it up and cover it back up. Vacuum the trunk liner as well.
Armoral your hood-lifters and rear window weather stripping.
Step #21:
Put your CLEAN spoiler on your CLEAN Deck Lid.
Step #22: the lights.
These are always a headache. Wash teh assembly with miguires car wash and shampoo. Rinse clean. avoid the sockets where the bulbs go in. Use Miguires Plast-x on the lenses. This acts like a wax. Wax on, let dry, buff off. Apply Rain-x to the lenses. Wash, clean, polish, and wax the tail light painted surfaces. Reassemble.
Step #23:
Disassembly ... again. Take out your back seats (two latches in teh center of each chair) and take out the front seats (4 bolts total.) Also remove your shifter boot (pull Straight up on the outer edge of the consol holding the shifter boot on)
#24:
vacuum under teh back seat area. Pick up loose change, used condoms, and any old candy that might have fallen back there... DO NOT EAT THE CANDY!!! re-set the insulation if it has come un-done.
#25:
vacuum the carpet.
I use "Spot shot" to remove stains.
Vacuum the "speaker box" under the back window.
Dont forget to vacuum the roof.
#26:
Vacuum teh seats (leather too)
I use "spot shot to remove stains on cloth seats, and clean water to wash the leather best i can on "noticable" problem areas. I then hit leather with Armoral Leather Conditioner.
#27:
reassemble
#28:
I use armoral cleansing wipes to CLEAN all the plastic parts in teh interior. This includes belt buckles, steering wheel, dash, and kicker pannels.
I use Armoral original protectant after the cleanser has dried. I use "Low shine" on the top of the dash to reduce glare. #1 place missed: the back of the seats on cloth seats... That is plastic... Hit it with the armoral. Also, dont forget teh "foot pad" on teh drivers side carpet. Use the leather wipes on your shifter boot and reassemble that unit after vacumming under where it sits (top of tranny)
Use miguires Plast-x on teh dome light and gauge cluster.
#29:
windows... same spray... just on the inside, and on all 3 mirrors inside.
#30:
rain ex the outside windows. Spray it ON THE RAG, not onto the glass. you DONT want that stuff on your freshly waxed paint. Rain-x your lights too, if you havent already. I also clean and rain-x my rear-bumper-reflectors.
#31:
the underhood. Use armoral cleanser to hit the black plastics. then hit it all with Armoral Protectant. Use the flitz on teh chrome parts, and the turtle wax tar and bug remover on the painted parts (painted intake, painted timing cover, etc.)
Clean your M.A.F. and I.A.T. sensors with CNC mass air flow cleaner. since its all taken apart anyways... replace your air filter. repair open or exposed wires.
#32:
re assemble
#33:
Pull the car out onto the street (try and hit the curb moderatly hard when pulling out, as to dis-lodge any hiding water) get out of the car as you let it warm up. Look for any water that fell out and rolled down the paint. Wipe it off with a clean sham-wow.
... now, get the camera and go cruise and start taking some pictures...after this detail job, even your mechanics under your car will ask what your secret is...
everything i use (with the exception of Bullet) can be purchased at your local auto parts store.
I also suggest a "New Car Smell" air freshner tree for around your mirror, but thats personal preference.
Here are my before pictures. It rained all weekend, so i was sure to get teh ride nice and dirty ;-)
<img src="http://c4.ac-images.myspacecdn.com/images02/56/l_a4e3c9c114ea40c383f05cb505949e9f.jpg">
you can see the condition of the paint is in pretty good condition.... it just needs some love.
<img src="http://c2.ac-images.myspacecdn.com/images02/15/l_1d4fba06d847455da33b6f561ed3dea1.jpg">
filthy windows
<img src="http://c1.ac-images.myspacecdn.com/images02/55/l_38ebe46242da44ca83ea7c98cb7c1578.jpg">
These are supposed to be CHROME valve covers. LOL! notice the oil in the bolt vallies.
<img src="http://c4.ac-images.myspacecdn.com/images02/8/l_17dbed0782694074b71c8e63f1f2873b.jpg">
look at the lack of luster in the black plastic and chrome parts.... its been a while. lol.
I will post more pictures soon. as progress continues...