Yes, it's been a wild ride and a heck of a learning curve but this Holley system has been treating me very well. I really like the support it has and the expandability it offers for the future of the build. The HP Tuners route you took also sounds extremely interesting.I have the HP running in mine now and I am by no means an expert but I might have gone through what your needing to know. Sounds like you have been one heck of a learning adventure like I have on mine.
You are using an out of date browser. It may not display this or other websites correctly.
You should upgrade or use an alternative browser.
You should upgrade or use an alternative browser.
Miscreant
- Thread starter miscreant
- Start date
He’s running the Holley HP.Yes, it's been a wild ride and a heck of a learning curve but this Holley system has been treating me very well. I really like the support it has and the expandability it offers for the future of the build. The HP Tuners route you took also sounds extremely interesting.
Good job on the car so far, you two have been through some trials for sure. You made a good choice going over to the Holley setup. I was running megasquirt on my coyote swap and recently swapped to the Holley HP, much better experience over all. It seems that if you are not a computer code writer then you’ll not really get the megasquirt to work correctly. I have to ask though, how did the 4r70w shift with that terminator before it crapped out? Did you do the tuning?
That makes more sense. Unfortunately I went to a full manual valve body from Broader in the 4R70W so it was never controllered by the terminator. For now it's still on the base map with the automatic tubing feature. I will have my local speed shop tune it most likely this spring.He’s running the Holley HP.
Good job on the car so far, you two have been through some trials for sure. You made a good choice going over to the Holley setup. I was running megasquirt on my coyote swap and recently swapped to the Holley HP, much better experience over all. It seems that if you are not a computer code writer then you’ll not really get the megasquirt to work correctly. I have to ask though, how did the 4r70w shift with that terminator before it crapped out? Did you do the tuning?
Sent from my Pixel 3 XL using Tapatalk
Man, if you take just a little bit of time to understand what’s going on, you can get that tune really close. The learning function works really well with the Holley systems
Yes it does! I'm very impressed. The only thing I have noticed is a small ignition break-up on cruising and some hot start issues. I think it has to do with ignition timing but those are my only complaints.Man, if you take just a little bit of time to understand what’s going on, you can get that tune really close. The learning function works really well with the Holley systems
Sent from my Pixel 3 XL using Tapatalk
ttocs
Forum's #1 poster
I found a good remote tuner that did wonders on mine. You download an app that allows him access to your pc so you just sit inside and connect to it and then he will teach you some things and make the adjustments needed.
I didn't do megasquirt but from what I have heard I would not have got it working either. I have been happy with holley tech support.
I didn't do megasquirt but from what I have heard I would not have got it working either. I have been happy with holley tech support.
Well it's been a little over 8 months and a lot has changed on the car with a lot more changes coming.
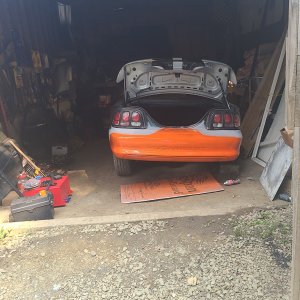
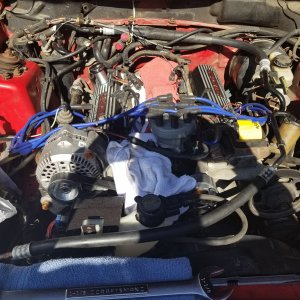
I did get to finish the engine bay over the course of my winter break and it came out really well. It involved several hours of applying bondo and sanding over and over again. I also used some panels from Scott Rod Fabrications to block off the holes in the firewall and they were very well made. Definitely interesting to drill and rivet into place but well worth it.


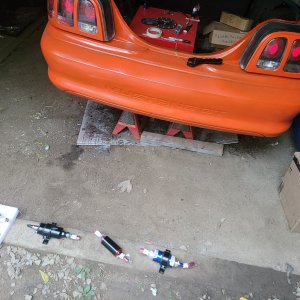
I also tackled the manual brake swap after finishing the engine bay. I used the Maximum Motorsports plate and pedal kit which were very nice pieces and bolts in without any issues. I used a 1993 Cobra master cylinder for the swap and hand-bent the brake lines from the master to the Jegs line-lock solenoid and the Willwood proportioning valve with the use of an eastwood brake/fuel line bender. All of which came out well and were painted the same color as the engine bay. It should also be noted I used an eBay proportioning valve plug (I don't currently recall the vendor) and removed all the internals to the distribution block. I am also very thankful I was able to flare these (ISO/Bubble flare type) on the first go without any leaks so that is a plus.

Some other stuff that was tackled in his period was a front main crankshaft seal as well as a new transmission separator plate. I had to modify my stock separator plate and I didn't like the lack of support for the starter. The front crankshaft seal had a tear in the lip which has caused a steady oil leak. This most likely had occurred from poor timing cover alignment or improper installation, but we live and we learn. This also gave me time to re-seal the back of the intake manifold since it had continued to seep at the back of the valley wall. I used some ultra black from Permatex and have not had trouble since then. Oil pan rail stiffeners were added to provide a better oil pan seal as I had also noticed a small seep there.
The cooling system also saw an upgrade from a single 14" SPAL fan to a Contour fan with some fabricated mounts by yours truly. This was to help with the temperature creep at stop lights and in traffic (which I later found helped but the cooling system needed more help).

After putting it back together it drove really well. I quickly adapted to the stiffer brake pedal and the engine no longer leaked. After driving it for awhile, I noticed the starter had developed a grind. Thankfully, I had gotten one from LMR and it came with a lifetime warranty. After, inspecting the starter and chatting with an advisor at LMR, I had a new starter with almost no hassle. Very happy with their customer service so far.
This brings us up to January with lots more to talk about, but I'll post that tomorrow.
I did get to finish the engine bay over the course of my winter break and it came out really well. It involved several hours of applying bondo and sanding over and over again. I also used some panels from Scott Rod Fabrications to block off the holes in the firewall and they were very well made. Definitely interesting to drill and rivet into place but well worth it.
I also tackled the manual brake swap after finishing the engine bay. I used the Maximum Motorsports plate and pedal kit which were very nice pieces and bolts in without any issues. I used a 1993 Cobra master cylinder for the swap and hand-bent the brake lines from the master to the Jegs line-lock solenoid and the Willwood proportioning valve with the use of an eastwood brake/fuel line bender. All of which came out well and were painted the same color as the engine bay. It should also be noted I used an eBay proportioning valve plug (I don't currently recall the vendor) and removed all the internals to the distribution block. I am also very thankful I was able to flare these (ISO/Bubble flare type) on the first go without any leaks so that is a plus.
Some other stuff that was tackled in his period was a front main crankshaft seal as well as a new transmission separator plate. I had to modify my stock separator plate and I didn't like the lack of support for the starter. The front crankshaft seal had a tear in the lip which has caused a steady oil leak. This most likely had occurred from poor timing cover alignment or improper installation, but we live and we learn. This also gave me time to re-seal the back of the intake manifold since it had continued to seep at the back of the valley wall. I used some ultra black from Permatex and have not had trouble since then. Oil pan rail stiffeners were added to provide a better oil pan seal as I had also noticed a small seep there.
The cooling system also saw an upgrade from a single 14" SPAL fan to a Contour fan with some fabricated mounts by yours truly. This was to help with the temperature creep at stop lights and in traffic (which I later found helped but the cooling system needed more help).
After putting it back together it drove really well. I quickly adapted to the stiffer brake pedal and the engine no longer leaked. After driving it for awhile, I noticed the starter had developed a grind. Thankfully, I had gotten one from LMR and it came with a lifetime warranty. After, inspecting the starter and chatting with an advisor at LMR, I had a new starter with almost no hassle. Very happy with their customer service so far.
This brings us up to January with lots more to talk about, but I'll post that tomorrow.
Akurma
Active Member
Engine bay looks great! that Contour fan upgrade, do you have more info on that? I will be swapping out my radiator soon and if I can upgrade the fan while im in there i probably should
Thanks! Yeah the Contour fan upgrade wasn't that bad. For the stock radiator I used the existing mounting bosses on the end tanks and made small brackets with thread inserts in them to mount the fan. For wiring, I just bought a pigtail for each motor and wire them each to their own 40 amp relay. They used a separate trigger using the Holley Terminator (160* F and 180* F) but I will be using the same trigger in the future (160* F) to get down to one output. If you're on a stock PCM you can use a thermostatic switch to operate the relay or there are some options for high-end fan controller like a Derale that offer a soft-start to decrease the initial amperage spike. I will say this upgrade was definitely worth it and they move way more air than my single 14" SPAL unit. Let me know if you if I need any specifics or help with yours.Engine bay looks great! that Contour fan upgrade, do you have more info on that? I will be swapping out my radiator soon and if I can upgrade the fan while im in there i probably should
So after replacing the starter, I no longer had an issue. Soon after I got the starter, I also got another shipment I hadn't expected. I had order a Holley 7" Digital Dash over break that was on backorder (Holley products on backorder, who would have guessed) and it had actually got in early. So I ordered a mount for the cluster from Eddie (@eddiett2v on Instagram) at a good price and quality. Install was straight forward and easy.


I got the car running soon after that, but unfortunately within 10 minutes of run time one of the lifters began leaking down and I had to tear the car back apart to replace it. I used some spare SBF lifters I had as they were the same, just a different brand.
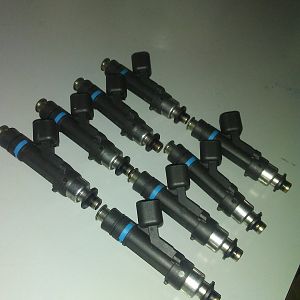
After helping restore a 2004 Mach 1 (I'll make a post about that soon) the owner offered to order me a Holley Hi Ram Intake for my motor and I couldn't say no. In preparation for the intake I started looking at the Holley Dual Sync. However, the more and more I thought about it, I decided it would be easier to spend a little more and go with a Holley 36-1 Crank Trigger and Cam Sync. This would be used with LS coils that I found in a junkyard for a whopping $40. I didn't really want to buy expensive valve covers or coil brackets so I decided to make my own.


By now it's the end of March and I was told the intake would be here within the second week of March. After multiple calls to my local speed shop, we decided it would be best to put on the old intake and drive the car until the intake manifold would be in. With that, I finished the car and got it running with the new ignition system. It cranks a little longer on start-up to sync the crank and cam signals but overall it is very seamless and a worthwhile upgrade.
As I prepared to take the car to SIU to enjoy a couple weeks with at school, I heard the all to familiar lifter knock. After checking lash over and over again, I decided to trailer it to school and take it to our vehicle lab to go more in-depth with it. After using a pressure transducer with an oscilloscope we were able to determine the camshaft lobe on cylinder 5 was in trouble. With a school event only a week away, I decided to overnight a roller cam, roller lifters, pushrods, and all gaskets necessary (at this point I was done with flat tappet camshafts). I ripped the motor out within a couple of hours with the help of some friends and started disassembling the motor. The camshaft had not only wiped a lobe but had eaten up a good chunk of the lifter as well.


After thoroughly cleaning the oil pan, we installed the new F-303 camshaft and Melling retro-fit roller lifters. Everything was going smoothly. Retimed the motor and changed the firing order in the PCM and it was ready for break-in. During break-in we heard a pop and I killed the motor. After pulling the valve cover, a rocker arm stud had snapped. After further inspection, we found that the pushrods were too long and all 16 had been bent (thanks to me hastily measuring them improperly). Unfortunately, I didn't make the event but after replacing all the pushrods with the proper length ones as well as all rocker arm studs, the car was ready to drive. I drove the car around for the remaining two weeks of school and enjoyed every second of it, other than the throttle cable occasionally coming out which I eventually fixed for good.
Now we are caught up to May and I'll post more updates tomorrow.
I got the car running soon after that, but unfortunately within 10 minutes of run time one of the lifters began leaking down and I had to tear the car back apart to replace it. I used some spare SBF lifters I had as they were the same, just a different brand.
After helping restore a 2004 Mach 1 (I'll make a post about that soon) the owner offered to order me a Holley Hi Ram Intake for my motor and I couldn't say no. In preparation for the intake I started looking at the Holley Dual Sync. However, the more and more I thought about it, I decided it would be easier to spend a little more and go with a Holley 36-1 Crank Trigger and Cam Sync. This would be used with LS coils that I found in a junkyard for a whopping $40. I didn't really want to buy expensive valve covers or coil brackets so I decided to make my own.
By now it's the end of March and I was told the intake would be here within the second week of March. After multiple calls to my local speed shop, we decided it would be best to put on the old intake and drive the car until the intake manifold would be in. With that, I finished the car and got it running with the new ignition system. It cranks a little longer on start-up to sync the crank and cam signals but overall it is very seamless and a worthwhile upgrade.
As I prepared to take the car to SIU to enjoy a couple weeks with at school, I heard the all to familiar lifter knock. After checking lash over and over again, I decided to trailer it to school and take it to our vehicle lab to go more in-depth with it. After using a pressure transducer with an oscilloscope we were able to determine the camshaft lobe on cylinder 5 was in trouble. With a school event only a week away, I decided to overnight a roller cam, roller lifters, pushrods, and all gaskets necessary (at this point I was done with flat tappet camshafts). I ripped the motor out within a couple of hours with the help of some friends and started disassembling the motor. The camshaft had not only wiped a lobe but had eaten up a good chunk of the lifter as well.
After thoroughly cleaning the oil pan, we installed the new F-303 camshaft and Melling retro-fit roller lifters. Everything was going smoothly. Retimed the motor and changed the firing order in the PCM and it was ready for break-in. During break-in we heard a pop and I killed the motor. After pulling the valve cover, a rocker arm stud had snapped. After further inspection, we found that the pushrods were too long and all 16 had been bent (thanks to me hastily measuring them improperly). Unfortunately, I didn't make the event but after replacing all the pushrods with the proper length ones as well as all rocker arm studs, the car was ready to drive. I drove the car around for the remaining two weeks of school and enjoyed every second of it, other than the throttle cable occasionally coming out which I eventually fixed for good.
Now we are caught up to May and I'll post more updates tomorrow.
Last edited:
Alright a break from my car, I wanted to showcase the 2004 Mach 1 in Azure Blue (32,xxx miles) that I mentioned earlier. This would be my second time working on this particular car. The first owner I met in community college and, during the summer class, we installed Kooks Longtube Headers on the car. Talk about a pain in the butt. Dropping the K-member with the steering rack and all associated hardware only to barely see the header bolts. While there, I had mentioned replacing the motor mounts, but the owner said he didn't want to borrow the money for mounts and thought it would be okay for now... it wasn't.
A couple weeks after the install, the owner did a dig race and the car wheel hopped. The passenger motor mount broke and sent the shake scoop into the hood, cracking it. It also damaged fifth gear in the transmission. The owner decided to rent a space for the car to sit while he saved up for a Maximum Motorsports K-member kit and associated front suspension. The car sat for three years on jack stands. Finally, a close-friend of mine had found a killer deal on a beautiful Mach 1 but it needed work and he would need my help. I wondered if it was the same car and sure enough, it was. I gladly said yes and we hauled the car to his garage. I asked exactly how much he paid for it and was blown away. He had agreed on 1,000 for the car as it sat, 500 more for the set of Rovos wheels, and that the previous owner keep the stock, cracked hood as a keepsake.


After reassembling the transmission (also a pain the butt) we mated it to the engine. I don't know how you mod motor guys do it. There is no room for anything in these cars for that motor and I was not about to put the engine in first and try to get the bellhousing bolts in after it was already in. Prior to this we finished install of the K-Member kit and all of the suspension, which, thanks to Maximum Motorsports amazing instructions, went very well. The only problem we had was having to replace the ball joints since the threads had gotten damaged removing them from the spindle for travel. Now it was time for engine/transmission installation. After three hours of cursing and frustration, we finally sat the powertrain in after having to drop the k-member back out of the car.
After wrapping up all the wiring and plumbing in the engine bay, it was time to start the car. Being that everything was stock, it should just be a turn key start, but nothing happened. After coming to the realization the fuel pump was not priming or turning on we replaced that with a new OEM unit and check for any fuel leaks. We found a small injector leaking, re placed the o-ring and tried again. The car fired right up without hesitation and ran extremely well. We cam back the following day to bleed the cooling system and install the Borla Atak exhaust system.
The new owner (first mustang ever) loved the car as it was extremely different than anything he had ever owned. He let me drive it some and I was pleased at how it pulled and drove almost effortlessly. Definitely a driver's car. Unfortunately, the owner felt that he was not the proper owner of the car and felt it deserved to be with someone that was more capable of caring for it. Soon after it was sold with all the original parts to a father and son from Wisconsin for an incredible profit, some of which I got to see through some engine parts for my vehicle. Nonetheless, I was sad to see the car go, but glad to be apart of the rebuild that got it back on the road where it belonged.

A couple weeks after the install, the owner did a dig race and the car wheel hopped. The passenger motor mount broke and sent the shake scoop into the hood, cracking it. It also damaged fifth gear in the transmission. The owner decided to rent a space for the car to sit while he saved up for a Maximum Motorsports K-member kit and associated front suspension. The car sat for three years on jack stands. Finally, a close-friend of mine had found a killer deal on a beautiful Mach 1 but it needed work and he would need my help. I wondered if it was the same car and sure enough, it was. I gladly said yes and we hauled the car to his garage. I asked exactly how much he paid for it and was blown away. He had agreed on 1,000 for the car as it sat, 500 more for the set of Rovos wheels, and that the previous owner keep the stock, cracked hood as a keepsake.
After reassembling the transmission (also a pain the butt) we mated it to the engine. I don't know how you mod motor guys do it. There is no room for anything in these cars for that motor and I was not about to put the engine in first and try to get the bellhousing bolts in after it was already in. Prior to this we finished install of the K-Member kit and all of the suspension, which, thanks to Maximum Motorsports amazing instructions, went very well. The only problem we had was having to replace the ball joints since the threads had gotten damaged removing them from the spindle for travel. Now it was time for engine/transmission installation. After three hours of cursing and frustration, we finally sat the powertrain in after having to drop the k-member back out of the car.
After wrapping up all the wiring and plumbing in the engine bay, it was time to start the car. Being that everything was stock, it should just be a turn key start, but nothing happened. After coming to the realization the fuel pump was not priming or turning on we replaced that with a new OEM unit and check for any fuel leaks. We found a small injector leaking, re placed the o-ring and tried again. The car fired right up without hesitation and ran extremely well. We cam back the following day to bleed the cooling system and install the Borla Atak exhaust system.
The new owner (first mustang ever) loved the car as it was extremely different than anything he had ever owned. He let me drive it some and I was pleased at how it pulled and drove almost effortlessly. Definitely a driver's car. Unfortunately, the owner felt that he was not the proper owner of the car and felt it deserved to be with someone that was more capable of caring for it. Soon after it was sold with all the original parts to a father and son from Wisconsin for an incredible profit, some of which I got to see through some engine parts for my vehicle. Nonetheless, I was sad to see the car go, but glad to be apart of the rebuild that got it back on the road where it belonged.
Similar threads
- Replies
- 60
- Views
- 4K
- Replies
- 29
- Views
- 3K
- Replies
- 13
- Views
- 680