ttocs
Post Whore
Metra has come out with a kit now to make it super easy to install a double din radio in a car that was previously 2 single din openings. The instructions show what you need but pics always help. The kit comes with the front panel, the rear air vents and then some brackets that attach to your radio. My initial review on it is that it seems like a well made kit. Its thick enough it does not flex and seems like it frames the radio nice so far. My only complaint is that its covered with a surface that reminds me of what was on the stock door pull cups in 94/95 that we all ended up hating as it peeled off over time. It reminds me of a silicon type of surface that was just sprayed on and I question how long it will hold up. Its not an issue for me as I have some plans for it....

First you need to attach the white tension clips to the back of the panel. This is what will center and help hold it in place. They are easy to slide over the tabs that are on the kit.

Next you will need to use the screws included with the radio to mount the radio to the mounting brackets. The easiest way I found to do it was to lay the kit face down and then put the deck on top, screen facing down. Be sure to do this on a soft surface but once it is you can slide the brackets in place over the white tension clips to get it all aligned. Once you do that you can find some screw holes that line up and tighten them down.

When you do the deck and brackets will look like this. This will get mounted into the dash and then the kit slides over it.

Once I had it at this point I actually loosened the screws a tad and then again with the deck/brackets in the kit I pushed the deck back about 1/16" so that the screen is flush with the dash.

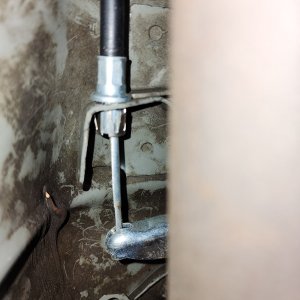
Phase two of this project moves into mounting it in the car. This is what a super messy dash in the middle of a wiring twister looks like so please ignore the spaghetti. It will be cleaned up now finally since I am putting that area together.

To make space for the double din you need to do some minor surgery and cut off the mounting tabs on the inner dash that stick into the middle and where the old dash you to mount too.

once the mounting tabs are cut off you can mount the deck. All you do to make sure its lined up correctly is to remove the two bottom t20 screws that hold the climate control in place and then use the top mounting holes on the decks mounting brackets for those two screws. There are two other self tapping screws provided that you then throw into the 4 remaining mounting holes. With 6 is makes for a solid mount.

all you do now is slap the dash kit over the deck. Between the tension clips that lock into the mounting brackets and the fit at the top its a nice solid mount and lines it up perfectly as well. Only complaint here is that the kit is perfectly straight on the top, where the stock kit had a slight curve to it so there is a small gap at the top center, but its not horrible.

From start to finish it would not have taken me more then an hour all at one time so it certainly saved time from converting a stock kit over. It is a nice clean look in the end, but that big that big empty spot below it bugs me. That will be phase 3 of the project where the real fun begins for me.

I cut the square piece with the holes in it for the usb and radar detector out of the abs sheet I have. I made a .1" flange around it to make it easy to mount it from the back as well as to give a good amount of surface area for the epoxy to grip. Then I cut the rectangle in the kit and this is how it looks slid in from the back.

this is what it looks like from the back just to get an idea. I thought about putting the carbon fiber side up but it would have made the next couple of steps of smoothing it in much more difficult.

A little epoxy and the new piece is in place.

And then add a little filler, some sanding, high build primer and then paint. not done yet thought....

IT always takes for ever to get the EL lighting sheets in to light these little projects. While I was waiting for it I added the color stripe in the middle and cleared it all. Once the lighting sheet was in after trimming and bending it I finally got to drop in the last piece to get an idea of how it all went together. I really love the cnc and this point of the project is something I would call "cnc chub" when the last piece falls into place(literally). Its too hot in the garage now to finally put the dash in so I am waiting till early evening but can't wait to see it all in place and finally lit up.

It took some time to snake all the usb cables into the dash and to get the radar buttons lined up but its in.

I was all excited to see it lit up till I looked and discovered they forgot the wire harness portion of the EL inverter..... I might be making a trip to the local electronics store tomorrow to see if they have one that will work as I do not want to wait 5-7 days to get the two wires I need to finish it.....
First you need to attach the white tension clips to the back of the panel. This is what will center and help hold it in place. They are easy to slide over the tabs that are on the kit.
Next you will need to use the screws included with the radio to mount the radio to the mounting brackets. The easiest way I found to do it was to lay the kit face down and then put the deck on top, screen facing down. Be sure to do this on a soft surface but once it is you can slide the brackets in place over the white tension clips to get it all aligned. Once you do that you can find some screw holes that line up and tighten them down.
When you do the deck and brackets will look like this. This will get mounted into the dash and then the kit slides over it.
Once I had it at this point I actually loosened the screws a tad and then again with the deck/brackets in the kit I pushed the deck back about 1/16" so that the screen is flush with the dash.
Phase two of this project moves into mounting it in the car. This is what a super messy dash in the middle of a wiring twister looks like so please ignore the spaghetti. It will be cleaned up now finally since I am putting that area together.
To make space for the double din you need to do some minor surgery and cut off the mounting tabs on the inner dash that stick into the middle and where the old dash you to mount too.
once the mounting tabs are cut off you can mount the deck. All you do to make sure its lined up correctly is to remove the two bottom t20 screws that hold the climate control in place and then use the top mounting holes on the decks mounting brackets for those two screws. There are two other self tapping screws provided that you then throw into the 4 remaining mounting holes. With 6 is makes for a solid mount.
all you do now is slap the dash kit over the deck. Between the tension clips that lock into the mounting brackets and the fit at the top its a nice solid mount and lines it up perfectly as well. Only complaint here is that the kit is perfectly straight on the top, where the stock kit had a slight curve to it so there is a small gap at the top center, but its not horrible.
From start to finish it would not have taken me more then an hour all at one time so it certainly saved time from converting a stock kit over. It is a nice clean look in the end, but that big that big empty spot below it bugs me. That will be phase 3 of the project where the real fun begins for me.
I cut the square piece with the holes in it for the usb and radar detector out of the abs sheet I have. I made a .1" flange around it to make it easy to mount it from the back as well as to give a good amount of surface area for the epoxy to grip. Then I cut the rectangle in the kit and this is how it looks slid in from the back.
this is what it looks like from the back just to get an idea. I thought about putting the carbon fiber side up but it would have made the next couple of steps of smoothing it in much more difficult.
A little epoxy and the new piece is in place.
And then add a little filler, some sanding, high build primer and then paint. not done yet thought....
IT always takes for ever to get the EL lighting sheets in to light these little projects. While I was waiting for it I added the color stripe in the middle and cleared it all. Once the lighting sheet was in after trimming and bending it I finally got to drop in the last piece to get an idea of how it all went together. I really love the cnc and this point of the project is something I would call "cnc chub" when the last piece falls into place(literally). Its too hot in the garage now to finally put the dash in so I am waiting till early evening but can't wait to see it all in place and finally lit up.
It took some time to snake all the usb cables into the dash and to get the radar buttons lined up but its in.
I was all excited to see it lit up till I looked and discovered they forgot the wire harness portion of the EL inverter..... I might be making a trip to the local electronics store tomorrow to see if they have one that will work as I do not want to wait 5-7 days to get the two wires I need to finish it.....
Last edited:
")