Correct 94-95 Firing Order & Sticky Request!

ElrodKTPQ_89

Legend
Joined
Aug 6, 2013
Messages
5,323
Reaction score
491
Location
Crossett, AR
Ok I'm still having trouble with my car. I'm not sure if I have the distributor a tooth off or what but it's driving me crazy! I tried searching everywhere for the correct firing order to make sure I have it right, but I'm just unsure about the ones I'm finding, because previously I had two plug wires swapped due to the diagram I have in my shop. I know the firing order itself and which cylinder is which but I need to know their orientation on the cap and which direction the rotor should be pointing, besides just saying point it at #1 cylinder. If someone could help me out it would be great. Also would be cool if someone could add this to the stickies at the top of the page. (not this thread just the firing order/diagram etc)
 

95opal

Well-Known Member
Joined
Jun 21, 2007
Messages
3,037
Reaction score
1,636
1-3-7-2-6-5-4-8.

from #1 on dizzy the order is counter clockwise
 
OP
OP
ElrodKTPQ_89

ElrodKTPQ_89

Legend
Joined
Aug 6, 2013
Messages
5,323
Reaction score
491
Location
Crossett, AR
1-3-7-2-6-5-4-8.

from #1 on dizzy the order is counter clockwise

I found my old distributor cap and figured out where #1 is and wired it according to that^, thanks. I still can't get it to fire up though. When I try to start it, if the cap is turned pretty far clockwise, it'll try to hit but never start running. It's like the farther clockwise I turn it the better it does. I have zero experience with distributors/timing or anything except for what I've been reading in an article on sbftech.com. So I'm sure I'm probably doing something wrong lol. But I made sure the #1 piston was up on compression stroke, then stabbed the dizzy, just not sure if I have it off a little bit or what.
 
OP
OP
ElrodKTPQ_89

ElrodKTPQ_89

Legend
Joined
Aug 6, 2013
Messages
5,323
Reaction score
491
Location
Crossett, AR
So is this correct also?
45538d1212118912-firing-order-302-e303-cam-43815d1209725593-1994-mustang-gt-5-0-timing.gif
 

ryclef331

Well-Known Member
Joined
Jan 20, 2006
Messages
2,913
Reaction score
11
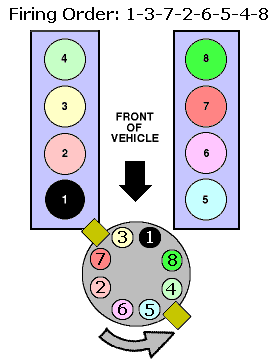
Ok...stop and take a step back. FIRST you can't just stab the distributor in there, put the plugs in order, and point it at #1 and expect it will fire...The pointing the rotor at the #1 plug wire ONLY works if you have the motor at top dead center coming up from the compression stroke...I.E. The rotor is pointed at that plug terminal b/c it is supposed to FIRE that cylinder....the cylinder should fire upon completion of the compression stroke...with me?

SO. Pull the distributor OUT. Pull the number one plug OUT. Put your thumb over the hole. Have some one bump the key until it blows your thumb off the hole. Look down at your balancer. See the timing marks? Turn the motor over with a sock and ratchet and line them up to "ZERO" MAKING SURE you turn the motor clockwise....same direction it was turning when it blew your thumb off. Put your plug back in.

NOW. With the distributor in hand, put the cap on and find #1 (If its labeled on the cap...cool. if not..it really doesn't matter right now...as long as the plug wires will reach where they need to just Pick a terminal and call it #1. With the cap on, make a mark on the body of the distributor that lines up with #1. This mark is what we are going to put the rotor at. We put it on the body so you can see it AND the rotor at the same time and not "guessing" looking at with a cap on.

Stick the distributor in. You may have to **** with it to get it to seat fully into the oil pump and line up the rotor with our #1 mark (Off a tooth on the gear or turning the body a bit...as long as it is seated and mark lines up....pay attention to the harness and make sure it will reach. It really only falls in one way.)

Dizzy is in, harness connected, rotor is pointed at #1 and the motor is at TDC on the #1 cylinder....lock the bolt down on the dizzy enough that it will not let it free spin but with some effort you can adjust it by hand. Now...put your cap on and working from the #1 going clockwise, put the wires on in firing order. Attempt to fire. If it doesn't..turn it slightly counterclock wise and try again. Don't go TOO far. it doesn't take much at all to change the timing. Once its fired, using a timing light set your timing using the normal procedure. Hope that helps clear things up. Remember...you CAN NOT SKIP ANY OF THE ABOVE STEPS.
 

RichV

Well-Known Member
Joined
May 6, 2012
Messages
4,230
Reaction score
252
Location
CO
You could still be 180* out. Without looking at the valves it can be hard to tell.


My old 5.0 ran tho at 180 out. Ran like crap, but it started.
 

PonyGlued

New Member
Joined
Jan 24, 2014
Messages
93
Reaction score
0
Location
down Island, NY
So is this correct also?
45538d1212118912-firing-order-302-e303-cam-43815d1209725593-1994-mustang-gt-5-0-timing.gif

http://www.oldfuelinjection.com/?p=71
notice too(in your image here) that the #1 is also at the 1:00 position in relation to the engine, picture in your mind as if just like a clock when it is installed in the proper position. The #1 is at the 1:00 to the engines center line. If I remember rightly the #1 if you looked at it, points right at the fuel rail schrader valve(at 1:00). Keep in mind that the cap and the cap base are both marked for #1 and must be used for that. That is the only way to have the free 1/8 rotation that's necessary for adjusting the timing. If this is not followed the 2 cap lock downs will hit when you try to rotate it, and you won't have the rotation that's needed. Take a few minutes and read this helpful guide, its very helpful...so then, make sure the wires start at the caps marked #1, then stab it in, if the #1 is not one o'clock to the engines center line, then make another stab and try again. Look at the markings on the base in my link, then you can estimate how much to adjust your stab...good luck
 
OP
OP
ElrodKTPQ_89

ElrodKTPQ_89

Legend
Joined
Aug 6, 2013
Messages
5,323
Reaction score
491
Location
Crossett, AR
Well I just tried what [MENTION=8067]ryclef331[/MENTION] posted and still nothing. It acts like it wants to fire up but won't still. One thing that's confusing me though is that one place I read to put the wires on CCW from the number one, and another here said to put them on CW..?? Also, when I last tried it, I made sure the number one cylinder was up on compression stroke, and that the timing mark on the balancer was lined up at 0 or TDC. The article that [MENTION=19297]PonyGlued[/MENTION] posted says to start with it at 10* before TDC. I'm not knocking either of your information, I may have either read it wrong or something but it does have me confused. Plus once again this a new experience to me and I have no help here other than asking you guys, waiting on a reply, then running back to the shop and trying that.
 

CC'S95GT

Post Whore
Joined
Apr 19, 2008
Messages
10,738
Reaction score
178
Location
Hampton ,Ga.
Base timing is 10*BTDC But it will start if it is set to 0*. Either way will work.
Have you tried using ether to start it?
If it starts on ether, then you know you have spark but no fuel. If it doesn't start on ether then you you don't have spark.
 

Addermk2

Well-Known Member
Joined
Mar 7, 2006
Messages
2,534
Reaction score
55
oh lord...

lets try this.

With the coming of the new car season, many of us 5.0 stang lovers are finishing up our projects. Sadly the most common error when completing a head/cam/intake upgrade, is the incorrect installation of the distributor. I have seen many people say "My car is running like crap after H/C/I, I think my timing is off...."

Here is how you will PROPERLY install your distributor so that you get the correct stab every time... no more "I think I'm one tooth off!"

Start by removing the #1 spark plug. (thats the one closest to the front of the motor on the passenger side.)
Find 0° on your balancer and mark it. In the following picture you will see three blue lines and a black area on my balancer. The black area is ATDC, otherwise reffered to as retarded timing. Each blue mark, starting at 0° are in 10° increments.

Place your finger over the #1 spark plug hole, then turn the motor over (clockwise) until you feel air push out of the spark plug hole. You have now found the compression stroke. Now, look at the balancer. Observe where the 0° mark is. If the mark has passed the end of the timing indicator, I do not recommend turning the engine back counter clockwise, as you can loosen your crank bolt... but if you must, go PAST zero, then come back up to it. bring the 0° mark up to the end of the timing indicator. You have now set the motor at 0° TDC on cylinder #1.

(disclaimer: I am holding the timing indicator because I clearly do not have the timing cover installed.... deal with it)

Now find the #1 plug wire on your distributor.


Mark the distributor so that when the cap is removed, you will be able to see where the #1 wire should be. I used a black sharpie to do this.

(To avoid confusing some of you, I would like to note that I did not remove the distributor to mark the #1 location on the body of the distributor, I merely spun it around... because im lazy like that...)


Remove the cap and extend the marker line into the inside of the distributor.
Check the alignment of your distributor in relation to the block. Little known to most, Ford actually provides you with a 0° referance and a 10°BTDC referance point. If you look closely at the base of the distributor you will see a clear cut line in the block. there is a matching mark on the distributor base. This indicates roughly 10°BTDC. The edge of the casting to the left of this mark is 0°.

Set the mark on the distributor to the 0° location.


Now look at the orientation of your rotor in the distributor itself. If the distributor is lined up with the zero mark on the block, your rotor should line up with the marker line you made, like this...


Anything else is incorrect. You can fix your alignment by lifting the distributor to the point where the rotor stops turning. (the gear on the distributor shaft that mates with the camshaft is curved and will cause the rotor to turn to the left as you pull it out. Do not remove the distributor all the way, but just enough to turn the rotor in the distributor.. If your set too far towards the left, simply turn the rotor slightly to the right and press the distributor back down into the block. If it will not slide back down, do not panic... Just continue to press down on the distributor while slowly moving the rotor to correct its position. When the gears mesh, it will slide down and turn towards the right on its own.

Once you have properly aligned the rotor inside the distributor like shown above, turn the distributor so the mark at the base and the mark on the block line up. This will get you close to 10°BTDC, only a timing light will get it perfect.

If you discover your rotor is oriented as the two following pictures, please review the last two steps we covered and correct it.


This is incorrect...


This is also incorrect. Please review the previous two steps and align the rotor properly.


I hope this has helped give you a more visual representation of how to properly stab your distributor. If you have any questions regarding this How To, please PM me.
 
OP
OP
ElrodKTPQ_89

ElrodKTPQ_89

Legend
Joined
Aug 6, 2013
Messages
5,323
Reaction score
491
Location
Crossett, AR
SUCCESS!!!! I decided to give it one more shot before I gave up for today. Followed the instructions I've been doing all day, installed the plug wires counterclockwise starting from number one. Turned the key and it started to fire. Turned the dizzy a little bit and tried then boom it fired right up! However, it's idling kinda rough at the moment, and at times I had to workthw throttle to keep it running. I don't have a timing light so thats all I can do for today but I'm still psyched that I finally heard it for the first time since November!
 

PonyGlued

New Member
Joined
Jan 24, 2014
Messages
93
Reaction score
0
Location
down Island, NY
That's great! congrats to you..no timing light, if you have a vacuum gauge that will do a great job on the timing.

1. idle the motor till normal hot, attach the vacuum gauge on the intake manifold

2. turn the distributor clockwise to advance and counter-clockwise to retard.

3. slowly turn the distributor clockwise (advance timing) and look for a maximum reading on the gauge. For instance, if the reading on your gauge peaks at 18 inches of vacuum, that is the maximum for your engine. (The normal range could be from a high of 20 inches to a low of 15 inches, depending on the internal condition of your motor). The reading will drop off if you advance too far, so turn the distributor counter-clockwise (retard timing) to go back to the peak reading on your gauge.

4. Once you have established the peak reading, retard the timing (turn distributor counter-clockwise) to reduce the reading by about 1 inch to reduce ping.
 

95opal

Well-Known Member
Joined
Jun 21, 2007
Messages
3,037
Reaction score
1,636
no light needed ..advance till you hear detonation then back it down a c-hair..
 
OP
OP
ElrodKTPQ_89

ElrodKTPQ_89

Legend
Joined
Aug 6, 2013
Messages
5,323
Reaction score
491
Location
Crossett, AR
I won't be able to work on it tonite, I'll be in class all night when I leave work. I will get to mess with it again tomorrow though, and I plan on also cleaning my IAC and see if that does anything to help the rough idle.
 

Addermk2

Well-Known Member
Joined
Mar 7, 2006
Messages
2,534
Reaction score
55
no light needed ..advance till you hear detonation then back it down a c-hair..

This is absolutely the worst piece of tech advice I have ever seen. a stock car will idle between 25 and 35 degrees of timing, with no signs of detonation.

Follow my post, or go get a timing light.

End of thread

Sent from my PC36100 using Tapatalk 2
 
OP
OP
ElrodKTPQ_89

ElrodKTPQ_89

Legend
Joined
Aug 6, 2013
Messages
5,323
Reaction score
491
Location
Crossett, AR
I followed your post, and do plan on getting a light, tomorrow. For now (yesterday) I just did what I could with what I had, and it worked, after following your instructions. Thanks they were helpful!
 

Latest posts

Forum statistics

Threads
77,548
Messages
1,504,737
Members
15,013
Latest member
96Mustang4.6GT

Members online

Top