If you are looking for some spice to your life, or your instrument cluster, check out the DIY below.
Full link: https://maddmotorsportsdesign.blog/2017/10/05/wrapped-gauge-bezel-sn95/
However, if you prefer to purchase one already made, Carbon Driven has an overlay made out of real carbon fiber. It is available in both silver and black carbon. The color are hyperlinks, so be sure to click on them.
Install: https://maddmotorsportsdesign.blog/2017/10/20/carbon-fiber-gauge-cluster-and-led/
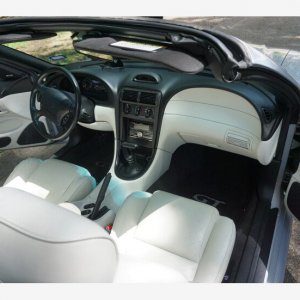
You can wrap it in any print or color you want. Personally, I decided to use carbon fiber.
Tools:
Full link: https://maddmotorsportsdesign.blog/2017/10/05/wrapped-gauge-bezel-sn95/
However, if you prefer to purchase one already made, Carbon Driven has an overlay made out of real carbon fiber. It is available in both silver and black carbon. The color are hyperlinks, so be sure to click on them.
Install: https://maddmotorsportsdesign.blog/2017/10/20/carbon-fiber-gauge-cluster-and-led/
You can wrap it in any print or color you want. Personally, I decided to use carbon fiber.
Tools:
- Knife (You can use any box cutter type blade)
- Wrap of our choice. Carbon Fiber vinyl was a stiff material to work with, which made it harder. However, not all vinyl is stiff.
- Heat Gun (You can get one from Harbor Freight for like $10, or you can borrow someone's blow dyer. However, heat gun is recommended)
- Squeegee card or credit card
- Dremel is recommended, but Flat Head screw driver will work
- First thing is first, you will have to remove the gauge cluster from the dash.


- Once that is removed, you will need to separate the bezel from the cluster.

- The next thing is a bit harder, because you will need to separate the plastic lens from the bezel. If you have a Dremel, you will be able to cut where the plastic was glued and it will come off. Or if you are careful and patient enough, you can pry it open with a flat head screw driver. It will crack the plastic if you're not careful enough, so watch out. DO NOT HEAT IT UP. It will melt. When you put the lens back on, you can add some silicone to the edges and glue it back, or you can just slap it on like I did. It does not move, and you cannot tell that it isn't glued on.


- When applying the vinyl, you will need to be careful because the bezel is not flat. Try and use only one piece, if you have to do two pieces, use the second piece on the bottom of the bezel. Make sure that the surface is cleaned. You will need to lightly heat up the vinyl so that it does not leave bubbles or wrinkles. You can apply and remove, but when you do, it will wrinkle and you'll need to apply heat to remove the wrinkles. The card will help get into the edges and take out some bubbles.

- Since the cluster was out, I took the opportunity to swap out the cluster lights with LED's. I bought a pack of 10 off of Ebay for a couple of bucks. To this day, they still work with no issues. You will need size 194 bulbs. You can use any color, I used blue.

- Final: