ttocs
Forum's #1 poster
this will be a long project as there is just alot of sanding/rubbin that will have to be done before its done. Bear with me and I will update pics when I work on it to show what is going on. After seeing thorco3's intake in person and reading his write up that made it seem so simple(it lies) I was determined to do this sooner then later. So why not now while I am in the middle of my stereo install........... There are some days I do not have the parts I need for that but I always have sand paper and elbow grease........

I bought the intake and it had been painted red previously. Didn't really care since I was going to have to strip the powder anyway so the paint would not be an issue. I use a chemical stripper I picked up at walmart. This is a citris based stripper so it doesn't have any bad fumes(orange), and isn't as strong but still works if you give it some time. I gave it a complete coat and waited about an hour and scrapped a couple of sections with a putty knife. Then I just put a super thick coat on, left it over night and the next morning most of the powder had shriveled up as though it had melted and either came off with water from the hose or with a steel brush. Took 3 coats to get all the corners but alot easer then sanding and cheaper then paying someone to blast it.

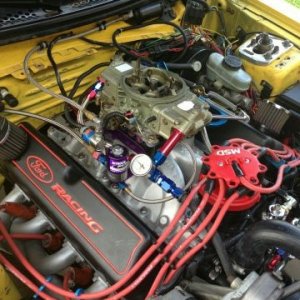
I didn't get any pics of the intake in its raw casted form and this is now after alot of sanding. I started first with a dremel and a sanding drum and small grinding stone to get the small areas and then used a larger drum and sanding disks and a drill to get the larger areas to remove the casting scale. Those power tools took off all the scale but left alot of tool marks on the intake that now need to be reoved so that meant there was alot of rubbing it.......... The first runner(bottom) here is almost smoothed out from the marks the power tools left. If you look closely at the runners above it you will see the tool marks that need to still be removed.
Once the tool marks are all gone and its all smoothed out then I will start increasing the grit# of the sandpaper until I am eventually up to 2000-2500(if my back and elbow are still working) and then buff/polish it. Like I said this will be a long project to do when I a can't work on my others but can't wait to see it finished....
I bought the intake and it had been painted red previously. Didn't really care since I was going to have to strip the powder anyway so the paint would not be an issue. I use a chemical stripper I picked up at walmart. This is a citris based stripper so it doesn't have any bad fumes(orange), and isn't as strong but still works if you give it some time. I gave it a complete coat and waited about an hour and scrapped a couple of sections with a putty knife. Then I just put a super thick coat on, left it over night and the next morning most of the powder had shriveled up as though it had melted and either came off with water from the hose or with a steel brush. Took 3 coats to get all the corners but alot easer then sanding and cheaper then paying someone to blast it.
I didn't get any pics of the intake in its raw casted form and this is now after alot of sanding. I started first with a dremel and a sanding drum and small grinding stone to get the small areas and then used a larger drum and sanding disks and a drill to get the larger areas to remove the casting scale. Those power tools took off all the scale but left alot of tool marks on the intake that now need to be reoved so that meant there was alot of rubbing it.......... The first runner(bottom) here is almost smoothed out from the marks the power tools left. If you look closely at the runners above it you will see the tool marks that need to still be removed.
Once the tool marks are all gone and its all smoothed out then I will start increasing the grit# of the sandpaper until I am eventually up to 2000-2500(if my back and elbow are still working) and then buff/polish it. Like I said this will be a long project to do when I a can't work on my others but can't wait to see it finished....