Tork Tech Thunderbird Project

OxmanWI

Member
Joined
Mar 16, 2013
Messages
120
Reaction score
6
Location
Milwaukee, WI
This project started a year and a half ago, but I thought I would post past progress to current date.

-------------------------------------

4/28/11

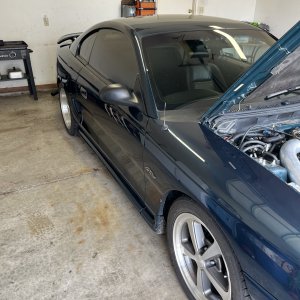
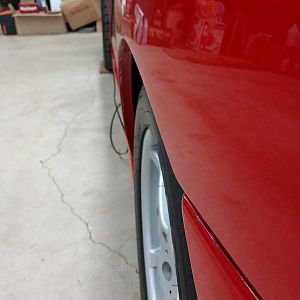
After buying my Thunderbird back[/URL] from a local who basically trashed the car and let it sit, the time has come to start working on the Thunderbird and bring her back to life. As you can see there is minor body damage to the fender and headlight panel, nothing I can’t handle with parts from the salvage yard. I’m keeping the stock NPI block for now, it’s only got 91K+ miles on the clock. There’s no need for a PI motor swap when I have a perfectly good motor to blow up.
Other than that, just trying to restore the look and finish from what she used to look like before the carnage.


Before Picture:

027.jpg


01-10-2012

I talked with Bill at Tork Tech / Supercoupe Performance and this will be the first Thunderbird with a Terminator kit. Ever since they came out I've always wanted one really bad. From the Allen to the SVO and now a Tork Tech Terminator kit. I'm hoping this is going to be the last Supercharger that's on the car.
As of right now I’m working on getting the block and heads sent to my engine shop, but they are booked solid for the next couple of months. I need the rotating assembly balanced with the new dish pistons and the block bored out to .020 over. Compression would be around 9.2:1 and something around 15 pounds of boost. I have no idea what kind of power this set up is going to make.
Thanks for looking!
Josh

Engine Block
97 Cobra Teksid
Cobra Crankshaft
Eagle H-Beams
Keith Black 21cc Dish Pistons
MV Performance Ported PI heads
- Ferea Valves
- Comp Cam Springs,
- 9 threaded SP holes
- GT rockers
- MHS Stage 2 Blower Cams
TSS oil pump
Forced Induction
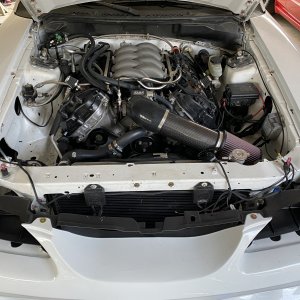
Tork Tech Terminator Kit
- Stiegemeier Stage 6 Ported Eaton M112
- Air to Water intercooled
- Lightning Heat Exchanger
- Lightning Bosch Water pump
- Tork Tech Reservoir
- AIS Stage 1 kit from RobertP
- Dragon Throttle Body and Plenum


IMG_0283.jpg

IMG_0289.jpg

IMG_0288.jpg

IMG_0307.jpg

IMG_0294.jpg

IMG_0287.jpg

IMG_0293.jpg

IMG_0292.jpg

IMG_0298.jpg

IMG_0306.jpg

IMG_0295.jpg


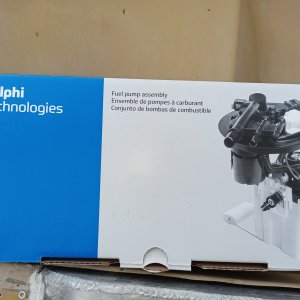
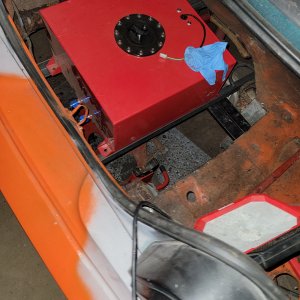
The block and rotating assembly is finally done and fresh from the machine shop. Since I've been home, I thought I would take advantage of the record breaking weather we've been having in the Midwest and get ready for the NPI removal.
Some pictures...
IMG_0451.jpg

IMG_0456.jpg

Picked up some new 18" rims from the Custom Wheel Shop, but what kind are they?:confused:
IMG_0457.jpg

2004 GT Trans and TC. Waiting patiently for the DirtyDog.
IMG_0454.jpg

140 speedo
IMG_0455.jpg

Triple pod with Aeroforce gauge from RobertP
IMG_0300.jpg

IMG_0301.jpg
 
OP
OP
OxmanWI

OxmanWI

Member
Joined
Mar 16, 2013
Messages
120
Reaction score
6
Location
Milwaukee, WI
4/21/2012
I'm working so much overtime at my job, haven't had any time to do anything with the Thunderbird. But today was so nice I had to clean my garage and finish the wiring for the COP mod. Also picked up an Optima battery that was on sale. Maybe in the next couple of weeks if I have time, I'll take the NPI out. Who knows…

IMG_0579.jpg

IMG_0580.jpg

IMG_0581.jpg


Pulled the exhaust, fuel tank, driveshaft, half shafts and differential this weekend. The tank was very easy to remove being my first time. My fuel gauge was way off before I parked it. The gauge was reading a notch above E...I had almost half a tank, lol.
I finally found the gas fume problem that I've been having ever since I've owned this car. There are a nice cut in the crossover hose. Looks like the hose made contact with the driveshaft.
I made a big order from Summit, should be getting a couple of big boxes on Tuesday for the differential rebuild kit and other parts. Kim (94 Thunderbird XX) is going to help me rebuild my differential and make a RTLB. Kim you're the man!
Also got a 2.8 SC pulley for the Eaton and quick change kit from Lightning Force Performance.
More updates to come!

IMG_0633.jpg

IMG_0642.jpg

IMG_0638.jpg

IMG_0639.jpg
 

Musturd

Post Whore
Joined
Feb 12, 2011
Messages
10,600
Reaction score
2,387
Nice start dude this is going to be kill
 
OP
OP
OxmanWI

OxmanWI

Member
Joined
Mar 16, 2013
Messages
120
Reaction score
6
Location
Milwaukee, WI
Very cool project!
Everything looks great so far, keep the updates coming.
Thank you! :)
I was motivated enough to pull the engine and transmission out today.
IMG_0659.jpg

IMG_0661.jpg

IMG_0662.jpg

IMG_0663.jpg

IMG_0664.jpg


Some progress was made this week.
First the differential parts are ready to go, shim kit, trac-lok and 4.10.
I shipping the stock exhaust manifolds to Preston (Braincoating) for the extreme port with coat.
To my surprise I found a 1990 SuperCoupe car cover on craigslist for $35! That was the best part of the week!
More to come!

IMG_0653.jpg

IMG_0655.jpg

IMG_0668.jpg

IMG_0665.jpg

This is on my wife's car. Looks brand new! :)
IMG_0667.jpg


Just had the diff sand blasted today. Dropped off at Mike's for powder coating. Rebuilding this weekend.
Before and After...
IMG_0672.jpg


Powder coated in less than 24 hours and $40 at:
Hy-Tec Powder Coating
1415 Ellis Street Waukesha, WI 53186
(262) 549-4855
This weekend I'm meeting up with Kim for the rebuild. Next week I'll have the cover done as well.
IMG_0674.jpg
 

KillNThrill24

Legend
Joined
Apr 16, 2012
Messages
7,500
Reaction score
442
Location
Cleveland Ohio
Damn man that's actually a pretty cool build you got goin on. I wanted to TT my GT but the price kept rising and it just became not worth it IMO. Looking forward to this build, total freakin sleeper man
 

belber095

Legend
Joined
Aug 7, 2012
Messages
5,489
Reaction score
408
Location
Ithaca, NY
woah this build is cool. i bet people are like wtf when you tell them your tbird has a cobra motor lol
 
OP
OP
OxmanWI

OxmanWI

Member
Joined
Mar 16, 2013
Messages
120
Reaction score
6
Location
Milwaukee, WI
5/18/2012
Today I removed the front suspension, tomorrow rebuilding the Diff and Sunday removing the rear suspension. Next week sand blasting the diff cover and front spindles and having them powder coated.
The engine bay looks pretty good, little rust here and there. I started to bag up all the wires and anything that I don't want to get primer and paint on. Going to paint the bay the stock Alpine Green.

IMG_0689.jpg

IMG_0687.jpg

IMG_0690.jpg

5/20/2012
This past weekend I took a visit to see 94 Thunderbird XX (Kim) so he could help me build the differential. Can't thank him enough for taking the time to help me, goes to show there are great people out there. Thanks again Kim! :zbeer:
While I was there he welded up a RDCB for me, very cool. Today I had the spindles, brace and cover sand blasted and dropped off for powder coating. Should be ready tomorrow.

2012-05-21080844.jpg

2012-05-21092043.jpg

Parts back from powdercoat.
IMG_0698.jpg

IMG_0700.jpg

IMG_0701.jpg

IMG_0695.jpg

IMG_0694.jpg

IMG_0696.jpg
 
OP
OP
OxmanWI

OxmanWI

Member
Joined
Mar 16, 2013
Messages
120
Reaction score
6
Location
Milwaukee, WI
Picking up my new VFN hood next week, ADDCO rear sway bar and Preston's coated and ported manifolds came in the mail. And too much parts to list and take pictures of.
Slowly but surely...
IMG_2304.jpg

IMG_2306.jpg

IMG_2309.jpg

IMG_2310.jpg

IMG_2311.jpg

IMG_2315.jpg

IMG_2316.jpg
 
OP
OP
OxmanWI

OxmanWI

Member
Joined
Mar 16, 2013
Messages
120
Reaction score
6
Location
Milwaukee, WI
6-29-12
I took a visit to the Chicago area to pick up my VFN hood.

VFN 3” Cowl
IMG_2395.jpg

8-14-12
Some progress has been made, go figure…
To start, I got my transmission back as well as my DynoTech driveshaft.
The front and rear suspension is bolted in, just have to torque everything to spec. New bushings and bearings to name a few. Painted the engine bay. In the out view picture you can't really tell, but the close up shots you can see the Alpine Green come out with some light on the surface. Going to clear it tomorrow. Everything is coming together nicely.
Thanks for looking.

Engine bay paint

IMG_4957.jpg

IMG_4962.jpg

IMG_4965.jpg

Rear
IMG_4969.jpg

IMG_4983.jpg

IMG_4985.jpg

Front
IMG_4967.jpg

IMG_4987.jpg

Went with the EMPI halfshafts on rockauto.
IMG_4952.jpg

Differential is in with Kim's bracing.
IMG_4982.jpg

Rebuilt 2004 Mustang 4R70W with 3.5" DynoTech driveshaft
IMG_4955.jpg

IMG_4956.jpg

Audio Alchemist Sub Box
IMG_4976.jpg

IMG_4977.jpg
 
OP
OP
OxmanWI

OxmanWI

Member
Joined
Mar 16, 2013
Messages
120
Reaction score
6
Location
Milwaukee, WI
Just got my Corbeau Sport seats in yesterday with the brackets. The seat brackets are not a good fit at all. I had to modify it to make it fit. One, the seat belt tab needs to be cut off because it's in the way of the center console floor. Two, you'll need to grind out the bracket to floor holes so that the bolts can fit through.
Overall I love the seats, they're nice and firm on the lower back. The color is almost a match with the medium graphite grey. The only thing is, the seats are a little low. Nothing serious, but that can be fixed. The shipping weight with box was 68 pounds. Minus the box and packaging, looking at 50ish weight savings over the old seats.
Circle-D TC was finished yesterday and shipped out today. Should see it Saturday or Monday…FAST!
IMG_4989.jpg

IMG_4995.jpg

IMG_4993.jpg

IMG_4997.jpg

This is a head rest from the stock color medium graphite with the Corbeau seat, very close match.
IMG_4999.jpg

IMG_5007.jpg

IMG_5010.jpg

IMG_5008.jpg
 
OP
OP
OxmanWI

OxmanWI

Member
Joined
Mar 16, 2013
Messages
120
Reaction score
6
Location
Milwaukee, WI
The Torque Converter from Circle D Specialties arrived. Paid on August 22nd and arrived at my doorstep today...Two weeks, enough said.
IMG_5016.jpg

IMG_5017.jpg

IMG_5019.jpg

IMG_5022.jpg

IMG_5023.jpg

IMG_5027.jpg
 
OP
OP
OxmanWI

OxmanWI

Member
Joined
Mar 16, 2013
Messages
120
Reaction score
6
Location
Milwaukee, WI
A little birthday present showed up at the front door today. Can't wait to see what they look like when all mounted up. Someday!

Falken FK452 - 275/40/18[/URL]
IMG_5038.jpg

IMG_5040.jpg

IMG_5039.jpg

IMG_5043.jpg
 
OP
OP
OxmanWI

OxmanWI

Member
Joined
Mar 16, 2013
Messages
120
Reaction score
6
Location
Milwaukee, WI
After waiting all spring and summer the heart is finally here! Big thanks to Randy at Per-Race-Engines[/URL] in Plainfield, IL. It's all downhill from here. And thanks to BR3WCITY for letting me use his engine stand!
Recap of engine stats:
97 Cobra Teksid block .020 over
Forged Steel 8-Bolt Crank
Eagle 4340 Forged H-Beams
Keith Black Forged Pistons 21cc Dish
9.2:1 Compression Ratio est.
MV Performance Ported PI heads
• Ferea Valves
• Comp Cam Springs
• 9 threaded SP holes
• GT supercar rockers
• MHS Stage 2 Blower Cams
• ARP 2000 head studs
IMG_5046.jpg

IMG_5052.jpg

IMG_5055.jpg

IMG_5056.jpg
 
OP
OP
OxmanWI

OxmanWI

Member
Joined
Mar 16, 2013
Messages
120
Reaction score
6
Location
Milwaukee, WI
I've been working so much that today I finally got a day off to work around the house and clean up my garage. As far as updates, I picked up my transmission for the second time but with another business near me to rebuild my 4R75W all over again. Should have gone with them in the first place. New rebuild kit, forged intermediate shaft and dyno'd with my TC. It is ready to bolt on after waiting on a couple odds and ends. The motor on the other hand is ready to go. Yet there are a couple things that I'm trying to figure out before I put it back in the car. That and waiting on parts and gaskets in the mail. I'm in no hurry, this isn't going to be ready until spring.
Thanks for looking...
IMG_7431.jpg

IMG_7440.jpg

IMG_7453.jpg
 

gate keeper

Active Member
Preferred Vendor
Joined
Mar 23, 2012
Messages
821
Reaction score
122
Location
Corona, Ca.
...No damn way.

I remember when my mom had one of this like 15 years ago. I LOVED that car
 
OP
OP
OxmanWI

OxmanWI

Member
Joined
Mar 16, 2013
Messages
120
Reaction score
6
Location
Milwaukee, WI
Pulled the steering rack out and looking for a new unit, replacing all the ground wires, wire ends, bolts, and odds & ends. I decided to bypass the A/C delete with a smaller belt, plus things will be out of the way with less. I’m hoping in the next couple years to have the engine and transmission back in the car, but every time I inspect something I feel the need to replace it.

In the second picture you can see the cam sensor has a 90 degree turn upward. That is a must for these kits with the front cross brace. If you also look at the alternator pulley and down at the steering pulley you notice that they look align, but they are not. In order to work with the belt routing and so that the belt does not walk off you need to get a steering pump pulley puller and bring the pulley out a nudge.
I bought a new mustang fan after knowing from other Tork Tech projects that the clearance between the fan and the alt are very tight. I measured the mustang fan compared to that of the thunderbird and the mustang fan is has almost 1/2 of an inch more clearance then the Thunderbird fan.
Lastly I bought a Tru-Cooler that everyone else has for keeping the transmission cool. And a nice addition to the fuel set up with some Fore rails, FPR and -8AN lines for the supply and return. Big thanks to RobertP for the discount, send him a PM if you are looking at some Fore products.

belt_zps26cc2673.png

IMG_8000_zpsb0183dd6.jpg

IMG_7999_zps0233ccbc.jpg

IMG_8004_zpsc80d2b11.jpg

IMG_8010_zps311b530c.jpg

IMG_8018_zps3fb4a671.jpg

IMG_8013_zps5aa66b0e.jpg

IMG_8015_zps78e99ed7.jpg

IMG_8020_zps0614fb87.jpg
 
OP
OP
OxmanWI

OxmanWI

Member
Joined
Mar 16, 2013
Messages
120
Reaction score
6
Location
Milwaukee, WI
Never thought this day would come! The engine and transmission are back between the towers baby! I spent half the day yesterday and almost the whole day today finishing up some of the little things to make this happen. Every time you think you can move on to the next step you either strip the threads in a bolt or find out something doesn’t work or fit causing your simply day to turn out longer than it should.
Next: I’m taking the fuel tank to get professionally cleaned and pressure-leak tested. I did have a gas fume problem with this car back in the day, I was almost sure it was the cross over hose on the tank, but better to be safe than sorry. After that I’ll start routing the fuel system, more pictures soon!

IMG_8108_zpsdfc6e640.jpg

IMG_8110_zpse4b6d926.jpg

IMG_8114_zpsee298bdd.jpg

IMG_8116_zps69dddfc0.jpg

IMG_8118_zps5698b868.jpg

IMG_8119_zpsbde866d5.jpg

IMG_8127_zpsd3f64267.jpg

IMG_8132_zps20283f6b.jpg
 
OP
OP
OxmanWI

OxmanWI

Member
Joined
Mar 16, 2013
Messages
120
Reaction score
6
Location
Milwaukee, WI
I just got the fuel tank back from being cleaned and pressure / leak tested. Passed with flying colors. Just waiting for some ptfe hose fittings from summit and this weekend I'll put the fuel tank and route the new fuel system.
Here is the detailed set up for the fuel system. I ditched the duel 255 for the 400 pump. I've been told that I'll be fine with the single 400 pump and E85 for my setup. I plan to have the lines and tank installed this weekend, stay tuned.
NEWfuel_zps19700623.jpg
 
OP
OP
OxmanWI

OxmanWI

Member
Joined
Mar 16, 2013
Messages
120
Reaction score
6
Location
Milwaukee, WI
Hoping for numbers sooner or never!
Basically the exhaust for the work under the car, there's a couple other odds and ends I need to patch up from other thread. The fuel lines are routed. I threw everything on today to mock up and measure how long my fuel lines from the rails have to be.
IMG_8282_zps07bc05a8.jpg

IMG_8290_zps7463f60a.jpg

From a side view the SC and inner cooler tank look really high. I have a 3" cowl hood, but damn I hope I don't have any clearance issues. :rolleyes:
IMG_8286_zpsc0d4109c.jpg

Here is a Russell fuel filter using the stock filter bracket. I had to bend the ends to make fit.
IMG_8273_zpsd7061c47.jpg

Driveshaft
IMG_8214_zps693b96db.jpg

Couple guys on other Mustang forums had said they had some clearance issues with the front crossover fuel line in the front with the coolant hose. The -AN 90 degree fittings with their aftermarket fuel rails would be the way. I have a tight clearance but looks like it will work. Maybe this is a good combo. :D
IMG_8293_zpsbc622a71.jpg

IMG_8291_zps9a3b309b.jpg

I put the Fore regulator right under the AC line ports. Very tight fit to say the least.
IMG_8300_zps44dd9049.jpg

Thanks for looking,
 

Latest posts

Forum statistics

Threads
77,612
Messages
1,505,947
Members
15,057
Latest member
mwright19832

Members online

Top