White face gauges - how to change them in your instrament cluster

Dalamar

Post Whore
SN95 Supporter
Joined
Feb 3, 2006
Messages
13,863
Reaction score
124
Location
SLC, UT
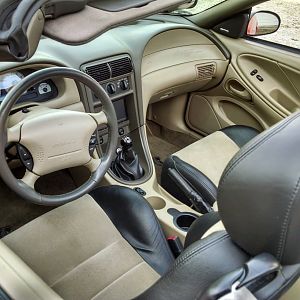
Gauge face change.  cheap and easy mod, and looks nicer.
This was one of the first mods I ever did, like 10 years ago.
went with white faces back then, I just changed them over to silver faces, and shot some pics.

Gface2.jpg


I Borrowed these pictures of the cluster removal from TXCobra:
IMG_0824.jpg

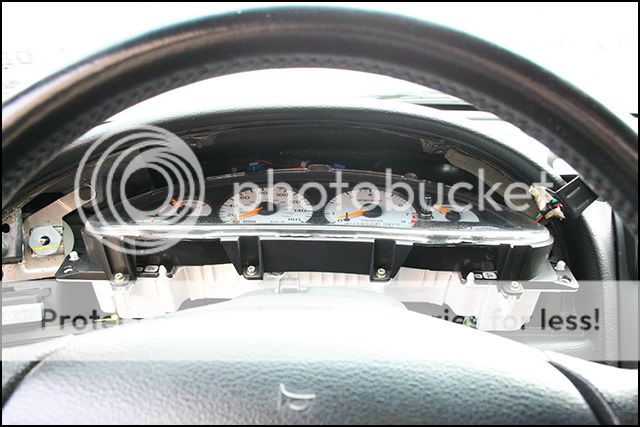
Start with your untouched gauge cluster.

IMG_0832.jpg

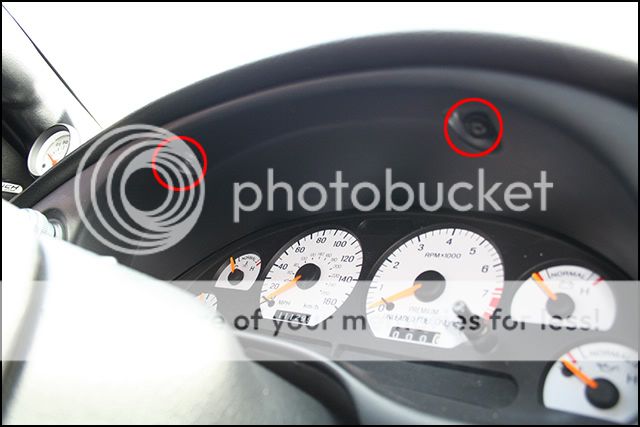
Remove the two T-15 Torx head screws.

Step 2
STOCK HEADLIGHT KNOB
wht2.jpg

"You need to pull a retainer clip outwards (away from the shaft) and then pull this knob off gently." - MustangWorld.com

Aftermarket Headlight Knob
IMG_0833.jpg

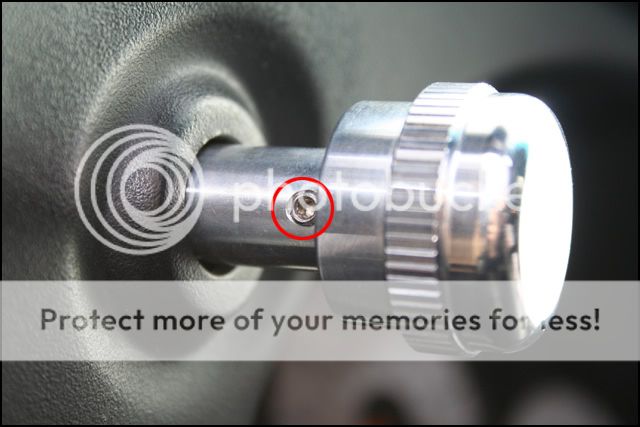
Remove the 2 mm Allen/Hex screw in the side of your Headlight Knob Switch

Step 3
IMG_0839.jpg

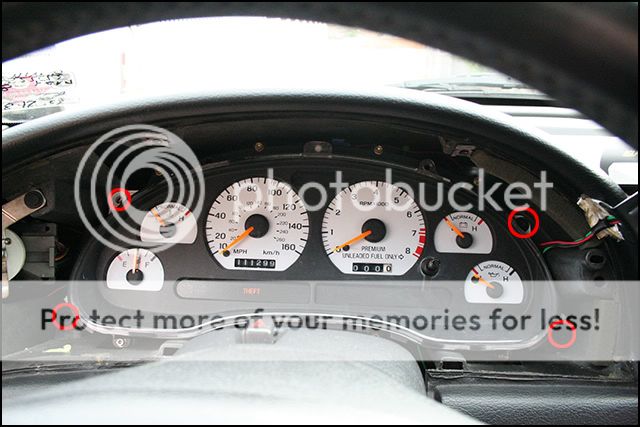
Once you have the knob taken care of, carefully remove the gauge clusters bezel (clusters surrounding piece). It will be stubborn more than likely but it should come out, just try not to break it! After the bezel is out, unscrew the four surrounding bolts to remove the cluster itself. They are again T-15 Torx headed bolts.

Step 4
IMG_0841.jpg

Tilt the cluster by bringing the bottom out first. (like you would be putting the gauge faces pointing upwards)

Step 4.1
IMG_0844.jpg

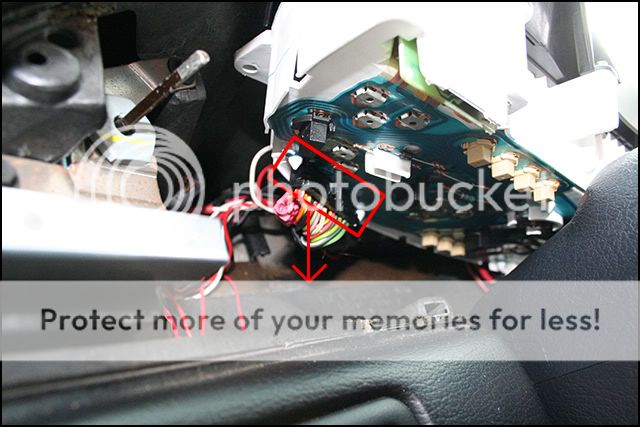
Remove the black connector that is connected into the back of the cluster. Carefully pull it straight back and out.

Step 4.2
IMG_0849.jpg

IMG_0847.jpg

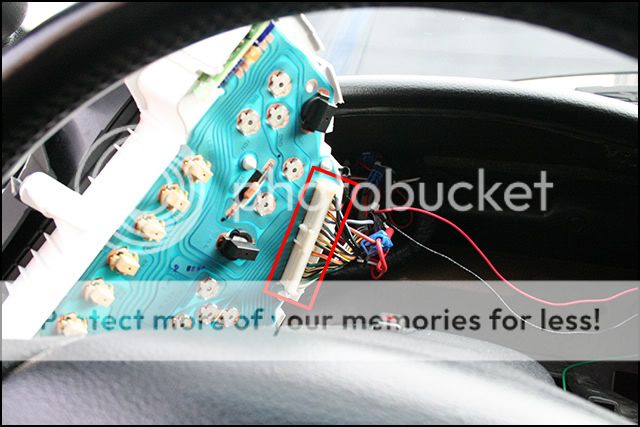
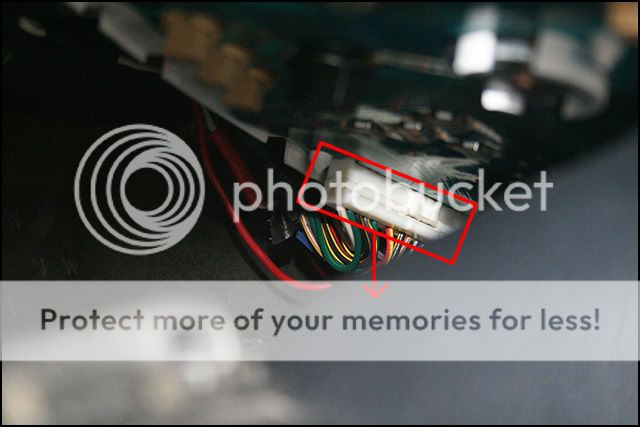
Notice the white connector on the opposite end of the gauge cluster. Just like the black connector, remove the white connector the same way. Carefully pull straight back and out.
 
OP
OP
Dalamar

Dalamar

Post Whore
SN95 Supporter
Joined
Feb 3, 2006
Messages
13,863
Reaction score
124
Location
SLC, UT
Re: Change the gauge faces on your instrament cluster

Now that you're unplugged, here's the disassembly:


STEP ONE - MAKE NOTE OF EXACTLY WHERE YOUR NEEDLES ARE POINTING!
you'll need to put them back in the same place.

Gface1.jpg


Remove the 8 gold torx head screws holding on the lense/bezle.
Gface2.jpg


Remove the needles, they pull straight off.
If they're a little tight, pry with a screwdriver - Make sure that you pry in the center, next to the shaft.
If you pry on the outside, you could bend it and screw it up.

Also pull out the 2 needle stops on the tach and speedo.
Gface3.jpg


Notice the inside hole diameter is the same for all needles except for the voltage.
Gface4.jpg


The gauge face should easliy peel off.
Gface5.jpg


Here's your instrament center, isn't it all cute and white & clear and plastic?
Gface6.jpg


Gface7.jpg


Here's a peek at how gauge faces have changed over the last 10 years.
Gface8.jpg


The new faces had a peel-stick backing.
there's holes top and bottom to center them in place.
Gface9.jpg


Press the needles back on, USING YOUR NOTES, in the same place.
Some of the needles may push all the way down, and bottom out agains the face.  Make sure they're up a little bit.

also careful not to twist them, or you could change where ithe reading should be.
place the bezel over to to check it out.

Now is also a good time to get a clean microfiber and wipe out the inside of the lense as best you can.
Gface10.jpg
 
OP
OP
Dalamar

Dalamar

Post Whore
SN95 Supporter
Joined
Feb 3, 2006
Messages
13,863
Reaction score
124
Location
SLC, UT
Re: Change the gauge faces on your instrament cluster

Once your back together, you may want to just put a few screws in it and plug it back in to check it.

As careful as I was, the readings were off when I put it back in. it did sit for a few weeks from when I pulled it and changed out the LED bulbs.
to when the faces arrived. Maybe my neighbors cat snuck in and messed with them?

Gface11.jpg


So, to fix this, you'll want to remove the lense/bezel while the rest is in the car.
Leave in the 2 screws in the white tabs, top left and right of the bezzel.
Remove the 8 gold screws
Remove the lense/bezzel.

To do this you'll want the tools shown below.
1/4" ratchet with long extension
1/4" wabbley
5/16" socket
#15 torx bit.

Put a piece of electrical tape on the end of the torx bit and jam it in the socket.
this will keep it in there when you tip it downward.

Gface12.jpg


THen you can remove the upper screws.
the lower screws you don't need the wabley.
Gface13.jpg


My tach was off and speedo was just above 0 at an idle.
With the car running, I pulled them off and adjusted them where they needed to go.
I'm not sure about the fuel, but to fix this, I would guess I could fill the tank, and set it at the full mark.
Gface15.jpg


put the bezel back on the same way, and you can use a telescoping magnet to start the lower screws if you don't have a magnetic torx bit.
Gface14.jpg


put the trim back on, and your good to go.

Also notice how the light isn't very uniform across the gauges. it's brighter on the ends, where the bulbs are.
Not much I can do about that.

I'll get some finished pictures up soon, I'm also messing with the radio/AC area of the dash.
More to come on that.
 

CanaryGT

Well-Known Member
Joined
May 22, 2006
Messages
3,689
Reaction score
2
Location
Phoenix
Hey, DO you notice an inconsistant light output through some of your numbers? Cause mine are brighter on the bottom and on top they get less bright...
 
OP
OP
Dalamar

Dalamar

Post Whore
SN95 Supporter
Joined
Feb 3, 2006
Messages
13,863
Reaction score
124
Location
SLC, UT
yes, it's dimmer in the center of the gauges, and brighter towards the outside, where the bulbs are.
 
OP
OP
Dalamar

Dalamar

Post Whore
SN95 Supporter
Joined
Feb 3, 2006
Messages
13,863
Reaction score
124
Location
SLC, UT
I've got an idea on what to do about that.
 
OP
OP
Dalamar

Dalamar

Post Whore
SN95 Supporter
Joined
Feb 3, 2006
Messages
13,863
Reaction score
124
Location
SLC, UT
I'll post it up, if it works... :tongue3:
 

CanaryGT

Well-Known Member
Joined
May 22, 2006
Messages
3,689
Reaction score
2
Location
Phoenix
Mhmmmm. It better. Oh and I should be sending you your money tomorrow. My check better come in by then or Im gonna have to go kill someone..
 
OP
OP
Dalamar

Dalamar

Post Whore
SN95 Supporter
Joined
Feb 3, 2006
Messages
13,863
Reaction score
124
Location
SLC, UT
cool deal man!

Should work, I just need to figure out what to spray it with....
 

CanaryGT

Well-Known Member
Joined
May 22, 2006
Messages
3,689
Reaction score
2
Location
Phoenix
Dude I wanna know what the hell you are doing now.....

The suspense is KILLING ME!
 

CanaryGT

Well-Known Member
Joined
May 22, 2006
Messages
3,689
Reaction score
2
Location
Phoenix
Oh that and I want your coilovers so my car can handle okay....
 
OP
OP
Dalamar

Dalamar

Post Whore
SN95 Supporter
Joined
Feb 3, 2006
Messages
13,863
Reaction score
124
Location
SLC, UT
thanks Matt

I need to shoot some but I'm messing with the center console. I changed the bulbs in my AC controls also.
I'm going to try and spray the outside edges of the dials in an attempt to even out the glow a bit. they're brighter on the edges - where the bulbs are.
 
OP
OP
Dalamar

Dalamar

Post Whore
SN95 Supporter
Joined
Feb 3, 2006
Messages
13,863
Reaction score
124
Location
SLC, UT
does anyone have their stock GT gague faces? I'd like a picture of the back of them...
 

Latest posts

Forum statistics

Threads
77,520
Messages
1,504,219
Members
14,988
Latest member
Carolinastang78

Members online

Top