2slo95fiveOhs 1994 GT rebuild...UPDATE 5-2! Forged shortblock, fuel upgrades!

OP
OP
2

2slo95fiveoh

Well-Known Member
Joined
Dec 31, 2006
Messages
2,559
Reaction score
4
Location
Lawrence, Kansas
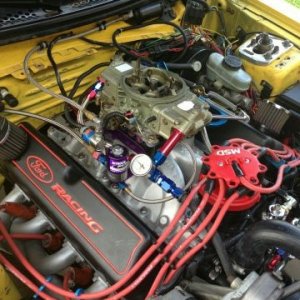
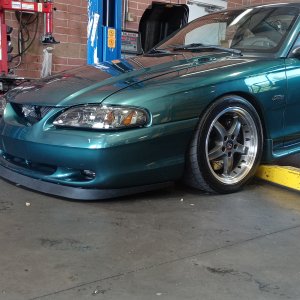
Well the more I thought about it and talked with a couple guys at work, I started fearing that the valve lash wasn't properly set, since I was getting so much excess noise resonating through the upper intake manifold. These suspicions were confirmed this evening when I took the valve covers off and found just about all of them with excess lash, two of which were concerningly loose. So I went through, turned the engine over by hand, and set the valve lash to 1 turn past zero lash (as specified by anderson motorsports), and triple checked them all after adjusting. I got it all put back together, and installed the new bearing in the supercharger tensioner pulley and put it back on (even though I plan on installing a smaller drive pulley when they arrive)..
I plan on starting it up tomorrow and seeing how it runs, if it sounds as good as I'm hoping, then I will be taking a video. If I'm really on the ball I will pick up my brake line parts and start that fabrication.
 

ProKiller

Well-Known Member
Joined
Jan 27, 2006
Messages
3,070
Reaction score
200
Location
PA
interesting...i didn't know AFM reccomended 1 turn. that would have been nice to know 6 months ago when i was having the same issues. i ended up doing a full turn in the end just to quiet it down, but that would have saved me a lot of heartache.
 
OP
OP
2

2slo95fiveoh

Well-Known Member
Joined
Dec 31, 2006
Messages
2,559
Reaction score
4
Location
Lawrence, Kansas
interesting...i didn't know AFM reccomended 1 turn. that would have been nice to know 6 months ago when i was having the same issues. i ended up doing a full turn in the end just to quiet it down, but that would have saved me a lot of heartache.

Yeah, although I thought I did that when I was assembling my engine, I re-did it last night, and it was too tight, not allowing the valves to close. So I RE-re-did it today, only 1/3 of a turn, and it runs like a beast..
 
OP
OP
2

2slo95fiveoh

Well-Known Member
Joined
Dec 31, 2006
Messages
2,559
Reaction score
4
Location
Lawrence, Kansas
Beautiful car. It looks more like a show piece. You got some mad skills.

Thanks for the kind words.. My intentions when building this were to have a fun, 400-500rwhp street car that can hold its own at the drag stip, as well as a car show. I didn't build it with anything specific in mind, just kind of a "well-rounded" functionality to it.. I don't expect it to take home car show awards, or be the fastest car with this combination at the strip, but I do expect it to make me very happy.
 

Mrstangerbanger

Well-Known Member
Joined
Jan 14, 2011
Messages
1,249
Reaction score
29
Location
CHICO , California, United States
Been there done that 500 times and I knew that was the problem because with those heads and rockers there is always noise when you have never done it before .. glad u fixed it :eek:

Sent from my SGH-T999 using Tapatalk 2
 
OP
OP
2

2slo95fiveoh

Well-Known Member
Joined
Dec 31, 2006
Messages
2,559
Reaction score
4
Location
Lawrence, Kansas
Those are the numbers I'd like mine to be. 450-500. Can't wait for your dyno results


I'm very curious to see what it puts down. I have seen very similiar setups to mine put down anywhere from 440rwhp to 514rwhp.. The 514rwhp is not a realistic goal IMO, considering that was produced by anderson ford motorsports, advertising for their cam (that I have), so I'm sure their tuning is more agressive than I will have, even though their combination is almost exactly the same as mine:

Anderson
Ford Motorsport Stage II S-Trim, Stock short block, TFS Heads,HOLLEY SYSTEMAX intake 42# Injectors,75mm T/B, Pro-M 80MM,,AFM B31 camshaft,1.6Roller Rocker , BBK 1.625"Header,BBK off road ,Flowmaster 3 Chamber Cat Back 514rwhp/481 ft/lb

So we'll see what kind of numbers I will get, I do want it to have great reliability though.
 
OP
OP
2

2slo95fiveoh

Well-Known Member
Joined
Dec 31, 2006
Messages
2,559
Reaction score
4
Location
Lawrence, Kansas
UPDATE
I just got back from a week long vacation (much needed), so the car didn't get a whole lot of attention. I did start working on the brake line fabrication tonight. I have all the fittings figured out, lines cut and bent, and line-loc bolted down. Tomorrow I will flare the lines, connect them all, bleed the system, and hopefully wire up the line-loc/switch/light.
Pictures to come..
 
OP
OP
2

2slo95fiveoh

Well-Known Member
Joined
Dec 31, 2006
Messages
2,559
Reaction score
4
Location
Lawrence, Kansas
Whew...
I didn't realize how long it has been since I posted on this thread until I saw the date (almost two months ago!), and the fact that my build thread was moved all the way back to the 4th page. Ha.
But, I did get a LOT of work done on it, and the several pictures included will show it.

First off, I got my blower inlet pipe made, fitted, painted and installed. I wanted something that flowed near the same as the Power Pipes, but without the cost of one. Another thing that bothers me on the Power Pipe setups is the way the hose routing is for the bypass valve. I think it looks kind of out of place, and it sticks out like a sore thumb to me. So I designed my own, and a buddy of mine that works at an exhaust shop bent and welded one up for me out of 3.5" diameter steel.
20121227_223806.jpg

Picture_094_zpsba2ec7c8.jpg


You can see how close it is to the headlight panel in this pic. When I go to the track I will probably remove the pass. side turn signal and headlight for a little increased airflow:
20130314_150927_zps3237328f.jpg


I also finished cutting, bending, and flaring my new brake lines.
I built new lines for:
Prop Valve-to-Line Lock (fronts)
Prop Valve-to-Rear brake junction (on RF side of car)
Line Lock-to-LF caliper hose
Line Lock-to-RF caliper hose

Line Lock installed (I still need to do the wiring)
20130314_152517_zpsb2a8b4e2.jpg


RF and Rear junction brake lines running in factory location:
20130314_152532_zps1483e882.jpg


Where I started today:
(Needed to finish the wiring for my HIDs (Headlights and foglights), attach a few loose ground wires, connect the airbag sensors, attach hood latch and cable)
20130314_145407_zpsc5af538c.jpg


A quick engine shot:
20130314_145416_zps0282c46b.jpg


Overall shot of the car: (After I was done working for the day I cleaned and organized the garage, it was getting a bit messy. Nevermind the stripped down moped, that is a long-from-completion project all on its own.)
20130314_145427_zps1fa8facf.jpg


A while ago I bought a universal coolant overflow tank to clean up the engine compartment. I finally got around to installing it:
20130314_162436_zps4d5fcce8.jpg


After various wiring and header panel installed:
20130314_170028_zps76b5b8a0.jpg


I will probably buy some sort of aftermarket radiator shroud and carefully cut an access hole above the overflow tank, but that can wait for a little bit.
 
OP
OP
2

2slo95fiveoh

Well-Known Member
Joined
Dec 31, 2006
Messages
2,559
Reaction score
4
Location
Lawrence, Kansas
Another thing I have been wanting to do for a while is shorten the length of my spark plug wires. I have always used Ford Racings 9mm wire set on every 5.0 I've owned, and other than burning one on the exhuast several years back, I haven't had any problems with them.
So I tracked down some 9mm terminal ends (Accel) and a really nice quality igntion wire crimper (Taylor), both from Summit Racing.
I love this effin crimper. This thing does everything I need for ignition wires. It cuts the insulation off, crimps the terminals together, and it's ratcheting, so you don't have to do the "Push a pair of pliers together while hunched over" trick.

What I started with (WAY too much slack for me..):
20130314_171301_zps5154540e.jpg


Cut to length:
20130314_173259_zpsc0df487b.jpg


Using the crimper tool, cut the insulation off:
20130314_173329_zps4de3d02c.jpg


Bare wire exposed:
20130314_173418_zps993315d6.jpg


Fold the wire over and lightly pinch the terminal end with a pair of regular pliers:
20130314_173503_zpsd349cb63.jpg


Use Handy-dandy crimper tool to fully crimp terminal end around wire:
20130314_173533_zpsbf7b5ad0.jpg


The result:
20130314_173652_zpsee9464ac.jpg


After doing the rest of them, this is the final product (much cleaner):
20130314_175532_zps21a3d00d.jpg


Various length comparison for the amount of wire I removed. #8, as you can see, had a ridiculous amount of extra:
20130314_182930_zps3cadbe06.jpg


A while ago I finally got the initiative to go through the warranty process with Mishimoto to get my radiator replaced (I bought the previous one WAY back in 2008). The whole process was pretty painless. I didn't have the original reciept, so I called American Muscle (who I got it from), and they emailed me a copy of the reciept right away. The replacement radiator was delivered a few short days after I emailed all the paperwork..
I had heard that they redesigned the radiators and the way they were mounted.. that sure is an understatement!
The replacement looks so much more solid and durable. I'm anxious to see how the cooling is with this sucka.
20130314_192455_zps8e3268ea.jpg


Installed: (I definitely forgot how much room it takes up..)
20130314_193505_zps43070ef8.jpg


Thats about all I got done today. Early next week (Spring break, so no school to worry about) I plan on installing the upper and lower radiator hoses, cooling fan, front bumper, headlights, wiring the line lock, and adjusting the front coilover height. Then bolting the wheels on it, and driving it out of the garage (onto the driveway) to check out how it looks in the sun.

Questions/Comments welcome.
 
OP
OP
2

2slo95fiveoh

Well-Known Member
Joined
Dec 31, 2006
Messages
2,559
Reaction score
4
Location
Lawrence, Kansas
^ Thanks for the kind words

UPDATE!
I got some more stuff done on the car tonight. I installed my supercharger bypass valve and respective hoses. (The vacuum line to it was installed after these pics were taken.
20130318_203632_zpsc6e838a7.jpg

20130318_203638_zps4c52b238.jpg


Then I moved onto putting the upper and lower radiator hoses on with new clamps, installing the cooling fan, and installing the coolant overflow hose.
Man does that fit fairly 'tight' in there. I attempted to 'clock' the cooling fan motor so the plug would be pointing down towards the passenger side, but parts of it were maybe 1/8-1/4" away from the water pump pulley bolts, and that is too close for comfort for me. So I will lengthen the wiring for the cooling fan motor plug here in the next day or so.
20130318_215345_zps38935c36.jpg

20130318_215352_zps1f6f9761.jpg


After that I tied up some smaller electrical wiring jobs, such as lengthening the a/c compressor plug, and lengthening the power wire for the HIDs hi-beam relay. I still need to wire loom and zip tie those, and a few other wires in the front of the car, so I will do that in the next couple of days.
My goals for this week are:
-Adjust front coilover ride height
-Lengthen cooling fan wiring (need to buy larger gauge wire to do so)
-Wire the Line-lock (I plan on installing the button in the ashtray location)
-Install clutch cable
-Top off all fluids
-Install front bumper
-Install headlights
-Pull the car out onto the driveway and take a few pictures/video.

Depending on the weather this week (supposedly we will see snow on Thursday), the last task of that list may not be achieved, but I hope to get the rest of it done while I'm on spring break.
Questions/Comments welcome
 
OP
OP
2

2slo95fiveoh

Well-Known Member
Joined
Dec 31, 2006
Messages
2,559
Reaction score
4
Location
Lawrence, Kansas
UPDATE.
Well I got the cooling fan wiring lengthened the other day, that is some big effin wire (I think 8 or 10 gauge) to solder! Needless to say I got it done, heat shrink tubing applied, wire loom and electrical taped up. Either today or tomorrow I will probably organize/tie up all of the various loose wires etc for cleanliness purposes. Then perhaps attempt at setting my coilover ride height, although my coilover kit (bought new) didn't come with a spanner wrench, so I am curious if I will be able to turn the adjuster much just 'by hand'.. I will double check the installation instructions for any mention of using that wrench, but I would think if it is required that it would come with their kit.. I will have to find out I guess.
 

jwhisl

Active Member
Joined
Dec 28, 2012
Messages
372
Reaction score
3
Location
Oklahoma
Wow man, that is one serious project! That's also a serious garage setup. I'm diggin the Ford Racing banner!
 
OP
OP
2

2slo95fiveoh

Well-Known Member
Joined
Dec 31, 2006
Messages
2,559
Reaction score
4
Location
Lawrence, Kansas
^ Thanks. 2 years in the making but this is the final stretch.
The banner was a last minute purchase idea from Late Model Resto, it popped up for an 'ad' on their website while I was in my 'shopping cart' ready to check out, so their publicity worked on this guy! And don't forget about the Ford Racing fender covers.. My fenders would be effed by now if I didn't have them..
 
OP
OP
2

2slo95fiveoh

Well-Known Member
Joined
Dec 31, 2006
Messages
2,559
Reaction score
4
Location
Lawrence, Kansas
UPDATE!
I got a lot of small odds and ends done this afternoon. My list of 'to-dos' is getting smaller and smaller each time I work on it, the anticipation is starting to build.
What I did:

-When I originally installed my coilovers a few months back, I didn't screw the bottom spring perch up that much (4x4 stance FTL), not thinking about the dynamics of the springs in relation to the low ride height I want. Today I screwed them up (compressing the spring) as much as I could with my hands, but I think a spanner wrench is going to be necessary for me to get the ride height I want. I'm kind of annoyed that the Maximum Motorsports kit didn't come with one, but I can still buy one from them for $10, so perhaps I will just do that.
-I used the 'zip-tie spark plug wire loom' trick on my drivers side, which I think cleans it up nicer than the regular wire loom..
regular loom:
20130314_175532_zps21a3d00d.jpg

Zip ties:
20130325_174040_zpsb5ff8063.jpg


-I continued the zip-tie kick and secured a bunch of wiring loom, connectors, etc. This is the only picture I snapped, but I did it in multiple locations on the front end:
20130325_182242_zps1949f841.jpg


-Then I directed my attention towards my line lock wiring. Since I am not a smoker, I thought the idea of mounting the line lock activation switch in either the cigarette lighter location (prefered), or the ashtray location would be a cool idea, and with the lid closed very 'secretive'.
What I started with:
20130325_191950_zps274f3023.jpg

I picked up a small round shaped button with a built in indicator light at a local parts store, and after figuring out how to dismantle the cigarette lighter, removing it, then using my dremel to remove a slight amount of material, the button slid right in. Then I cut the 'cigarette holder' portion off of the ashtray, cleaned it up, and shot it with some spray paint to still use as a small storage area for coins, etc. The finished product:
20130325_201716_zps1c1312d3.jpg
 
OP
OP
2

2slo95fiveoh

Well-Known Member
Joined
Dec 31, 2006
Messages
2,559
Reaction score
4
Location
Lawrence, Kansas
I still need to look up some wiring diagrams for the cigarette lighter and see if I can use its power and ground for the line lock switch (very convienent)
-Next, I moved to one of my least favorite eye-sores under the hood of my car: The ignition coil. I have always liked MSDs cap/rotor kits, coils, and ignition boxes, but damnit why do they have to be bright ass red! haha. Anytime I looked at an engine picture of my car I felt like my eye was immediately drawn to the red ignition coil. So I took it off, sprayed it with some high temp black paint and clear, and man what a difference did it make for the overall 'look' under the hood.
Before:
20121128_114001.jpg

After:
20130325_202707_zpsa0c90e55.jpg


-Next I FINALLY got around to installing the clutch cable. I forgot how big of a p.i.t.a it is to do it by yourself when the cable keeps coming off the quadrant while you're underneath the car, so I finally temporarily zip-tied the cable in position onto the quadrant, and that small task was complete.
After install:
20130325_210129_zpsb0f92c56.jpg


-Also today when I was poking around up front I started inspecting my charcoal canister. I discovered a small crack on the top of it, and a few of the hoses looked like they had seen better days, so I ordered a new one from a local parts store, and I will pick it up tomorrow. There was one line coming from it that wasn't connected to anything, I'm not sure if it was smog pump related or what, but I need to look into that.
-The only things left under the hood now are cruise control, wiper cowl, and a/c. I gathered up new O-rings for every component in the a/c system, and after I flush the lines and condenser, I will install it on the car (unfortunately it will slightly clutter up the nice engine bay, but it's the price I will live with for that creature comfort).
-I hope to get the front bumper and headlights installed within the next few days, I am very anxious to see it all put back together. Then I may bolt the wheels on to get an idea of where the ride height is. Either way I have a feeling I should just buy the spanner wrench, but just so I know.
As always, Questions/Comments welcome.
 
OP
OP
2

2slo95fiveoh

Well-Known Member
Joined
Dec 31, 2006
Messages
2,559
Reaction score
4
Location
Lawrence, Kansas
UPDATE!
I didn't get a lot done today time wise, but pretty big accomplishment in my book.

-I purchased a steeda air/oil seperator a few months back before doing the necessary research to determine that it was not the best solution for my potential increased crankcase pressure.. So after some looking around, and talking to a couple buddies with forced induction cars, I decided that an oil catch can would be the best fix in place of the pcv system.
I scored this oil catch-can setup off ebay for $30. All I need now is to buy the necessary fittings to attach the hoses too, and figure out where I want to mount it and it will be all set.
20130326_185400_zpsd82049b6.jpg


-I noticed that my factory hood "bumpers" on the radiator support were missing the rubber cap, and it slightly bothered me that I forgot to remove them prior to paint, so they were body color (not supposed to be). So I bought new ones for $13 for the pair.
20130326_184422_zps9f87451a.jpg


-FINALLY I got around to installing my front bumper and headlights together. The only issue I ran into was where I mounted my coolant overflow tank is slightly in the way of the drivers side headlight adjusting 'stud'. So I will need to troubleshoot that. Also, the hood doesn't seem to be fitting very well. It was starting to get dark out, and I had other obligations, so I didn't have time to mess with the fitment, but this is the (rough) completed progress:
20130326_193349_zps63240d80.jpg

20130326_193414_zpsd213ac1e.jpg


School is starting to pick back up, so I'm not sure if I will get a ton of progress done within the next week or so, maybe an hours worth of tinkering every other day or something. The hood fitment issue is really bugging me though..
 

Latest posts

Forum statistics

Threads
78,555
Messages
1,536,138
Members
16,201
Latest member
jgib8795

Members online

Top