MXProbeStang Build: continued...

GTTRacing97GTS

New Member
Joined
Feb 15, 2019
Messages
30
Reaction score
32
Been years since I posted on this project. I started out on The Source forums but things soon died out and I just stopped updating the build thread.

Here's the link to the original thread, if allowed: https://www.sn95source.com/topic/5902-mxprobestang-build/

It's been 7 years and honestly, not a whole lot has changed with the car until recently. I moved, kids grew up, house projects, so the car just kind of hung out in the garage, maybe seeing the road one or two days a year.

This fall I finally bit the bullet and finished the turbo setup. I bought a used hot side, like, 7 years ago, believed to be from a 94-95 car. Was supposed to fit with all factory accessories so I figured it wouldn't need too much massaging. Maybe a new crossover pipe since I have subframe bars coming forward off the K-member.

I dropped the car off at my friend's shop to do the fabricating. I can't weld, and he's amazing. Turns out, pipes must have been from a fox body, because all of it had to be modified. Nature of the beast I suppose. After about 2 months, it's all on and finished, and I brought the car home to continue the rest.

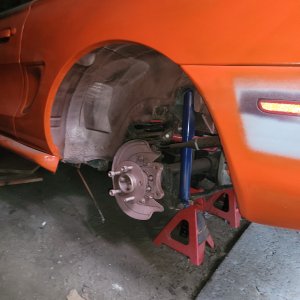
That's where I am at now. I have a lot of stuff to do in order for it to be truly drive-able and road ready. I'll leave a picture of the engine bay before the turbo went on, and I'll update as I get time going forward. Check out the link to the original build thread if you want to get caught up.

IMG_5978.jpg
 

wmfateam

Active Member
Joined
Aug 23, 2013
Messages
933
Reaction score
334
Location
Gilbert, AZ
Heading over to SN95source now! I always wanted to rear wheel drive swap a Probe after watching all the Pro Stock Probes back in NHRA.
 
OP
OP
GTTRacing97GTS

GTTRacing97GTS

New Member
Joined
Feb 15, 2019
Messages
30
Reaction score
32
Took the car to Nick @ North Performance in Mohnton. Shop is pretty much at the end of the track at Maple Grove. He does some awesome welding and fabricating. It became apparent pretty quickly that the hot pipes I had would not fit. I bought these specifically for minimal modifications but like everything else custom, wasn't even close.

IMG_7545.jpg

The awful front bracketry of the 94-95 5.0 was the first problem. The enormous brackets didn't leave much room to maneuver, and I only run an alternator anyhow, so we decided to ditch the driver side all together and modify the passenger side.

IMG_7561.JPGIMG_7568.JPGIMG_7567.JPG

The passenger bracket was cut to eliminate the smog pump delete pulley, which opened up space for the collector header to fit. Just had to source a new belt for the Alt/WP/Crank and everything was good to go.

IMG_7560.JPGIMG_7592.JPGIMG_7594.JPGIMG_7595.JPG

Both headers needed to be modified, and the mid-pipe had to be fabbed from scratch because of this. Kind of defeated the purpose of buying the hot pipes to begin with. Lesson learned I suppose.

IMG_7596.JPG

This is pretty much where the snowballing began though. This was not my intentions when setting out with the turbo install. I planned on just fabbing it up, hitting the dyno and driving it for the summer. However, I don't like going back and redoing things but every step leads to another, and yea... Here we are.

I never really perfected all the swap components once I started driving it. Most of it is still that initial "rigging" to get things to fit, or work, or hold me over; wiring all over the place, hoses pieced together, rough bracketry, etc. etc. The turbo install has been the nudge to "finish" all the stuff in a more "professional" manner. I enjoy the work and all, I just don't have endless time to work on it. Hopefully this won't take me all summer and hopefully it's enjoyable for everyone to follow along.
 
OP
OP
GTTRacing97GTS

GTTRacing97GTS

New Member
Joined
Feb 15, 2019
Messages
30
Reaction score
32
The downpipe turned into the next roadblock. There are braces between the firewall and strut tower to reinforce that area and it was blocking any route for a traditional downpipe to go. Nick even tried with an oval pipe and just could not maneuver it correctly. I really did not want to do a hood exit or fender exit exhaust. Even though it will reduce some strength there, we decided to remove that brace. I don't drive the car hard enough or often enough to be concerned and I'd rather a traditional rear exit exhaust.

IMG_7597.JPG
IMG_7621.JPG
IMG_7637.jpg

For now it's just tied into the existing exhaust. I still have old Flowmaster mufflers on it, but I plan on ditching them and trying to duplicate the IRS tail pipes from a New Edge Cobra. Not sure if it'll end up looking like I hope, but we'll cross that bridge in a little bit.

Hood latch mount bracket had to be modified so the intercooler could fit properly. Ended up doing 2.5" intercooler pipes. They seemed to fit better and we didn't think I would need 3" at this point. The motor isn't "built", I'm still running a stock Miata LSD rear, I don't have a huge turbo and won't be running a lot of boost for now. I may end up regretting this decision, but again, not going to second guess things now.

IMG_7615.JPG
IMG_7658.jpg
IMG_7659.JPG


IMG_7661.jpg

Next obstacle was the hood. I never ran an intake or air cleaner on it, so the hood always fit fine. Now with the carb hat and IC pipes, the hood was just not tall enough. I kind of always knew that, just kinda hoped I was wrong. Nick did a nice job cutting for it to fit.

IMG_7667.JPG
IMG_7669.JPG

Just need to finish up some small odds and ends and then fire it up. I'll be bringing it home to finish the rest of it.

IMG_7670.jpg
 

ttocs

Forum's #1 poster
Joined
Oct 9, 2009
Messages
37,642
Reaction score
7,760
Location
Evansville Indiana
who would have thought space would be tight under there when ya pack 10 lbs in a 5 lb bag? But it should be a fun ride, sign me up if you ever make it to indiana...
 
OP
OP
GTTRacing97GTS

GTTRacing97GTS

New Member
Joined
Feb 15, 2019
Messages
30
Reaction score
32
I’m really slacking with the updates here and I didn’t take nearly enough pictures but a run-down of what’s been going on. I'm about 5 months behind here so just playing catch up:

I drove the car on and off the trailer, but the wastegate and blow off valve weren’t even hooked up. Just had it to the point I could move it around. Once I got the car home and in the garage, I started dismantling the front end. Fenders and bumper both came off and I decided to pull the headlight assemblies as well. Figured while the car is down anyhow, might as well spruce them up. You’ll notice as I go along that this becomes a common theme throughout, this snowball effect of unplanned work.

The “chrome” plastic bezels were all pitted and the reflective chrome was pealing apart. All the mounting brackets were still just bare metal also. Never really finished them off nicely.

IMG_7793.jpg

IMG_7789.jpg

IMG_7790.jpg

I painted the bezels black and the mounting brackets white to match the car. With everything apart for painting, I took this opportunity to install some retrofit LED switchback halos to the outer projector. Needless to say, I think they turned out great. Not perfect by any means, but I’m content with them.

IMG_8171.jpg
IMG_7792.jpg
IMG_8173.jpg

I pulled the driver side & passenger side harnesses so I can tuck them in the fenders. Made a bracket and mounted the fuse box under the driver side headlight behind the bumper. Fit is pretty good but I extended the alternator harness and the positive battery cable. Rewrapped the alt. harness with nice braided split loom. Passenger side harness didn’t require any modification. I did realize though that I never ran an IAT sensor. The IAT harness is part of the MAF harness which I removed when I installed the MSPNP2. So I extended the IAT sensor wiring at this step and ran that through the fender. Finally, took the opportunity to reinstall the factory Probe coolant tank while the fender is off. I didn’t have one before, just a hose dumping to the ground. Now it's all tucked away and can properly recirculate.

IMG_8218.jpg
IMG_8217.jpg
IMG_8219.jpg

More to come:
 
OP
OP
GTTRacing97GTS

GTTRacing97GTS

New Member
Joined
Feb 15, 2019
Messages
30
Reaction score
32
Replaced the red underdrive pulleys with polished. Fabbed all new silicone radiator hoses. Lower/driver side hose had all kinds of reducers and clamps and metal pipes and was kind of in the way of the IC pipe to begin with, and I was tired of the blue upper hose. It’s now all black and all silicone, no rubber anywhere.

IMG_8435.jpg
IMG_8210.jpg

Installed an Innovate SCG-1 boost controller/wideband gauge and ran all AN lines to the wastegate. Tucked the solenoid wiring in the passenger fender also. Running a new wideband sensor just to be safe. While I was at it, I installed AN hose to the blow off valve and to a newly installed vacuum block.

IMG_8438.jpg
IMG_8439.jpg
IMG_8440.jpg

Installed an Innovate EGT gauge into the driver side header and tucked the probe wiring in the fender. Wrapped the harnesses that are close to the hot pipes while I was in there. Wrapped the downpipe and installed the turbo blanket and plug boot sleeves just for good measure also.

IMG_8441.jpg

to be continued:
 
OP
OP
GTTRacing97GTS

GTTRacing97GTS

New Member
Joined
Feb 15, 2019
Messages
30
Reaction score
32
Sold the Racepak dash. I was never able to get the Racepak to communicate correctly with the MSPNP2. Going with a piDash this time in a 3D printed bezel.

image1.JPEG

Reinstalled the factory Miata booster hose with a check valve. Just had a piece of vacuum line before, but with boost now, I wanted to make sure that check valve is in place. Spliced my existing hose onto this one.

Removed the injector harness and rewrapped it all. Installed FIC 775cc injectors at this point also. Threw in a Walbro 355lph fuel pump.

IMG_8200.jpg
IMG_8457.jpg
IMG_8458.jpg

Installed new valve covers and replced the hardware with ARP and billet vertical loom brackets. Alternator hit the Ford Racing covers, so I had to space the alternator bracket, crankshaft and water pump pullies to clear the valve covers.

IMG_8342.jpg

Fabbed up a catch can setup with a custom bracket I had made locally. The loom keeps the wires off my headers and away from the downpipe on the passenger side. I shortened all the plug wires and added the correct ends for the MSD cap. Got a new MSD coil on there with a new bracket as well. Installed an angled oil filter adapter at this point so the filter wasn't sitting against the header.

IMG_8359.jpg
IMG_8361.jpg
IMG_8360.jpg
IMG_8392.jpg

to be continued:
 
OP
OP
GTTRacing97GTS

GTTRacing97GTS

New Member
Joined
Feb 15, 2019
Messages
30
Reaction score
32
Slacking with the updates, but got her going finally and off to the dyno she went.

Don't know if this works or not... Not really good at the whole Youtube thing:

 
Last edited:

Latest posts

Forum statistics

Threads
78,528
Messages
1,535,659
Members
16,185
Latest member
dmen76

Members online

Top