My Neglected 94 GT vert

Slice

Member
Joined
Feb 26, 2023
Messages
111
Reaction score
50
Location
Toronto Canada
Yeah just find someone that scrapping a 99/04 model. There are some nuances though. When you get the cup holder you need to trim off the rearmost tab otherwise it will push the cup holder into the trim ring around the shifter. Also the profile is ever so slightly different and you need to sand down the back of that cup holder so that it is flat rather than curved. I think I'll make a posting on these details but here are a few photos to show what I mean.

20230328_171859.jpg20230328_172111.jpg20230328_181256.jpg
 
OP
OP
b1pig

b1pig

Active Member
Joined
Jul 15, 2022
Messages
309
Reaction score
326
Sorry to hijack the thread but where did you get the cup holder that goes where the ashtray is?
Not a hijack at all.

It was in the car when I bought it.
I wouldn't bother with it unless you always drink from a 12oz can and you want your car to be 100% original. Outside of that it's worthless.


As soon as my camper, Ranger, Polaris, kids, wife, dog and farm stop robbing my bank (yes, since its mine that makes it piggy bank)...... I'm going to cut the console and install the later one as pictured by others. MUCH lower in the console and will fit a more suitable American sized drink.
 

NEW EDG

Active Member
SN95 Supporter
Joined
Aug 3, 2019
Messages
731
Reaction score
967
Location
NoVa
As soon as my camper, Ranger, Polaris, kids, wife, dog and farm stop robbing my bank (yes, since its mine that makes it piggy bank)...... I'm going to cut the console and install the later one...
So what I read here is this project is never happening lol
 
OP
OP
b1pig

b1pig

Active Member
Joined
Jul 15, 2022
Messages
309
Reaction score
326
Oh, it will. Eventually.

I spent the day working on the Ranger. Found a broken ground wire that was causing the fuel pump not to work. Or anything else for that matter. Got that sorted... listed it on FB. It's the oldest thing we own and it has to go. I oughta be getting a super low fleet rate on my insurance. Hopefully, things will work out.

Drove my Jeep to pick my daughter up from a BD party and found that both front brake rotors are dragging on it now. Debating on parking that one for a little while and putting a few bucks into the Mustang this time.
 
OP
OP
b1pig

b1pig

Active Member
Joined
Jul 15, 2022
Messages
309
Reaction score
326
Finally got around to it. Saw one at a slightly discounted price due to it's sun faded shade. I'm cool with that. This car isn't showroom straight anyway. It fits the rest of the car with wear & tear and life use. So I ordered it. came in yesterday.

Got home after church today and took the body saw with a med tooth scroll blade to the center console and got rid of the smoker's trash hole.

1699223571541.png


After ALL of the fine trimming and shaping with the dremel... small coarse sanding drum.
1699223696238.png

Yes, I did leave the rear tab on the cupholder. I decided that between the two front clips and the rear tab, the friction fit between them SHOULD keep the cup holder seated in the console without having to use any adhesive. Just going to give it a run and see what happens.

Final fit....

1699223877648.png

Haven't taken the car out to put them to the real world test yet... but I'm happy with the result. Only cost me $30 for this one. Others are $40 on ebay. I used to see them all the time, but they're getting a little more rare. Seeing this one pop up a little lower made me snap it up. Glad I did. Wish I hadn't waited this long... but here we are.
 
OP
OP
b1pig

b1pig

Active Member
Joined
Jul 15, 2022
Messages
309
Reaction score
326
After whining about not wanting to be "that guy"...
I went to a local upholstery shop and still tried not to be "that guy".

After some digging, one of the ladies was able to find the material officially in their binder for the 1995 year models. It is exactly what is in my car.
1700001997448.png

So far, I've found ONE supplier of this material and it aint cheap. $52 a yard? :eek:

I'm going to let the local lady call me back with a quote later this week, but they're already at $500 labor on her estimate without factoring the materials. On a side note, I'm on my work computer at the moment... which has multiple monitors. Man what a difference monitor quality and settings make.

Anyway.
I'm betting that the $1200 cost and me doing the installation is going to be the way I go. Man, what a dilema.
 

96blak54

Moderator
Staff
Joined
Feb 21, 2011
Messages
10,043
Reaction score
2,884
Location
In the shop
I have an uncle that did upholstery back in his prime. I remember his shop was literally wall to wall, floor to ceiling with rolls of fabric. I dont remember him tackling any auto work, but thats not to say he didnt. He was always busy. Anyhow, what im getting at here is check with as many upholstery shops you can, they may have a roll of the fabric you seek at the bottom of their pile.
 
OP
OP
b1pig

b1pig

Active Member
Joined
Jul 15, 2022
Messages
309
Reaction score
326
Lady called back. They found a source with the exact material in hand at $80 a yard. They have 10 yards... which now she thinks I would not need all of that... But she did throw out the 10 yard estimate yesterday. So, if I went with that, and I'm roughly recalling their labor estimate, it could be around $1500. Roughly. She's waiting on another place to get back to her, but she warned me that each time she reached out to this supplier, it took two weeks for her to get samples from them.


Wife and I had a chat about it last night.
She seems to be supportive of the interior redo. She's onboard. Now I just need to figure out how ridiculous this is going to get. If I do it all myself, based on my last estimate I'm looking at about $2000 for a whole new interior. (front foam, covers front & rear, carpet and some trim bits) That's about 2/3 what I paid for the car.

Guess I'll wait it out a bit to see where this goes. If I don't go with the upholstery shop, once we have our annual tax stuff sorted out, I'll start buying bits to do the interior.
 
OP
OP
b1pig

b1pig

Active Member
Joined
Jul 15, 2022
Messages
309
Reaction score
326
Well.
I didn't wait too long.

Earlier this week, I sat down and started clicking boxes online. I had almost everything set to order, but saw a discrepancy in the carpet color. The "saddle" color was no longer on the list. I reached out to CJPony Parts, but they were very slow in responding. Essentially, "saddle" is no longer available according to them. One rep recommended I reach out to ACC directly about it. I'm seeing other online suppliers that carry ACC, and "saddle" isn't even an option, while others "LMR" still seem to list "saddle" as an option. I can't even find it on the ACC website.

So.
I ordered everything else. Today, I received both front seat foams, hogring kit, two seat heaters :cool: , electric seat rod/gear kit.
The upholstery order has been sent to TMI. Will likely be after the first of the year before I see that. I think I'm going to wait until I have the upholstery kit in hand and then request some sample material from ACC and go from there. Other than a few more trips to church, there won't be much happening with the car until January some time.

With luck, I'll have a couple hundred available to order the carpet. I plan to do it all at once. New seats. New carpet.
 
OP
OP
b1pig

b1pig

Active Member
Joined
Jul 15, 2022
Messages
309
Reaction score
326
After extensive searching, the OEM 94-98 antenna base is not only out of production, but NOS options have dried up. I started a search last night on FB for “SN95 part out” and found a few options within about 80 miles of me. Actually the closest guy was the one to answer. He offered me the complete antenna assy for $25. Made my way out there this morning as I had to remove it myself. There was a nearly new Pioneer media stereo in the car. He let me have that for $25 as well.

Installed the whole bit this afternoon.
IMG_0080.jpegIMG_0081.jpeg


Afterwards, got a complementary flyover by the Airmen returning from deployment.

IMG_0086.jpeg


‘Merica!
 
OP
OP
b1pig

b1pig

Active Member
Joined
Jul 15, 2022
Messages
309
Reaction score
326
Seems like such a minor thing…. But now I can not only listen to the stereo, I can Bluetooth off my phone again. My wife will hate it… but oh well.
 
OP
OP
b1pig

b1pig

Active Member
Joined
Jul 15, 2022
Messages
309
Reaction score
326
I may have mentioned elsewhere... I had been waiting on my new upholstery to come in. I expected it to be here mid January, but it arrived before the new year. Between weather and life, I have had to put car work off. Until this weekend.

One of the things that encouraged me to put it off was that I had not ordered new carpet yet. Well wait no more. Turns out a 17 year old kid who "had" a Mustang.. no longer has one, but he had a new in box ACC carpet in black. When this came up, the money I planed to pay on my credit card... the wife said buy the carpet.

So, now. My interior.... is um... its and exterior. I pulled it all out Saturday morning.
1704676176310.png

A little ambitious as I didn't have the carpet in hand.... but hey. You can see how bad this carpet was.

1704676260201.png

Let me tell you.
There is nothing I found online about the back seat. It was an absolute pain in the butt. The material is glued to the foam. I didn't find any rear seat foam, but then again I wasn't really looking for it. Nothing told me it was glued to the cover. If I knew that I might have tried to actually find some. Peeling that material off without damaging the foam was fiddly. Doable... but fiddly.

1704676455270.png

1704676961955.png
1704676580237.png

I did try spraying some glue down in the cuts, but the OEM foam has no rods to tie the cover to.... so I just let it go. End results:

1704676956795.png
1704677036778.png

Upper rear seatback compared to recovered lower rear seat. You can see how flat it looks without rods in the roam to tie to. Still. Looks better than it did.
1704677166727.png

And with that done... that was my Saturday.
 
OP
OP
b1pig

b1pig

Active Member
Joined
Jul 15, 2022
Messages
309
Reaction score
326
There are two days in a weekend, right? Well not to disappoint, here ya go.

After church and driving 40 minutes away to get the carpet, I got home and got to work. I unboxed the new carpet and set it out with a heavy dose of febreeze.... let's just say there was an odor of an illegal substance clinging to the box. The carpet, not so much. But why risk it.

Since I have to replace the electric seat rods, the passenger side seat was the chosen one today. I didn't get started until around 3 anyway.
1704677857674.png
1704677645945.png
The upped was divorced from it's frame.... and joined with the carpet which is destined for the trash. In a lot of ways, the front seat is easier... and at eh same time harder than the rear. The upper was an absolute pain. And I mean that. My hands are sore. I'll feel it for days.
1704677855613.png
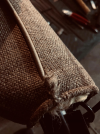
The new TMI foam has rods molded into the foam. Hog rings clamp the molded-in rods to the ones you insert into the upholstery. Also. I did mention that I was putting seat heaters into the front seats, right? Winters are cold. I'm also getting older and I can appreciate seat heaters in a car. Since I'm in essence rebuilding the seats, I may as well add something useful.

1704678139563.png

Above, you can see the seat heater stuck to the foam. What I don't have pictured is the rods hooked together. This process is covered in much detail in several videos on youtube. Honestly, those videos make it look MUCH easier than I had it. Right after I took this photo, it got real hard to make progress. The bottom of the cover is super tight. I struggled with it for a long time. Eventually it made it over the thickest part of the seat, which is around the release latch mechanism. Its housed in a plastic housing in the upper seat frame. The stress of it actually caused a small separation in the seam. I plan on loading that down with some super glue. That should harden the fabric and prevent any more separation. I am also going to reach out to TMI. Not really asking for anything... but they should be aware of it. If I can't stop the separation and it winds up tearing out, THEN I'm going to have to have a replacement.
1704678496114.png

Ultimately.... I got it taken care of.
The lower was easy compared to the upper. I had only one real issue. The plastic "clip" that secures the upholstery on one side was longer than there was room. That or there was a slight deviation in the material causing it to be forward of it's intended position. Everything was straight and even, so not an installation issue. I decided to cut the "clip" in a way that allowed me to secure it.

1704678757683.png

I cut a slit in the foam for the lumbar air line, then a small cut in the upholstery. I decided that I was NOT going to cut the upholstery for the heater harness to pass through, and I didn't feel like depinning the plug... so routed the upper harness around by the inner hinge bolt. The lower heater, I chose to run the harness through the bottom of the foam forward of the molded-in tab. This made it simpler, took some stress of running the line under the upholstery, cutting the foam more and making more pinch-points. You can see the lower harness poking through the foam to the left of one of the "6's" written on the foam in the photo above. This worked out well. You can also see where I cut the "clip" to secure the upholstery. It was a tight fit for sure.
1704679129823.png

For comparison, the finished passenger side seat next to the yet-to-be-new driver's seat. You can see the drastic difference between TMI's Saddle Tweed and the OEM. Looking at the pic, it does look like the upper material is lopsided at the top. I don't see that in real life with my eyeballs.

The junk pile so far..
1704679341878.png


Not sure how I'm going to attack the driver's seat. Steeda is doing a thing this weekend. I'm not planning on going anyway... but the idea did cross my mind if I get it done. We shall see. My bucket seat might end up being an actual bucket. LOL

And for the record.
The headrest was easy. Very easy. Almost too easy after dealing with the upper.
 

Attachments

  • 1704678699702.png
    1704678699702.png
    1.4 MB · Views: 3

96blak54

Moderator
Staff
Joined
Feb 21, 2011
Messages
10,043
Reaction score
2,884
Location
In the shop
Take pics of the "bucket" seat if it happens.

I like the progress! Its all going to look great when you get it back together
 
OP
OP
b1pig

b1pig

Active Member
Joined
Jul 15, 2022
Messages
309
Reaction score
326
I had a short work day today. Being as I already rearranged the garage, regardless of the crappy weather, I could work on the car a little today. Pulled the wife's Q3 out into the rain and got down to business.

I figured I would work on the carpet today. Too much day had gone by to bother trying to take the driver's seat on. Pulled all the stuff I had hastily stored in the car out and vacuumed the interior out. I had recalled there being a slight amount of surface rust on the rear floor. Not much and not serious. My memory had been a little soft. There was a lot more than I recalled. There was a bunch of the paint bubbled up that I hadn't really noticed while the floor was dirty. I put a wire brush to it and got all the loose stuff off the floor.

1705116196549.png

There were several spots where there was no rust, but the paint was no longer sticking to the car.
1705116312032.png

No worries. Scrubbed it all with the wire brush. Hit it with some carb cleaner (I'm out of mineral spirits, lacquer thinner and brake cleaner), wiped it down...... and sprayed all the the affected areas with some rust converter paint. I've had good experience with this stuff. Its cheap. Its effective. Since this interior stuff, its not that big of a deal. Used it on two other Jeeps and it lasted as long as I ever owned them. Once the paint was "dry", I got out the box of sound deadener and affixed it to the tinny spots on the floor.

1705116578881.png

This was some 50mil stuff. Pretty economical... but not as good as the stuff I used on my wife's last Audi and not as good as the original Dynamat that I used on some cheap junk I've had in the past. Still took most of the tinny sound away, so that'll have to do. I mean... its a convertible. How much sound can you actually mute in a convertible? :p

Once I got both sides of the floor covered to the level I thought mattered, I cut out the bolt holes for the seat and seat belts. Then... it was time to work on the carpet.

To start, I laid out the new and old side by side and made some comparisons. Then cut a couple of initial slits down the middle to gap the shifter and to slot the parking brake through. Then it was a tedious affair of compare, trim, adjust, trim, search/feel, trim, tuck, trim..... I got the holes trimmed out for the seats and seat belts, opened up the holes around the shifter and parking brake. The little bracket that the center console screws to... got those spots opened up and drilled the rivets out the rest of the way. Three rivets and one bolt at the back of the parking brake mount. Tomorrow, I'll dig in my shop to see what size rivets I have in there. Then I'll put the bracket down and get the center console back in the car.
1705117210545.png

1705117247668.png

In the end, I only made two minor mistakes with the carpet. One was corrected and will never matter, as it was just how the rear seat clip was positioned. The other... most people will never notice it, but I know it's there and will annoy me forever. When I put the passenger side seatbelt reel in and cut the hole in the carpet for the bolt.... I forgot the bracket tab went UNDER the carpet. Instead, dummy me cut a small slot for the tab and then mounted the reel over the carpet. I didn't even think about it until I was on the driver's side doing that one. Too late... so it will remain as it is.

The rest was simple enough. Just tedious. The carpet is tucked pretty well all around the front. The back has some wrinkles in it that will be tough to relax out of it, but despite that, it still fit pretty good. I came up with only one "problem". The fit at the base of the a-pillar was not as good as I would have liked. I used a self tapping screw and washer to tack the carpet to the base of the a-pillar. It needed a little extra support there.

The black carpet looks really good in there, I think. Better than the ruined carpet at least. LOL
 
OP
OP
b1pig

b1pig

Active Member
Joined
Jul 15, 2022
Messages
309
Reaction score
326
Took a day off today. No car work.

Other than sorting out a battery connection for the seat heaters, and figuring out how I want to tackle the shifter surround. Those new ones come with an abnormally large diameter hole for the 12v plug. I'm guessing it's a Ford thing. My brain was dead from laying on my back looking under the dash much of the night so I didn't have any further brain power to devote to it. Minus the center console, it's done.... wait... "done".

1705286814027.png

The TMI "tweed" is much much lighter in color than the original. Mentioned how different the material was previously. All done, I"m still happy with it. It's cloth, so I won't be scalding my butt on the seat in the summer.

"Courtesy" lights were installed under the dash since the OEM mirror was junk. Wired into the harness and work about as well as can be expected. What I didn't think about at all was the change in seating position. The new seat foam (TMI as well) moved the seat height up A LOT. I bought this car VERY used. Nothing to compare it to. I've heard people complain before about lack of legroom. I didn't have an issue with it until right now. Debating on pulling the seat back out and "adjusting" the seat on the slider. Not sure it's worth the effort. meh....

Anyway.
When I get the center console sorted, I'll consider the interior finished.
 
OP
OP
b1pig

b1pig

Active Member
Joined
Jul 15, 2022
Messages
309
Reaction score
326
After sitting in the car finishing up the center console, I pulled the driver's seat back out. I couldn't stand the seat not moving back bar enough. I remembered that the seat had three bolt holes on each side at the rear of the seat. I moved the seat slider forward on the seat, using the rear bolts in the standard rear holes. Marked the new font position and drilled new holes in the slider for the front of the seat. Installed... worked great. Seat now moves far enough to the rear that it will contact the seatbelt cover. Maybe too much, but my wife is 5'09 and I'm 5'10. Both of our kids are likely going to hit 6 feet by the time they're driving. So I don't see any issues coming up. LOL.

1705371565243.png

Drilled the holes for the second 12v port and the two switches for the seat heaters. The switches have a small tang on them to keep them from rotating in whatever hole they're poked into. Something else I discovered is that the aftermarket shifter surround is thick. The plastic is thick enough that the switches would pop out. Took the file to the holes and fixed that problem.

1705371897244.png

For whatever reason, I didn't take a pic of the finished console. The shifter surround is the only thing that really changed in this instalment... and with so many other pics to this thread... I imagine it doesn't matter anyway. Wife and I took the Mustang around the block and I parked it in it's spot under the shelter next to the boat.

Wife's Audi is back in the garage. Now I need to pick up all my tools and put the bench away. Might do that next weekend. Why do today what can be put off until tomorrow.
 

ElrodKTPQ_89

Legend
Joined
Aug 6, 2013
Messages
5,320
Reaction score
488
Location
Crossett, AR
Nice work on the interior, the black carpet really pulled it all together. Those cloth seat covers look great too! I'm usually more a fan of leather seats but that turned out nice, kind of a 95 Cobra R look.
What other plans do you have for the future?
 

Latest posts

Forum statistics

Threads
77,520
Messages
1,504,178
Members
14,985
Latest member
Suprasuavy

Members online

Top