200,000 mile GT build

OP
OP
Akurma

Akurma

Active Member
Joined
Apr 22, 2020
Messages
283
Reaction score
353
Location
Pennsylvania
That hurts my heart. I know you’ll fix it up right though. Keep us posted!

It hurt mine as well. I knew it was there but not this bad. Time to make it right!

Fck cancer!!!

I hate ford!

Im watching you save her tho!

Its the worst! By the time i'm done with her, it'll be many many years before this returns!
 

Musturd

Post Whore
Joined
Feb 12, 2011
Messages
10,500
Reaction score
2,267
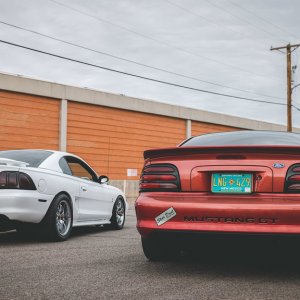
doing this old girl right bringing it back to its former glory .
 
OP
OP
Akurma

Akurma

Active Member
Joined
Apr 22, 2020
Messages
283
Reaction score
353
Location
Pennsylvania
This ones going to be picture heavy.


I've been looking for replacement sheet metal for a while. NOS frame rails are next to impossible to find, let alone quarter panels and finding rust free used versions was proving difficult. after months of searching and calling yards down south, I got lucky. In the middle of the summer on one of the Facebook pages someone up in the Poconos posted that they part out Mustangs and had an entire rear section of a 1999 GT. I drove the 4hr round trip up there and picked up an entire rear floor pan from torque boxes back. Had to cut it down the middle to fit it in the bed of the truck but I really only needed the frame rail. Put it in storage until the time came for this project. Fast forwards to last week and here is that same section cut in half flipped upside down.

53071771279_9a7489bf4b_h.jpg

53405970717_ad3dbb0cfc_h.jpg

53407329635_342b070c2c_h.jpg


Tore the trunk and bumper apart and got to work. Original plan was to only cut the rail about a foot or so back (white lines in first photo) as we didn't think the rust was that bad elsewhere. But with anything involving rust, there is always more once you dig into it. That plan quickly changed as we noticed further up there was a questionable looking spot as shown in photo 4 below.

53405970622_0ff3a3d7c2_h.jpg

53407329555_a18998bf7c_h.jpg

53405970532_c02da6b433_h.jpg

53406894736_a595170725_h.jpg


Once that was noticed we decided that the best course of action was to take it back further and section it in. Marked out all the spot welds, drilled them out and began separating it from the car. Once we had the rusted section out we went over to the good section I picked up and marked out it out and began the same process again.
Once the old rail was out we noticed that a good bit of the trunk floor was soft and rusting from the underside. Boxed out a section of it and cut it out and replaced it with fresh metal.

53407329505_2478e56ea5_h.jpg

53405970382_f025d9eaa5_h.jpg

53407220259_34404333be_h.jpg

53407220404_f9a15d64cf_h.jpg

53407074573_18d1145f31_h.jpg

53425324831_4c509c2563_h.jpg


With the old rotted metal out of the way it was time to test fit to new section. After a bit of finagling and massaging into place it fit like a glove and was ready to be welded into place. In addition to the rail the bumper support mount needed to be repaired as well. Took the good section from the donor rear that I picked up and made a patch plate for it. I was surprised at how bad that area was. Definitely makes me wonder if driving it around like this was such a good idea.

53406894501_2fe0e40834_h.jpg

53424416897_ea1502038e_h.jpg

53407074943_ddd56fd01f_h.jpg

53405970372_b7dd82d570_h.jpg

53425401903_05907716f6_h.jpg

53424325567_9fd90c3d46_h.jpg
 
OP
OP
Akurma

Akurma

Active Member
Joined
Apr 22, 2020
Messages
283
Reaction score
353
Location
Pennsylvania
With all the welding, patching, sanding and grinding done it was time to paint. Being nearly 25 year old Rio Red paint, its not going to be a spot on match. I was aware of this but think the color match is pretty decent. Especially for areas that nobody is going to see.

53424325652_47bb1499fb_h.jpg

53425401988_46ebe34d77_h.jpg

53425567254_a6f7e7e4b9_h.jpg

53425241751_6d440f9aad_h.jpg

53425567194_40a9e1df7c_h.jpg

53425241746_dfa4fc6219_h.jpg

53424431527_1e8122f775_h.jpg


Next up is the lower quarter extensions. This part might be worse than the actual frame rail replacement as I couldn't find clean, non-rusted sections and its has a few different angles. I had a smashed up section from the donor piece that I was able to make work. Did the best we could but was very tedious. Finished the driver side which was far worse than the passenger. Passenger side is up for repair tomorrow. Then the rust converter and undercoating begins!

51093489435_6c8ca3dfa4_h.jpg

53407220329_22f4952bc8_h.jpg

53425567159_fc78f0a287_h.jpg

53425670155_9f9873856e_h.jpg

53425401718_e026ee1cb3_h.jpg

53424325387_1ee88910c3_h.jpg

53425567084_8cc6b04655_h.jpg
 

weendoggy

Active Member
Joined
May 31, 2019
Messages
640
Reaction score
733
^ Agree 100%! Damned impressive and nice to have lots of room to do it.
 
OP
OP
Akurma

Akurma

Active Member
Joined
Apr 22, 2020
Messages
283
Reaction score
353
Location
Pennsylvania
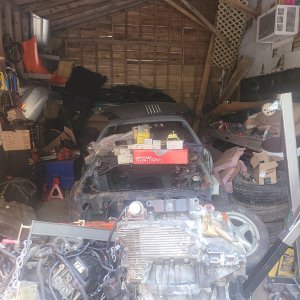
Dood thats some top notch work. Looks really good! Is this something you do for a living?

^ Agree 100%! Damned impressive and nice to have lots of room to do it.


Thanks! This isn't something I do for a living but my brother does and has for the last 15 or so years. I know somethings but not nearly as much as he does. truly lucky to have the knowledge and skill available to me.
 
OP
OP
Akurma

Akurma

Active Member
Joined
Apr 22, 2020
Messages
283
Reaction score
353
Location
Pennsylvania
First things first.. HAPPY NEW YEAR! hard to believe this car is now 25 years old!? Its been a busy last week of the year for me, lots of time in the shop to get this done before I have to head back to work tomorrow.

Made a patch for the passenger rear quarter extension from scratch. Cut the rotted and cracked metal out and welded and then seam sealed the new stuff in place.

53435299612_fc8ad156f3_h.jpg

53436646835_82f4515bbf_h.jpg


Then it was go time. The moment i've been waiting for. Undercoating and preventing this from happening again for as long as possible. I picked up a Quart of POR15 and their Chassis Black top coat. In addition to their degreaser and metal prep. Set a tape line and then got to work. Sanded, scuffed, degreased, metal prepped the underside from the axle back. so much time getting in every little nook and cranny. I would have liked to go further but with the rear axles in the way and was proving difficult to reach the spots with my hands. So I opted to go from the top of the rear axle, where the upper control arms attach all the way back. Photos below are of the process.

Picture 1 - sanded and scuffed
Picture 2 - degreaser spray
Picture 3 - Results of the metal prep spray (the white/gray powder is Zinc iirc attached to the surfaces from the metal prep solution)
Picture 4 - First coat of POR15


53436345318_0e52a9f3c7_h.jpg

53436201291_e6bb793494_h.jpg

53436201246_0a7042df53_h.jpg

53436345243_819ebbd875_h.jpg


While I waited for the first coat to dry I debated if I wanted to do the top of the gas tank "while i'm in there." The top of the tank looked pretty rough but still solid. I picked up a new gas tank a year or so ago but haven't swapped out of fear of breaking those two blue plastic vents. One of them is discontinued and very hard to find, at least from my research.

Anyway. decides to hit the top of the tank with a wire brush and scuff pad. Then the same process, degreaser and metal prep then dry. Once it was bone dry I hit it with 2 coats of POR15. Little sloppy but not going to be seen.

53436628835_864793bea5_h.jpg


53436201176_99c8d11b08_h.jpg


53435281277_6a30570f75_h.jpg


53436526899_411fa6285e_h.jpg


53435281227_938571da5f_h.jpg

After a painfully slow 12 hours day spent watching paint dry on this undercoating it was finally finished. Photos below are after all coats were applied and cured. So these are final results. Hopefully its obvious which ones are before and after lol.

53407074903_fa7cf9ed7e_h.jpg

53436526824_88e03aae76_h.jpg

53406894876_29faffb99f_h.jpg

53436629005_9b269fc046_h.jpg

53435281152_c259976dad_h.jpg

53436345413_6c83e8e237_h.jpg

53436201006_bcc2d91910_h.jpg


53436628835_864793bea5_h.jpg

53436344978_6f04ee585c_h.jpg
 
Last edited:

96blak54

Moderator
Staff
Joined
Feb 21, 2011
Messages
10,043
Reaction score
2,884
Location
In the shop
Dood, I appreciate all the detailed photos and process. I fear my car is in or close to the same condition and you breaking down the process gives me confidence.
 
OP
OP
Akurma

Akurma

Active Member
Joined
Apr 22, 2020
Messages
283
Reaction score
353
Location
Pennsylvania
Dood, I appreciate all the detailed photos and process. I fear my car is in or close to the same condition and you breaking down the process gives me confidence.

I always like reading threads with photos so I always try to take as much as I can whenever I do something. If your car was/is a northern rust belt car i'd highly recommend giving the shock towers and rear frame rails a good hard look lol. But if its the car you have a thread about I think you're in the clear because that thing looks clean!
 

96blak54

Moderator
Staff
Joined
Feb 21, 2011
Messages
10,043
Reaction score
2,884
Location
In the shop
I appreciate that! The car spends most of its time sitting in the garage waiting for me to build and rebuild the engine. I cant leave it well enough alone. I get an idea for an improvement and i act on it making the improvement a 5year process.

I dont believe it was a northern car, I bought it local, but there is a nice rust hole on the trunk floor between the fender and spare tire well. I fear its in the beginning stages of what yours has turned out to be. So one day ill have to investigate the cancer damage and possibly correct why its doing what its doing. Seeing your handy work gives me hope that it wont be as bad of a repair as my mind is making it out to be.
 

Latest posts

Forum statistics

Threads
77,520
Messages
1,504,177
Members
14,985
Latest member
Suprasuavy

Members online

Top