2slo95fiveOhs 1994 GT rebuild...UPDATE 5-2! Forged shortblock, fuel upgrades!

OP
OP
2

2slo95fiveoh

Well-Known Member
Joined
Dec 31, 2006
Messages
2,559
Reaction score
4
Location
Lawrence, Kansas
A little wiring update.
As stated before, I bought a trunk mount battery kit for the car. While I had mocked up the box and drilled the holes, I hadn't done much with the wiring for it... Until yesterday. I don't even want to be reminded of how much money I spent on 1 gauge welding cable and solder on terminal/spade ends, but once the car is running and I won't have to worry about wires coming loose from connections, not being crimped down right, etc because it was done correctly the first time... then the cost will be worth it. Right now it just stings my bank account a little.
For those of you that were curious on the differene between 1 ga battery cable and 1 ga welding cable, it's all in the thread count. Although it's a blurry picture, you can still tell that the welding cable (black jacket) has more than double the threads (way finer), than the battery cable (red jacket):
004-12.jpg


I didn't take pictures of all of them, because it's not super exciting, but I measured twice, and cut once the length of cable for:
-(ground) battery-to-quad shock bolt
-(ground) engine mount to sway bar bracket
-(power) starter to fuse box
The Taylor relocation kit came with both a positive and a negative cable, but the negative was about 4" shorter than where I wanted it to be, so instead of sacrificing ground location, I just made a new one. The positive cable, however, I am using, and routed through the grommet in the trunk, through a hole in the subframe above the rear axle, and down the length of the subframe to the starter (location).
Picture of one of the ends all finished (positive fuse box to starter in this case):
007-11.jpg


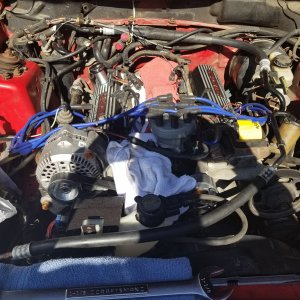
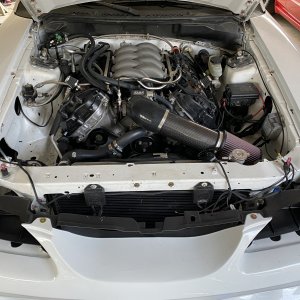
The engine bay as it sits now with both positive wires ran to an approximate area where the starter will go (I will solder both of those connectors on when the engine is in the car and I wont have to "guess" length), as well as the starter trigger wire from the fuse box harness (now routed behind the fender. closer to the sway bar):
011-9.jpg


The trunk battery setup (I still need to drop the gas tank and install the hold down bolts):
012-5.jpg

013-4.jpg


Hopefully a paint update tomorrow!
 
OP
OP
2

2slo95fiveoh

Well-Known Member
Joined
Dec 31, 2006
Messages
2,559
Reaction score
4
Location
Lawrence, Kansas
Super Exciting update today..
1) I talked to the painter. He has everything done except the trunk and ground effects, so hopefully I will be picking up everything else (hood, bumper covers, side mirrors, door handles, and side scoops) within the next couple of days.

and 2) I decided that I had procrastinated enough, and since I didnt have class or work today, I would make the most of it... and drop the engine in.

Little stuff before it was ready..
I replaced the pilot bearing for the crankshaft (I wasnt sure if it was that or my throwout bearing making a high pitched noise in my old car, so I bought new ones of both while they are easily accesable). I forgot to take a picture of it installed, but its not that exciting.
001-17.jpg


I also replaced the rear main seal while it doesnt have a transmission/clutch/flywheel covering it up. (again, I forgot to take a picture of it installed).
002-17.jpg


Then.. the moment of truth. Finally sitting in its resting position instead of on an engine stand. The longtubes slid right into place with the engine supported by a chain 2-3 inches above the kmember (naturally with a tubular front end). I also forgot to take a picture of the headers installed, but they are all bolted up with new gaskets and NGK v-power spark plugs installed (1 heat range colder than stock).
Getting ready to put the lower intake on:
003-15.jpg
 
OP
OP
2

2slo95fiveoh

Well-Known Member
Joined
Dec 31, 2006
Messages
2,559
Reaction score
4
Location
Lawrence, Kansas
lower intake installed:
004-13.jpg


Fuel injectors, Fuel rail, and distributor installed. (I also put some wire loom over the oil feed line for the supercharger).
005-15.jpg


Where I left it tonight (started fitting the wire loom, but I will probably cut the tape off, run the water temp, oil press, and fuel press sending unit wires with the factory loom, then retape):
006-13.jpg


As I finish this major "stepping stone", I am starting to add up all the little things I need to do. Finish polishing the upper manifold, mock a blower inlet pipe, run the wires down to the starter/o2 sensors/oil sensor, and lengthen the alternator wires are the main ones I can think of right now.
Questions/comments welcome.
 
OP
OP
2

2slo95fiveoh

Well-Known Member
Joined
Dec 31, 2006
Messages
2,559
Reaction score
4
Location
Lawrence, Kansas
I've been really busy with school lately, so I haven't worked on the car a whole lot. I have the shield, flywheel, clutch, belhousing, and clutch fork installed in the car (sorry no pics). So now underneath the car installing the transmission, driveshaft, and h-pipe are the only things left (other than wiring).
I picked up most of the remaining painted pieces from the painter last week. I have been slacking on the pictures, but the same day I picked the parts up I installed the side scoops, door handles, and door locks.
I did, however throw the hood and front bumper on the car just to see how it would look... And I cannot WAIT until the car is sitting on the ground, although this still looks really good... I haven't seen glossy paint on the front bumper of my mustang in 5 years.. Unfortunately for Sonic Blue, the color desperately needs sunlight to really pop, but this will have to suffice until the car moves under its own power. I'm still undecided on what kind of headlights I will use, but I just threw the stockers on for the photo:
imagejpeg_2-42.jpg


After I finished starring at it for a good 15-20 min, I covered the hood back up, and stashed the front bumper on the garage shelf. Both of them won't be attached "for good" until I am all done under the hood (i.e. the engine runs).
I am in process of tracking down parts to convert the rubber fuel lines in the engine compartment to stainless braided. I also need to figure out my coilover situation, and route some more wiring.
Right now I am shooting for having the car running in October. With the list of things "to-do" now becoming less and less by the day, I don't see that time frame to be too unrealistic.
Questions/Comments Welcome.
 
OP
OP
2

2slo95fiveoh

Well-Known Member
Joined
Dec 31, 2006
Messages
2,559
Reaction score
4
Location
Lawrence, Kansas
A small update (with no pics YET unfortunately)
-I ordered a Flaming river battery disconnect switch. I figured I might as well only have to have the rear battery/trunk setup torn apart once, so now is as good of a time as any to make my trunk mount NHRA legal..
-I ordered the necessary fittings/stainless braided line to replace the factory rubber hoses (that run from the passenger rear of the engine compartment to the fuel rail), I figured that a 18 year old car with original rubber (aged) fuel lines was going to make me too nervous with all the work (and money) that has gone into it.
-I ordered some 150 amp slo-blow fuses and fuse holder for the alternator charge wire (goes to the battery disconnect switch in the trunk).

The only actual progress on the car within the last week has been:
-re-wrap fuel injection harness with autometer sending unit wires (fuel press, water temp, oil press)
-route positive (battery to starter) and alternator charge (alternator to battery) cables through the trunk, and secured to the subframe with rubber insulated conduit holders.

I am waiting on the battery cut-off switch to arrive before I make my final cut, then solder terminal measurements (inside the trunk). I also need to buy a starter, bolt it in, then make final cut, then solder terminal measurements for the battery-to-starter cable, and starter-to-fuse box cable. Two small hold-ups to keep me from being done with all this electrical headache. But it will be worth it when its done.
Hopefully pictures of my new purchases/car progress within the next few days.
 

ProKiller

Well-Known Member
Joined
Jan 27, 2006
Messages
3,070
Reaction score
200
Location
PA
just read through this whole thing again. love this build especially after all the fixing you had to do. very interested to see the final wiring tuck and the engine bay in general.
 
OP
OP
2

2slo95fiveoh

Well-Known Member
Joined
Dec 31, 2006
Messages
2,559
Reaction score
4
Location
Lawrence, Kansas
Thanks.. Yeah as far as the fixing goes, I figured this time while I have the extra time, I would just make sure it was all taken care of. I'm sure it will pay off in the end... but I want it to be just that... The end!
 
OP
OP
2

2slo95fiveoh

Well-Known Member
Joined
Dec 31, 2006
Messages
2,559
Reaction score
4
Location
Lawrence, Kansas
UPDATE!

So, as I mentioned before, I ordered some more stuff for my trunk mount battery kit, so I went to work installing that.

The pink-ish looking wire is the alternator charge wire, with a 150amp slo-blo MEGA fuse in that black holder (on the wheel well panel). I decided while the trunk was torn apart and I hadn't determined wire length yet, that now was the best time to make it NHRA legal for when I go to the local track (won't be until next spring, but I don't want to do it twice). The more red-ish looking wire is positive terminal-to cutoff, then cutoff to starter.
002-19.jpg


001-19.jpg


The cutoff switch handle: (consider the holes in the reverse light area "practice".. ha). Oh well, these are just an extra set of tailights I will use when I go to the track (and need to have the external handle for the shut-off..
003-17.jpg
 
OP
OP
2

2slo95fiveoh

Well-Known Member
Joined
Dec 31, 2006
Messages
2,559
Reaction score
4
Location
Lawrence, Kansas
... I still need to get my battery from storage, and secure the hold-down bolts for the battery box. Then it will be all buttoned up, and I can put carpet back in the trunk.

I then moved my attention to the engine bay fuel lines. I always wondered about the factory rubber lines, and recently did a little research on the factory stuff, and how some guys are noticing a fuel smell emitting from their factory rubber lines. I didn't want to take the risk of them beginning to fail, considering it is a 18 year old car. And, the fuel lines were already out, so it was just a matter of ordering the parts...
-One of the fittings (line to front of fuel rail) is incorrect, so I had to reorder that one (should be here within the next few days), so it is all hooked up and tightened down, except for that front fitting.
004-15.jpg


Installed (mostly):
006-14.jpg


005-17.jpg


I plan on ordering the clip that holds the fuel lines to the passenger side shock tower (since mine is broken), so that should tidy up their location.

Also, (although I forgot to take a picture), I bought and installed a new starter for the car, swapped out the ignition lock cylinder, and installed the door handles, and door lock cylinders. I also installed the back seat, and the plastic paneling that goes around it. The second week in October I will be having the front and rear glass installed, so then that will allow me to install the A-pillars, B-pillars, and the associated interior panels that cover up the bolt holes for the A & B pillars.
I really need to get on the ball and finish polishing the upper intake manifold. Then maybe I could actually fire the thing up fairly soon.. it's finding the free time that is so hard as of late...
 
OP
OP
2

2slo95fiveoh

Well-Known Member
Joined
Dec 31, 2006
Messages
2,559
Reaction score
4
Location
Lawrence, Kansas
^ Thanks for the kind words.

Another update..
With the help of a buddy of mine, the transmission, driveshaft, and h-pipe are now installed. Crappy pictures from underneath:
005-18.jpg


006-15.jpg


And I finally got around to trimming the carpet in the drivers side footwell, installing the lower knee "cover", and the most important pedal of the pedal assembly (the go-fast one)..
007-13.jpg
 
OP
OP
2

2slo95fiveoh

Well-Known Member
Joined
Dec 31, 2006
Messages
2,559
Reaction score
4
Location
Lawrence, Kansas
The Safelite autoglass guy came out today too.. I bought new rear glass seals from Ford last week, and they put the seals on the glass, then installed it and a new front windshield in the car. Boy has it been a while since the car has had a front windshield in it...
001-Copy.jpg


Which allowed me to install the A-pillars and B-pillars..
002-Copy.jpg


003-Copy.jpg


And just another update on polishing the upper manifold..
008-11.jpg


My maximum motorsports order (Coilovers and steering shaft) should be here tomorrow, so I will probably install those. Another buddy of mine who is better at window regulators/motors than I am will be coming over within the next week or so to help me get my window setup back to where it should be.
 
OP
OP
2

2slo95fiveoh

Well-Known Member
Joined
Dec 31, 2006
Messages
2,559
Reaction score
4
Location
Lawrence, Kansas
Update:
Some more parts came in. (Truly is better than Christmas, because unlike Xmas, I know what I want, becuase I bought it!)


Steeda oil seperator (Still need to work out the details of mounting, etc):
006-16.jpg


Universal coolant overflow tank (The factory one just clutters everything up.. I'm thinking this will go somewhere between the front bumper and the radiator support):
005-19.jpg


AAANNNNDDD My Maximum Motorsports order came in..
Front coilover kit with 225lb springs, and steering shaft:
001-21.jpg
 
OP
OP
2

2slo95fiveoh

Well-Known Member
Joined
Dec 31, 2006
Messages
2,559
Reaction score
4
Location
Lawrence, Kansas
A little comparison between stock and Max. Motor. steering shafts:
002-21.jpg


After removing the factory steering shaft, I realized that the factory steering shaft "boot/seal" that bolts into the firewall and seals out heat from entering the cabin via the steering shaft hole, was torn in half. The rubber bushing had torn completely off the metal frame, and came with the steering shaft. I ordered a new one from Ford, but it wont be here until friday, so I'm putting that off until then.

I did, however, get the coilovers installed...
Assembled:
003-18.jpg


And installed:
004-16.jpg


Finally! my spindles aren't just hanging there... Gees. As you can tell in the pics, I also attached the (new) sway bar links.. (Ignore the red/undercoated inner fender, and the misc wires).
I didn't put my brakes back together because I am debating on what I want to do. The pads I had with those brakes previously were pretty noisy, and had a decent amount of dust for the little that I drove the car. At minimal I will probably machine the rotors, and buy new pads (perhaps EBC?)... But I still need to research that stuff.

Goals for this week are:
-Install all the power steering lines
-Get at least done with 320 grit on the intake sanding/polishing (I'm halfway with 180grit now)
-Install steering shaft, once the Ford seal/boot comes in.

Questions/Comments welcome
 

2v_takeover

Active Member
Joined
May 20, 2011
Messages
514
Reaction score
9
Location
Saskatchewan
Holy hell this thing is coming together. Going to be a beast when you're done. Tons of work usually means lots of passion. good job
 

belber095

Legend
Joined
Aug 7, 2012
Messages
5,490
Reaction score
410
Location
Ithaca, NY
Lots a stuff coming in all at once dude! Nice to see some progress. Was the car previously red? The wheel wells say yes :p

tapatalkin'
 
OP
OP
2

2slo95fiveoh

Well-Known Member
Joined
Dec 31, 2006
Messages
2,559
Reaction score
4
Location
Lawrence, Kansas
Thanks. It's hard for me to feel like the car is coming along when I have such little time to work on it, but then I look at my "to-do" list shrinking, and glance at the earlier pages of this build thread, and it reminds me that I suppose I have made some progress in the last 2 years. I suppose my "passion" for it is also intertwined with not wanting to do stuff twice, and when it's all done I hope the end result is better than I imagine it.

Holy hell this thing is coming together. Going to be a beast when you're done. Tons of work usually means lots of passion. good job
 
OP
OP
2

2slo95fiveoh

Well-Known Member
Joined
Dec 31, 2006
Messages
2,559
Reaction score
4
Location
Lawrence, Kansas
Yeah it hurts the wallet when I order lump sums of parts, but it is more exciting that way. haha. Yeah, the car was originally Lazer red/pink, (there are pictures on some of the earlier pages of this thread). The passenger side had been repainted and still looked pretty glossy red, the drivers side appeared original, as it was nice and faded pink.. I prefer matching paint tones on my vehicles, and really prefer Sonic Blue (as the pictures show)..

Lots a stuff coming in all at once dude! Nice to see some progress. Was the car previously red? The wheel wells say yes :p

tapatalkin'
 

Latest posts

Forum statistics

Threads
78,556
Messages
1,536,149
Members
16,201
Latest member
jgib8795

Members online

Top