2slo95fiveOhs 1994 GT rebuild...UPDATE 5-2! Forged shortblock, fuel upgrades!

OP
OP
2

2slo95fiveoh

Well-Known Member
Joined
Dec 31, 2006
Messages
2,559
Reaction score
4
Location
Lawrence, Kansas
I have those seats lol

How long have you had them/how have they held up for you thus far? The only negative I read about a lot of corbeau seats is that the color fades (especially black).. I've been noticing our cars will look similar in a few ways (whenever mine gets done)..
Blue(Yours is dark moonlight or w/e the name is), wingless(wings are for chickens), cobra front bumper(no front lip for me though), both will be Slow ass forced induction cars (wink wink), And who knows, maybe by the time mine gets done, you will have switched wheels again (it seems like you change it up every now and then) haha.
 
OP
OP
2

2slo95fiveoh

Well-Known Member
Joined
Dec 31, 2006
Messages
2,559
Reaction score
4
Location
Lawrence, Kansas
Small update for today...

As you can see in the picture I posted of the car on the trailer, the very front lower portion of the fenders was left red. Also, not in the pictures, the lower portion of the rear quarter panels was also left the original color (red on the pass side, white on the drivers side from the quarter panel I replaced). The painter said that since the paint isn't very cheap, he was trying to conserve as much as he could, and although the front and rear bumpers would cover up those areas, it was going to bug the snot out of me to leave them, so I just scuffed it and shot it with some duplicolor "exact match" spray paint, obviously with the same paint code..

Before (pass side):
imagejpeg_2-5.jpg


After (drivers side):
imagejpeg_2-6.jpg

I would say that "exact match" earned it's name today in my book.. two light coats and one medium wet coat and it looks pretty good (good enough for something that won't eventually be seen..

Then I started cleaning up the interior (a lot of sanding dust).. I remembered that I had repaired the wiring from the stupid alarm installation at the dash, but that I had yet to correct the wiring on the body. So I fixed that.
Before:
imagejpeg_2-7.jpg


After(sorry the flash wasn't working):
imagejpeg_2-8.jpg

It shows how crappy of a job that the alarm install place did with "soldering" the wires in, when I took the alarm wires out of the factory harness by just using heat to melt the glob of solder, then pulling the alarm wire out, re-soldering the factory wire to itself, then individually electrical-taping the wires, then taping them together.

Hopefully I will be starting the sound deadner install fairly soon. I'm getting anxious to get my interior back in this thing so I can at least sit in the car and pretend it runs...
 

drake

Member
Joined
Mar 20, 2012
Messages
116
Reaction score
2
Location
mi
about at the same progress interior wise as yours it sucks.... lol and im starting my rear quarters next week.... looks great love the blue :O
 
OP
OP
2

2slo95fiveoh

Well-Known Member
Joined
Dec 31, 2006
Messages
2,559
Reaction score
4
Location
Lawrence, Kansas
about at the same progress interior wise as yours it sucks.... lol and im starting my rear quarters next week.... looks great love the blue :O

Thanks. Good luck with the quarters. My advice would be to take as many measurements and pictures as you can (both sides for reference). i had about 6 fitments with the quarter to the car before I was ready to attach it. The results are really good, so the patience must have paid off.
 
OP
OP
2

2slo95fiveoh

Well-Known Member
Joined
Dec 31, 2006
Messages
2,559
Reaction score
4
Location
Lawrence, Kansas
Well I finally got the chance to see the car in the direct sunlight.. Now, let me say that initially I was excited about the new paint job, but didn't get that giddy feeling like a little kid on Christmas morning until i stepped back and look at it. Pictures to share my excitement:

imagejpeg_2-11.jpg


imagejpeg_2-12.jpg


imagejpeg_2-13.jpg


Now I'm really excited to see it all pieced together, and I think my chrome 18s will really bring out the color more..

I got a little bit of work done on the car. A while back a buddy of mine bought 100 square feet of fatmat sound insulator for his truck, and (since it was a regular cab), covering every metal surface inside the cabin, he still only used 50 square feet, so he sold me the other 50 for cheaper than I can buy it online, so I started getting that installed:

imagejpeg_2-14.jpg


Again, sorry for the poor picture quality. All of the pictures within the last 2-3 pages have been taken with my cell phone, the lighting messed with this one.. So in case it's hard to see, I have the passenger side done, and half of the firewall. Tomorrow I will hopefully have the rest of the floor, backseat area, and roof done. Then maybe mocking up wiring and (fingers crossed), get the HVAC box and master cylinder bolted in. Questions/Comments welcome.
 
OP
OP
2

2slo95fiveoh

Well-Known Member
Joined
Dec 31, 2006
Messages
2,559
Reaction score
4
Location
Lawrence, Kansas
Thanks for the kind words everyone. Although at the end of the day, it's my car and as long as I love it thats all that matters (no offense to anyone who complimented), I do appreciate the positive encouragement for my cars completion. It's small comments like these and also all the people I know around here asking "whens that car gonna be done?" that fuel my motivation to work on it. So thanks.

I got a little progress done the other night..
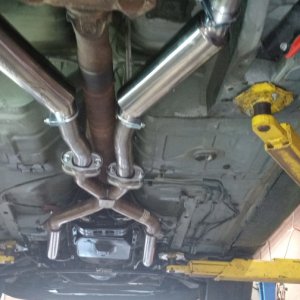
I used up the last of the 50 sq ft of fatmat that I had.. Only covered the cabin foward of the rear seat "ledge" (on the very bottom of this picture). I wanted to cover my roof, wheel wells, and trunk, so I will order another 50 sq ft of the stuff to finish that portion, but luckily I got enough done to where I can press on with getting the dash/wiring/carpet installed while I wait on the second round of fatmat to ship in.
Completed pic (as much as materials would allow)
imagejpeg_2-15.jpg


After that, I moved onto getting the few things bolted to the firewall before the dash (master cyl w/ booster, pedal assembly, hvac box etc..). All I have for now is the master cyl/booster combination bolted into place.. (I like taking pictures at night, because my camera phone automatically switches to flash, which makes the paint POP.
imagejpeg_2-16.jpg


I need to investigate my brake lines... I am not running ABS on the car, and will either get lines from a non-ABS car and bolt them in, or buy some bulk brake line and flare and bend my own stuff to make it how I want. Theres a mustang-only salvage yard here in town, so hopefully they have a non-chopped up non-ABS mustang there I can reference. Also I will be installing bullit pedals on my pedal assembly before bolting them in (I've only had them sitting in the box since, oh, Xmas of 2009...). Since the 4th of July is a holiday from school and work, that means I can spend one entire day working on the car, I would really like to get the interior put in for the most part, but we'll see what kind of small snags I run into. I should have updates and pictures for tues/wed/thurs for this week, hopefully some progress will come out of three days work. Thanks for looking.
 

Latest posts

Forum statistics

Threads
78,555
Messages
1,536,140
Members
16,201
Latest member
jgib8795

Members online

Top