You are using an out of date browser. It may not display this or other websites correctly.
You should upgrade or use an alternative browser.
You should upgrade or use an alternative browser.
Dirty Money: An Impractical Investment
- Thread starter sluggish94
- Start date
")
OP
OP
sluggish94
Member
Hey throw a bone out about Bad Business too! Sharp looking fox!
Thanks man! I don't want to take too much of the attention away from Dirty Money at the moment. I might start another thread about Bad Business on here in the future. Its nothing special really, just a stock 302 with e7 heads. Couple other little things ("racer secrets") here and there like a T5Z, 6-point, PIMPXS, .70/.96 turbo, etc... the progress isn't as fluid with that car as is this one. I just finished putting it together in April of this year so its pretty much done. Still need to drive it some more, tune it and other little things need perfected. It's on a completely other level than Dirty Money. Bad Business was my first Mustang. That car has kept me sane since 2012. Downright scary to drive on the street no lie, the thing makes so much freakin power. Not for the weak.


OP
OP
sluggish94
Member
Cool project! I'm partial to that color combo for one reason or another
Be interesting to see what that shot of gap juice ends up making on a mostly stock bottom end.
Nice work so far!
Haha, I think I know why! My goal is to make around 230/280 on the motor and 350/400 on the unit. I feel these are very realistic expectations. Will make for a stout little street beast with the sauce. Excellent work on your SN as well man! That thing is intense.
Thanks man! I don't want to take too much of the attention away from Dirty Money at the moment. I might start another thread about Bad Business on here in the future. Its nothing special really, just a stock 302 with e7 heads. Couple other little things ("racer secrets") here and there like a T5Z, 6-point, PIMPXS, .70/.96 turbo, etc... the progress isn't as fluid with that car as is this one. I just finished putting it together in April of this year so its pretty much done. Still need to drive it some more, tune it and other little things need perfected. It's on a completely other level than Dirty Money. Bad Business was my first Mustang. That car has kept me sane since 2012. Downright scary to drive on the street no lie, the thing makes so much freakin power. Not for the weak.
View attachment 6692
View attachment 6693
Niiiiiiiiiiice!!!!! Great job on this one!! Plain to see you've put a lot of time and love in this project!!
OP
OP
sluggish94
Member
Niiiiiiiiiiice!!!!! Great job on this one!! Plain to see you've put a lot of time and love in this project!!
I appreciate your kind words man. Its been a rewarding experience with much help from family and friends. Definitely hasn't been a solo endeavor, and I'm still learning a lot as its my first turbo application.
OP
OP
sluggish94
Member
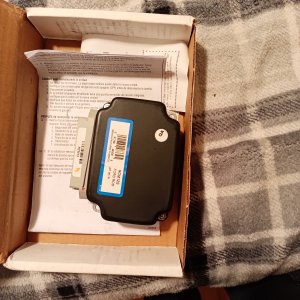
I sprung into action today and acquired some motivation to drop the tank and install the Walbro 255LPH Pump. This was but only my second time doing this and it went rather smoothly. First I made sure to drive around until the tank was almost empty. One gallon of gas is 8.3lbs. so I had to take that into consideration. I removed the cap and these bolts at filler neck with an 8mm.
I then removed this lone bolt with an 8mm as well:

I actually didn't bother with these underneath because the rubber helped sustain the filler neck and the tank a bit.

I undid the tank straps with a 1/2in. and dropped the tank. It came to rest on a little stool and a jack. The area around the fuel pump was super dirty so I cleaned it with some compressed air and a rag. There was a grip of dust and dirt and if it wasn't for the compressor I'm sure I would have dropped a bunch of it into the tank.

The fuel lines came off with my trusty quick disconnect tools. 5/16 and 3/8

Congratulations, it's a boy:

OEM Walbro pump. Sweeeeeet.

Next post is some install pictures.
I then removed this lone bolt with an 8mm as well:
I actually didn't bother with these underneath because the rubber helped sustain the filler neck and the tank a bit.
I undid the tank straps with a 1/2in. and dropped the tank. It came to rest on a little stool and a jack. The area around the fuel pump was super dirty so I cleaned it with some compressed air and a rag. There was a grip of dust and dirt and if it wasn't for the compressor I'm sure I would have dropped a bunch of it into the tank.
The fuel lines came off with my trusty quick disconnect tools. 5/16 and 3/8
Congratulations, it's a boy:
OEM Walbro pump. Sweeeeeet.
Next post is some install pictures.
OP
OP
sluggish94
Member
The pump fits into the OEM hanger perfectly. My wiring is kind of long but I can live with it. From what I understand I believe Walbro changed their name to TI Automotive because this pump came in their packaging. Something having to do with fake Walbro pumps floating around or something. Anyways....
....I almost forgot this little rubber seal before I threw the pump and hanger assembly back in permanently.

The jack was a big help. The tank is wonky.

Many trials and tribulations later:

I also got my hangers welded in. The mufflers ended up not being as straight as I wanted them to be but I can't complain. They don't hit anything and they're secure. That's what my intention was with getting the hangers on there.

With the fuel pump upgrade I'm just one step closer to making good reliable power. I won't have to worry about the pump for a good while now.
Thanks for reading and thanks for looking.
....I almost forgot this little rubber seal before I threw the pump and hanger assembly back in permanently.
The jack was a big help. The tank is wonky.
Many trials and tribulations later:
I also got my hangers welded in. The mufflers ended up not being as straight as I wanted them to be but I can't complain. They don't hit anything and they're secure. That's what my intention was with getting the hangers on there.
With the fuel pump upgrade I'm just one step closer to making good reliable power. I won't have to worry about the pump for a good while now.
Thanks for reading and thanks for looking.
OP
OP
sluggish94
Member
Installed my Intellitronix Window Switch. This thing looks super cool. Really fits the eary 90s era that Dirty Money is from. It has three modes for controlling RPM. Glad I got this simple little unit and not the $100+ units that essentially do the same thing. Plus it's got a lifetime warranty and is made in the USA. I used some gorilla tape to avoid drilling any holes in the dash. Not the prettiest install, but the most functional.

Still need the right diameter wire loom to hide all the wires. The red switch where the radio used to be is to arm the nitrous.
I got myself some 110 octane for when I hit the dyno on October 14th just in case I need to address any unforeseen detonation or pinging issues. I'll be hitting a 175 shot.

I haven't found a definite answer on running really high octane fuel in a stock fuel system. I will probably end up mixing it with 91 (the highest available octane at the pump in my area) to try and aim for a 93 blend. I'm pretty excited and looking forward to making some stout numbers with the nitrous.
Here's my current set-up and how I will be running it on the dyno:
100% Stock 5.0L Windsor 302
Stock E7 Heads
Stock Camshaft
Proform 1.7 Rockers
BBK 75mm Throttle Body
Explorer EV1 19lb. Injectors
Walbro/TI Automotive 255LPH Fuel Pump
Smog & A/C Delete
Underdrive Pulleys (not installed yet)
Pypes X-Pipe
Magnaflow 2.5in Mufflers
Nitrous Outlet X-Series Wet Kit 175HP
T5 Transmission
3.08 Gear
Any thoughts or guesses on what it will put down NA and on the unit?
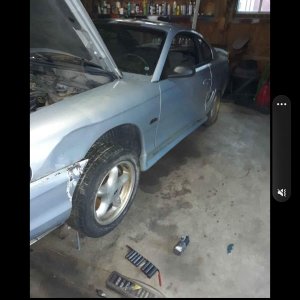
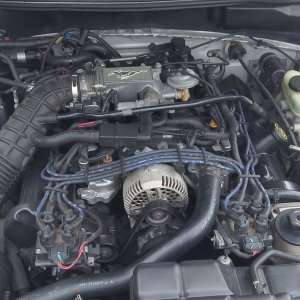
I've made sure to address all the little things as well; Autolite 24 nitrous plugs, new distributor cap and rotor, good spark plug wires, brand new summit racing 48kV ignition coil, clean paper air filter, fresh fuel filter, appropriate antifreeze/water mixture, fresh oil change with FL1A filter. We will be making the necessary timing adjustments on the dyno to accommodate for each jetting size. If anyone has any little tips or tricks I might have looked over, please feel free to mention them. Here's a picture of the engine bay as it sits right now:

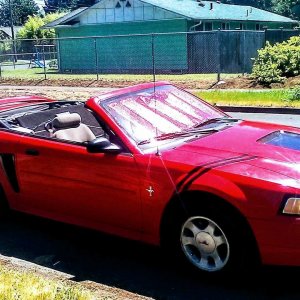
Bad Business and Dirty Money

Thanks for looking at my build thread. Blue Oval Forever.
Still need the right diameter wire loom to hide all the wires. The red switch where the radio used to be is to arm the nitrous.
I got myself some 110 octane for when I hit the dyno on October 14th just in case I need to address any unforeseen detonation or pinging issues. I'll be hitting a 175 shot.
I haven't found a definite answer on running really high octane fuel in a stock fuel system. I will probably end up mixing it with 91 (the highest available octane at the pump in my area) to try and aim for a 93 blend. I'm pretty excited and looking forward to making some stout numbers with the nitrous.
Here's my current set-up and how I will be running it on the dyno:
100% Stock 5.0L Windsor 302
Stock E7 Heads
Stock Camshaft
Proform 1.7 Rockers
BBK 75mm Throttle Body
Explorer EV1 19lb. Injectors
Walbro/TI Automotive 255LPH Fuel Pump
Smog & A/C Delete
Underdrive Pulleys (not installed yet)
Pypes X-Pipe
Magnaflow 2.5in Mufflers
Nitrous Outlet X-Series Wet Kit 175HP
T5 Transmission
3.08 Gear
Any thoughts or guesses on what it will put down NA and on the unit?
I've made sure to address all the little things as well; Autolite 24 nitrous plugs, new distributor cap and rotor, good spark plug wires, brand new summit racing 48kV ignition coil, clean paper air filter, fresh fuel filter, appropriate antifreeze/water mixture, fresh oil change with FL1A filter. We will be making the necessary timing adjustments on the dyno to accommodate for each jetting size. If anyone has any little tips or tricks I might have looked over, please feel free to mention them. Here's a picture of the engine bay as it sits right now:
Bad Business and Dirty Money
Thanks for looking at my build thread. Blue Oval Forever.
OP
OP
sluggish94
Member
Dirty Money got put away the first two weeks of October. One of my friends helped me install some Prothane Polyurethane motor mounts so I left it as his house to get worked on. This is another positive aspect to add to the list of improvements this car has seen in the past few months. No more shaky engine!
I put Dirty Money on the rollers October 14th, 2020.

I went to a local shop called Bottle Blown Racing in Camarillo, CA. Build specs as to how I ran it on the dyno are in post #49. Stock Pulleys though, not under drives, I didn't put them on.
It made 212hp/278ft.lbs. naturally aspirated.

On a 35 shot (31 nitrous jet, 16 fuel jet) it made 252hp/361ft.lbs.

I changed the jets to what Nitrous Outlet recommends on their jet chart for a 100 shot (52 nitrous, 24 fuel) and it created a crazy lean spike. That run was aborted and is represented by the red line. After that happened Tommy recommended we try and do a run with the nitrous turned off to make sure the fuel solenoid was firing. That run is represented by the black lines on the graph.

Since the fuel solenoid was definitely firing and I didn't have any other nitrous jets I decided to call it a night right there. I put the 35 jets back in and I will run it like that until November 11th which is the next dyno day. We were all impressed with the efficiency of how the kit was working. More nitrous stuff soon. Thanks for reading and thank you for your interest in Dirty Money.

I put Dirty Money on the rollers October 14th, 2020.
I went to a local shop called Bottle Blown Racing in Camarillo, CA. Build specs as to how I ran it on the dyno are in post #49. Stock Pulleys though, not under drives, I didn't put them on.
It made 212hp/278ft.lbs. naturally aspirated.
On a 35 shot (31 nitrous jet, 16 fuel jet) it made 252hp/361ft.lbs.
I changed the jets to what Nitrous Outlet recommends on their jet chart for a 100 shot (52 nitrous, 24 fuel) and it created a crazy lean spike. That run was aborted and is represented by the red line. After that happened Tommy recommended we try and do a run with the nitrous turned off to make sure the fuel solenoid was firing. That run is represented by the black lines on the graph.
Since the fuel solenoid was definitely firing and I didn't have any other nitrous jets I decided to call it a night right there. I put the 35 jets back in and I will run it like that until November 11th which is the next dyno day. We were all impressed with the efficiency of how the kit was working. More nitrous stuff soon. Thanks for reading and thank you for your interest in Dirty Money.
apsmith49921
Well-Known Member
- Joined
- Aug 5, 2020
- Messages
- 1,042
- Reaction score
- 891
New injectors next?
Sent from my SM-G955U using Tapatalk
Sent from my SM-G955U using Tapatalk
OP
OP
sluggish94
Member
New injectors next?
Sent from my SM-G955U using Tapatalk
I sprayed 100 dry on my last Mustang on UREMCO 19lb. injectors and stock pump. Dirty Money has EV1s and a 255LPH pump so I'm not too worried about injector duty cycle at the moment. To correct the lean spike we will do some tuning with the jets next dyno session. I will end up maxing out this combination on whatever shot is the safest and stop there. If it can't handle more than 75 or 100 that will be fine. The kit is working really effectively.
OP
OP
sluggish94
Member
I was thinking prolly time for new rubber after adding all these new ponies!!
I have some ET Streets under there at the moment. They work amazing. I will get another set of those or some Nitto NT555R Drag Radials once it's time.
OP
OP
sluggish94
Member
Since my last update my neighbor backed into my front end and damaged the front passenger headlight and header panel. A sad moment, but I got everything fixed already. Here's some pictures:
Everything taken apart

Wet sanding late at night, just getting it done. I got some front fenders off a 96 GT back in August because I knew at some point I was going to replace the ones it came with. These were super straight.

Putting together the vision. Doing all the body work alone was tough, this took some serious time and patience.

Another late night working from my Dad's little garage. A tight space to work with but I got it done.

A lot of work got done this night and I was very pleased with how everything was turning out.

The entire passenger side ready to paint. I ended up going with the 96-98 style fender spat just because they came with the fenders.

And I really had to do it

Looks way better with the 94-95 taillights. The black letter inserts bring everything together in the rear. These are OEM Ford pieces I found at the junkyard for super cheap and painted satin black.
I bought some eBay corner lights that fit kinda like garbage but whatever, it still looks way fresher.

Everything back together while waiting for the last piece.

After the headlight came in I went on a sweet cruise to Randy's Donuts in Inglewood, CA. It was a splendid day. Don't mind my dead friend Arthur Itis in the back seat.

Glad to be driving this thing around again.
Everything taken apart
Wet sanding late at night, just getting it done. I got some front fenders off a 96 GT back in August because I knew at some point I was going to replace the ones it came with. These were super straight.
Putting together the vision. Doing all the body work alone was tough, this took some serious time and patience.
Another late night working from my Dad's little garage. A tight space to work with but I got it done.
A lot of work got done this night and I was very pleased with how everything was turning out.
The entire passenger side ready to paint. I ended up going with the 96-98 style fender spat just because they came with the fenders.
And I really had to do it
Looks way better with the 94-95 taillights. The black letter inserts bring everything together in the rear. These are OEM Ford pieces I found at the junkyard for super cheap and painted satin black.
I bought some eBay corner lights that fit kinda like garbage but whatever, it still looks way fresher.
Everything back together while waiting for the last piece.
After the headlight came in I went on a sweet cruise to Randy's Donuts in Inglewood, CA. It was a splendid day. Don't mind my dead friend Arthur Itis in the back seat.
Glad to be driving this thing around again.
OP
OP
sluggish94
Member
I also put together this contraption here for less than 1/3 of what a BBK unit costs and that's including a brand new ACT sensor.

I'd call this version 1.0 (unwelded)

The ACT sensor bung and PCV bung did get welded on there before I actually drove around with it. I ended up throwing some different couplers I had laying around to route it in a way that the filter ends up right by the bottom corner of the bumper to draw in the most dense air as possible, instead of in the wheel well behind the headlight.
Because of the little accident I couldn't take it to the dyno November 11th how I had hoped, but when I take it back I'll be strapping it down with this contraption here to try and make another 1-2hp or something (pre-body work picture here, was getting ready for dyno)

A velocity stack is proven to increase airflow.
A more direct inlet path has to be beneficial.
An increase in intake runner length changes how the air enters the engine, therefore changing the dynamics of the power curve. Will this hold true with the inlet tube as well?
Maybe I will do a run with the normal cold air that I run on the street, another with the long tube + velocity stack inlet, and another with a short tube + velocity stack inlet.
I extended the nitrous solenoid to nozzle line, installed a Steeda Shock Tower Brace, and I have a Steeda Air Bag kit going on this car as well.
Last thing is I swapped out the jets to 35 nitrous/17 fuel, which equates to a "50 shot" according to Nitrous Express. This car has proven to like the bottle and with the new nitrous line and the larger jets it really gets up there. It's been a lot of fun so far.
Thanks for reading, and thanks for looking at my build thread.
I'd call this version 1.0 (unwelded)
The ACT sensor bung and PCV bung did get welded on there before I actually drove around with it. I ended up throwing some different couplers I had laying around to route it in a way that the filter ends up right by the bottom corner of the bumper to draw in the most dense air as possible, instead of in the wheel well behind the headlight.
Because of the little accident I couldn't take it to the dyno November 11th how I had hoped, but when I take it back I'll be strapping it down with this contraption here to try and make another 1-2hp or something (pre-body work picture here, was getting ready for dyno)
A velocity stack is proven to increase airflow.
A more direct inlet path has to be beneficial.
An increase in intake runner length changes how the air enters the engine, therefore changing the dynamics of the power curve. Will this hold true with the inlet tube as well?
Maybe I will do a run with the normal cold air that I run on the street, another with the long tube + velocity stack inlet, and another with a short tube + velocity stack inlet.
I extended the nitrous solenoid to nozzle line, installed a Steeda Shock Tower Brace, and I have a Steeda Air Bag kit going on this car as well.
Last thing is I swapped out the jets to 35 nitrous/17 fuel, which equates to a "50 shot" according to Nitrous Express. This car has proven to like the bottle and with the new nitrous line and the larger jets it really gets up there. It's been a lot of fun so far.
Thanks for reading, and thanks for looking at my build thread.
OP
OP
sluggish94
Member
Dirty Money sitting mean

I'm planning out what I will be doing with this car next. There is an open test-n-tune March 20th at Irwindale Speedway so I will be taking this car to the 1/8 mile to see how it does.
Right now Dirty Money is getting an 8-point roll bar installed so I wont get any static at the track. I chose a Jegster Cage. I have one in my Fox and it fit pretty good. I'll also be installing a driveshaft safety loop for extra safety. I don't "need" one unless I'm running slicks but its better to be safe.
I pulled all of the interior stuff I didn't want and wasn't going to use in preparation for the cage install. This carpet was downright nasty. I washed it as much as I could and dyed it black with Dupli-Color trim paint. I'll have some pictures of the finished product when its back from the fab shop.

I installed a lightweight Jegs Pro High Back seat. I made a supporting bracket out of some bar stock and used the original seat brackets. Work in progress:

Here's what the seat looks like installed. I had to have it in before the cage install so my welder could properly measure clearances and all that.

So now that this car is going to be a more dedicated drag car I decided to pull off all the seats and rear panels off. I dropped like 90lbs on just the passenger seat, center console, and rear seats. I'm gaining most of it back with the cage but the benefits in body rigidity and safety outweigh the poundage increase.
I also finally got around to installing those American Muscle underdrive pulleys. If anyone is curious as to wether or not there was a SOTP difference, yes, there was a big difference in SOTP after 3500 rpm. It feels really strong. I made a little YouTube video on it. If anyone wants to check it out I'll send the link.
Any guesses as to what it will run at the track?
I'm planning out what I will be doing with this car next. There is an open test-n-tune March 20th at Irwindale Speedway so I will be taking this car to the 1/8 mile to see how it does.
Right now Dirty Money is getting an 8-point roll bar installed so I wont get any static at the track. I chose a Jegster Cage. I have one in my Fox and it fit pretty good. I'll also be installing a driveshaft safety loop for extra safety. I don't "need" one unless I'm running slicks but its better to be safe.
I pulled all of the interior stuff I didn't want and wasn't going to use in preparation for the cage install. This carpet was downright nasty. I washed it as much as I could and dyed it black with Dupli-Color trim paint. I'll have some pictures of the finished product when its back from the fab shop.
I installed a lightweight Jegs Pro High Back seat. I made a supporting bracket out of some bar stock and used the original seat brackets. Work in progress:
Here's what the seat looks like installed. I had to have it in before the cage install so my welder could properly measure clearances and all that.
So now that this car is going to be a more dedicated drag car I decided to pull off all the seats and rear panels off. I dropped like 90lbs on just the passenger seat, center console, and rear seats. I'm gaining most of it back with the cage but the benefits in body rigidity and safety outweigh the poundage increase.
I also finally got around to installing those American Muscle underdrive pulleys. If anyone is curious as to wether or not there was a SOTP difference, yes, there was a big difference in SOTP after 3500 rpm. It feels really strong. I made a little YouTube video on it. If anyone wants to check it out I'll send the link.
Any guesses as to what it will run at the track?
High 12’s
Keep up the good work!
Keep up the good work!
OP
OP
sluggish94
Member
High 12’s
Keep up the good work!
Hoping to dip it into the 12s once I arrange an outing to Famoso Raceway. In March I will be running in the 1/8th mile at Irwindale. Really hoping to dip it below 8.5 in the 1/8th. It would be a major accomplishment if I dipped into the 7.9s
OP
OP
sluggish94
Member
I got the car back from 8-point installed. My welder Ben Larson took care of getting everything fitted and burned in. I am extremely impressed with how it turned out. Really puts the other cage I have in my Foxbody to shame. Picture dump:


Similar threads
- Replies
- 1
- Views
- 551
- Replies
- 14
- Views
- 782
- Replies
- 4
- Views
- 630