Dirty Money: An Impractical Investment

OP
OP
sluggish94

sluggish94

Member
Joined
Jul 18, 2020
Messages
128
Reaction score
127
Location
805
Was really excited, I had to paint it and put everything together today. The can I used said "ivory". While it was at the shop I dyed the carpet black. I made a little bracket for the nitrous bottle that mounts to the stock seat studs. I just used a towel for a little bit of back support instead of getting those $30 dollar pieces of molded foam that go under the seat cover.
DSCF6452.JPG
DSCF6457.JPG
DSCF6461.JPG
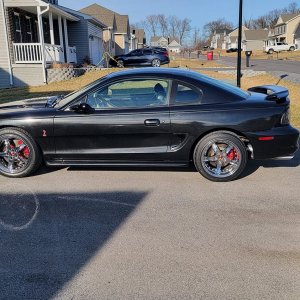
I have to do a bunch of little stuff to it before I take it to the track. I'm pleased with how all the work has turned out so far. It looks freakin killer with the top down. The plastic drag seat and the nitrous bottle riding shotgun just puts a smile on my face.

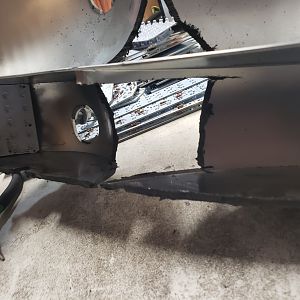
One thing I also wanted to mention was that with the addition of the cage, the car feels so much more rigid and safer. It feels real stout when taking off from a stoplight, even with light acceleration, and driving around the city is a lot more pleasant because there isn't as much slop in the body. One of the best additions to Dirty Money.

So far.
 

Overboost

Member
Joined
Jul 29, 2019
Messages
111
Reaction score
78
Location
Flushing, Michigan
Dirty Money sitting mean

I'm planning out what I will be doing with this car next. There is an open test-n-tune March 20th at Irwindale Speedway so I will be taking this car to the 1/8 mile to see how it does.

Right now Dirty Money is getting an 8-point roll bar installed so I wont get any static at the track. I chose a Jegster Cage. I have one in my Fox and it fit pretty good. I'll also be installing a driveshaft safety loop for extra safety. I don't "need" one unless I'm running slicks but its better to be safe.

I pulled all of the interior stuff I didn't want and wasn't going to use in preparation for the cage install. This carpet was downright nasty. I washed it as much as I could and dyed it black with Dupli-Color trim paint. I'll have some pictures of the finished product when its back from the fab shop.
View attachment 9378


you should really get some seats in there... makes it much easier to drive...
 

joemomma

Well-Known Member
Joined
Dec 9, 2020
Messages
1,225
Reaction score
733
Good looking cage! I'm jealous of folks that can weld that good.
 

Overboost

Member
Joined
Jul 29, 2019
Messages
111
Reaction score
78
Location
Flushing, Michigan
I like the hurst shifter handle, I had one in my 87 and was the only handle that I would not miss 3rd on a consistent basis.
sadly, it wont fit in my 98 because it has a B&M ripper pro in it and the bolt locations do not match up due to the 3 holes and opposed to the 2
I have it so I can shift fine, I just prefer the looks of the hurst..
 
OP
OP
sluggish94

sluggish94

Member
Joined
Jul 18, 2020
Messages
128
Reaction score
127
Location
805
Good looking cage! I'm jealous of folks that can weld that good.

Thanks man, I was really impressed with Ben's work. He really took that Jegs cage and made it something to be proud of.

I like the hurst shifter handle, I had one in my 87 and was the only handle that I would not miss 3rd on a consistent basis.
sadly, it wont fit in my 98 because it has a B&M ripper pro in it and the bolt locations do not match up due to the 3 holes and opposed to the 2
I have it so I can shift fine, I just prefer the looks of the hurst..

I always wanted the Hurst handle. It's my favorite shifter as far as looks go. Just looks proper inside the Mustang. And I also have the B&M pro ripper in my Fox, it's a good shifter too. A little bit shorter/tighter on the throw than the Hurst IMO.
 

joemomma

Well-Known Member
Joined
Dec 9, 2020
Messages
1,225
Reaction score
733
I had a Hurst Competition in my '06GT. It was a good shifter, and never got the praise it deserved. Plus, it looked sweet! My '94 has something in it, I can't really tell exactly what it is. I know it isn't a Pro5.0, but it could be a Steeda or a Hurst. I'll try and throw a pic up and see if we can get it identified.
 
OP
OP
sluggish94

sluggish94

Member
Joined
Jul 18, 2020
Messages
128
Reaction score
127
Location
805
I've been enjoying this car a lot lately. I drove to Los Angeles and then to Long Beach last month for an all Convertible Mustang cruise. Then I made a trip to Huntington Beach the following weekend for a sick car show/cruise that happens once a month. If you'd like to see a video that I put together of those events you can find them on my YouTube channel, High Density Network.
What I see before I hop in every time. Freakin love it.
DSCF6661.JPG
Anyways, this car just keeps getting better and better. I swapped the jets out from 31/16 to 35/17 which according to Nitrous Outlet's jet chart is a "50 shot". Wow, what a difference in the hit! Now it really feels like it's going somewhere in first and second. It still falls on it's face in third. I want to gear it.
I also had to build a solid bracket for the nitrous bottle, not only to secure it a lot better but to also achieve a better mounting angle. A 15* degree angle is suggested when mounting the bottle horizontally.
DSCF6667.JPG
It's two separate pieces, and each piece is made to mount to the factory seat holes. The rear piece has a stubby boxed section to achieve the angle I was looking for.
DSCF6665.JPG
Total cost was $0. All scrap parts.
I also wired up a bottle heater that I got for stupid cheap. It's basically just a heating element/heating blanket, nothing fancy about it at all. This thing works excellent and heats up way fast. I made a shoddy little plate to hold the switch in place.
DSCF6669.JPG
Since I deleted the center console I had to do something about the wiring harness that runs inside of it. I ended up deleting a few pins on it and splicing in the bottle heater to the wires that operated the cigarette lighter.
DSCF6670.JPG
I retained the switch for the convertible top as well and tucked it nicely. It's still completely accessible even if I'm strapped in.
DSCF6672.JPG
Next I need to drill a hole in the floor pan to mount the blow down tube properly. I have to figure something out on that because the tube might be a little bit short due to the angle the bottle valve needs to be in (45* degrees).
DSCF6674.JPG
Since my last update I also got a chance to prime down both side skirts and as high up into the door jambs as I could. The body work is really coming together.
DSCF6677.JPG
I'm currently working on the last pieces that require paint preparation, the hood and the A-pillars. I'm really particular about the details when doing all of my sanding. This makes the process a lot longer but gives the greatest results.
DSCF6680 (2).JPG
Well, that's all for now. Thanks for looking, and thank you for being interested in my project.

$$$$$$$$$$ Dirty Money $$$$$$$$$$
DSCF6636 (2).JPG
 
OP
OP
sluggish94

sluggish94

Member
Joined
Jul 18, 2020
Messages
128
Reaction score
127
Location
805
Finally got to put my work to the test.
Drove out to Irwindale 1/8th Mile Dragstrip last Thursday and got 3 runs in.
1. Went a 9.0 @ 78.6 on motor, 2.01 60ft.
2. Turned the nitrous on and went 8.31 @ 84.65 with a best 60ft of the night, 1.94. This run I smoked a cammed out 6th Gen Camaro on an *expensive* race wheel setup. Haha.
3. Last run of the night was my best ET & MPH , 8.25 @ 88.95, 1.98 60ft.

Motor vs. Nitrous timeslips
DSCF7737.JPG
I lost .75 sec off my ET and gained 10mph on the nitrous!

Overall Dirty Money did fantastic. We drove there and back, 160 mile round trip. Guy who teched me in said I could go as fast as 6.39, so all my safety gear is up to snuff for a good while until I actually make some real horsepower. Next outing the goal is to come back with a 7 sec. timeslip. Thanks for looking.

$$$$$$$ DIRTY MONEY $$$$$$$
DSCF7675.JPG
 

totalchaos

Member
Joined
Nov 8, 2014
Messages
111
Reaction score
39
What magnaflow mufflers did you go with. A sound clip would be great if possible.
 

Blueraz_5.0

Member
Joined
Jan 22, 2021
Messages
143
Reaction score
41
Location
Houston
Would it be possible to get a few more pictures of the roll cage? specifically the backseat area? I’ve got a rear seat delete on my droptop and I’ve been thinking about how to get a roll cage in there. Just want to see how it looks.


Sent from my iPhone using Tapatalk
 
OP
OP
sluggish94

sluggish94

Member
Joined
Jul 18, 2020
Messages
128
Reaction score
127
Location
805
not bad bro, keep up the good work...
BTW, my 87 fox on engine, no hose...
View attachment 10202

Good times with that fox, I'm going to dip into the 7s next outing in the SN for sure. I just pulled like over 100 lbs from the interior (HVAC, Blower motor, heater core, ect, ect..) and i'll be doing some pretty solid performance mods to it. It's still a stock engine at the moment so I'm quite satisfied with the numbers and performance so far.
 
OP
OP
sluggish94

sluggish94

Member
Joined
Jul 18, 2020
Messages
128
Reaction score
127
Location
805
Finally got my Fox out for paint.
Now Dirty Money is in the garage.
Time to try and go fast with this turd.
IMG_4399.JPG
 

dookiemane

New Member
Joined
Apr 11, 2021
Messages
23
Reaction score
5
Amazing build man! As someone who also has pretty bad clearcoat and wants to repaint at home, can you detail your sanding and painting process?
 
OP
OP
sluggish94

sluggish94

Member
Joined
Jul 18, 2020
Messages
128
Reaction score
127
Location
805
Amazing build man! As someone who also has pretty bad clearcoat and wants to repaint at home, can you detail your sanding and painting process?

Thanks brotha, they're always far from done but it will get there with determination and hard work.
I am far from an expert on all the body/paint work. Please take these words only as suggestions and not as rules for preparation. Always keep the mentality that the longer you take preparing your panels, the better the end product will be. Generally what I will do:
-wet sand the panel with 320 grit to remove all the clear and first layer of paint. Having a bright flashlight helps to see where the panel still needs sanding.
-Then I'll take it down with 400 grit (wet) to get it smooth and ready to prime. The sanding part really is the most tedious and time consuming. I have a lot of hours of sanding this car down smooth. The thing is that if you don't get the entire panel down to the same consistency, the parts that didn't get sanded entirely will be very obvious once you prime. Then it will reflect even more once you lay the paint. So don't skimp on the sanding. A bottle sprayer helps keep the sandpaper& panel always wet.
-for priming I just used a rattle can. And don't skimp on the primer either because, like with the sanding, if your panel doesn't have the same consistency as you lay the primer, it will be very obvious once you lay your paint. When you spray your primer think about mowing a lawn or buzzing someone's hair with the clippers: you have to go slightly over the last section so that each section gets gotten entirely.
-my friend that has worked in the automotive body sector once recommended to me: "go over the panel *VERY LIGHTLY* one more time with 400-600 grit before laying the paint" . He said this helps the paint stick better to the surface.
-as far as paint preparation goes, we use single stage paint. My dad preps it and shoots it so I couldn't tell you much about the formulas and all that. I'd say just follow the guidelines for the paint that you're using and you can't fail! And don't forget the hardener! Ask me how I know!
Any other questions feel free to ask away!
 

Latest posts

Forum statistics

Threads
77,440
Messages
1,502,174
Members
14,920
Latest member
marktuck99

Members online

Top