FivepointSlow's Super Slow 1994 Mustang GT

OP
OP
FivepointSlow

FivepointSlow

Well-Known Member
Joined
Oct 22, 2013
Messages
2,646
Reaction score
60
Location
Enfield, CT, USA
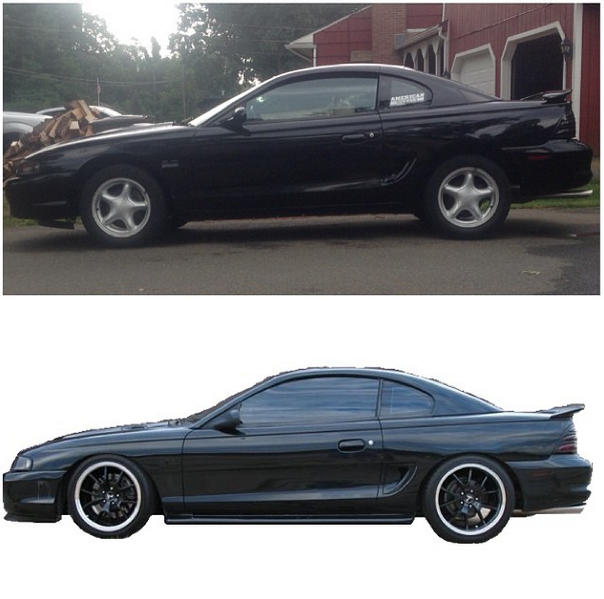
[MENTION=15502]Ferocious[/MENTION] Yea they look huge compared to when they're on my dad's 2007. The SN95s have a smaller body compared to the s197's though, looking from the front our car's noses look so tiny compared to the s197's and from the side it's the same deal. The roundness makes it look smaller I think. Also the tires on these wheels have a higher sidewall than if you put 18's on our cars... I think.. I'm not too sure. But that might account for them looking bigger than they are. I'm very pleased with these. And when it comes to change my tires I'll probably go looking for another set of take-offs and do the same thing but I should be able to get about 10k more miles out of these, which should last me over a year.

[MENTION=17616]the5.ohh[/MENTION] Yea I think I'm going to lower the car before looking at what spacers I want. I heard most guys that put wheels that are made for the s197's on our cars use 5/16" spacers up front and 1" in the back... I don't think I'm even gonna put spacers in the front and maybe I'll go 1/2 in the back... I want to be able to have it look nice daily driving and not hit my fenders, and when a big car show comes around I can drop it and tuck the wheels in a little bit.

I'll see how it looks when I put coil overs on it first though...


I put 3 coats on my other 2 wheels and I came back outside after a half hour of waiting and it started sprinkling... They didn't get too wet and I think the plastidip had enough time to dry before the rain so it didn't mess it up too bad. Just brought them back outside to put another coat on... hopefully they come out good.
 

mavisky

Active Member
Joined
Aug 26, 2011
Messages
328
Reaction score
15
Location
Atlanta, GA
YpfqC6U.png


For a minute there I thought you'd gone to the time to photoshop out the bush in this picture of my car lol


Good progress. I too tore the whole top end down and blasted everything. Cleaned up the front motor brackets so much when all said and done.
 
OP
OP
FivepointSlow

FivepointSlow

Well-Known Member
Joined
Oct 22, 2013
Messages
2,646
Reaction score
60
Location
Enfield, CT, USA
LOL loving your car! Thanks. I still have my valve covers and stuff. Waiting for parts to build my top end to button everything back up. It's coming along.


Sent from my iPhone 5 using Tapatalk
 
OP
OP
FivepointSlow

FivepointSlow

Well-Known Member
Joined
Oct 22, 2013
Messages
2,646
Reaction score
60
Location
Enfield, CT, USA
So it's about 40 degrees here, and that's pretty warm for what it's been lately. I decided to skip school today as I wasn't doing much at all in any of my classes, wasn't worth going. So I decided to venture out to the car and play with my turn signal wiring... At first I wired it correctly... White came on for turn signal and orange was for the parking lights.. But I wasn't thinking and thought that was wrong so I switched those wires.. now that I am inside I realized I had it right to begin with. So when I play with it some more one of these days and go to do the other side I will flip those wires again, and then solder it all up (right now they're all just twisted together and wrapped in electrical tape)

I had my moms old taillights harness' laying around from when we bought the splice in sequential kit, that shit itself after about a year and we got her the plug and play kit. So I had this harness that was doing no good, and was already cut up preventing it from ever being used as a 2005-09 taillight wiring harness again. So I got the idea to take it apart and use the sockets to fix my turn signals.

Couldn't of worked better. They fit pretty well. And it was a free fix, even though my existing harness' where working, they where hacked up so I wanted to set them straight.

Taking the harness apart
imGUiF0.jpg

Taken apart
AdM2eHY.jpg

rt5Bnz0.jpg

Installed.
Running lights
4yY2obC.png

7FwTqjk.jpg

Turn Signals w/running lights
zbkOawX.png

eq7jUZh.jpg

Turn Signals w/out running lights
VJRpQLx.jpg

bzEOnDO.jpg


I am going to see later how they look at night. I only bought these to see if I'd like them before getting the kit form AM. But I might just stick with these if they're bright enough at night.
 

white95

Apex Junky
Admin
Joined
Dec 30, 2007
Messages
20,630
Reaction score
8,814
Location
Prairieville, LA
What's the trick for getting the front bumper off? The tabs under my headlights don't seem to wanna release?
 
OP
OP
FivepointSlow

FivepointSlow

Well-Known Member
Joined
Oct 22, 2013
Messages
2,646
Reaction score
60
Location
Enfield, CT, USA
1994 Mustang GT project (Little bit of wiring... and LEDs :) )

white95 yea that picture is both amusing and good looking. Got the car with 1 busted license plate bulb lens and 1 missing one, so the upgrade to LEDs and the new lenses was night and day x10 for me.
And for the bumper: well a lot of people seem to remove the bumper without the headlight assembly... But IMO it's easier to remove the entire thing... 2 bolts on each side infront of the fenders, 1 screw on each side on the edge if the fenders, and 4 bolts in the grill area holding the headlight assembly to the radiator support. I know the5.ohh took off his bumper once or twice without the headlight assembly attached...

Orange94 (It keeps breaking when I try tagging you...)
Orange94 said:
-inset something Orange would say here-
Maybe it ill let me do that so you get the notification.. lmao
Went out and took this just for you
 
OP
OP
FivepointSlow

FivepointSlow

Well-Known Member
Joined
Oct 22, 2013
Messages
2,646
Reaction score
60
Location
Enfield, CT, USA
On a side note: hopefully updating this thread sometime in the next week. If everything goes as planned I'm getting a very nice pile of parts.


Sent via swagPhone 5.0 using Tapatalk
 

the5.ohh

Legend
Joined
Oct 15, 2012
Messages
9,561
Reaction score
129
Location
Shaolin, NY
Yeah I took my bumper off a few times, I removed the whole header panel first. It made it way easier, and the bumper just popped right off after getting all the bolts and crap off.
 

white95

Apex Junky
Admin
Joined
Dec 30, 2007
Messages
20,630
Reaction score
8,814
Location
Prairieville, LA
Im im sorry for the thread jack man!

just try working it up/down while pulling out a little at a time.

I tried that and it didn't seem to wat to budge

And for the bumper: well a lot of people seem to remove the bumper without the headlight assembly... But IMO it's easier to remove the entire thing... 2 bolts on each side infront of the fenders, 1 screw on each side on the edge if the fenders, and 4 bolts in the grill area holding the headlight assembly to the radiator support. I know the5.ohh took off his bumper once or twice without the headlight assembly attached...

Thanks!! I'll try that this weekend.. I wanna try to at least sand and primer my front bumper..

Yeah I took my bumper off a few times, I removed the whole header panel first. It made it way easier, and the bumper just popped right off after getting all the bolts and crap off.

Really, that sounds interesting.. My headlight panel has never been removed, is there anything that's prone to break I should watch out for?
 
OP
OP
FivepointSlow

FivepointSlow

Well-Known Member
Joined
Oct 22, 2013
Messages
2,646
Reaction score
60
Location
Enfield, CT, USA
Im im sorry for the thread jack man!
No worries! Glad my thread is helping you figure out your bumper!

As long as the discussion in here stays Mustang related I don't care haha. Just don't start talking about ponies or something on me. lmao
 

RonBurgandy

Active Member
Joined
Apr 4, 2012
Messages
838
Reaction score
8
Location
Pikeville, Nc
More info on led turn signals please and when you had the intake off you shoulda grab a gt40 from the pull yard or someone on here.

Brought to you from a a land far far far very far veryy very far away
 

the5.ohh

Legend
Joined
Oct 15, 2012
Messages
9,561
Reaction score
129
Location
Shaolin, NY
Im im sorry for the thread jack man!


I tried that and it didn't seem to wat to budge


Thanks!! I'll try that this weekend.. I wanna try to at least sand and primer my front bumper..


Really, that sounds interesting.. My headlight panel has never been removed, is there anything that's prone to break I should watch out for?

Not at all. All you need is a ratchet set. 2 bolts behind the sidemarkers on each side, one in the middle, and i think behind the headlights
 
OP
OP
FivepointSlow

FivepointSlow

Well-Known Member
Joined
Oct 22, 2013
Messages
2,646
Reaction score
60
Location
Enfield, CT, USA
More info on led turn signals please and when you had the intake off you shoulda grab a gt40 from the pull yard or someone on here.

Brought to you from a a land far far far very far veryy very far away

What info do you want? lol
If it's not snowing tomorrow I am going to go out and get the other turn side done.. Oh procrastination.
Also, I don't have the money for a gt40. And there is little to no mustangs in the junk yards around me. I think there might be one explorer I ran into but never bothered looking too far into because I believe it had the wrong motor.
Usually my junk yard hunts come up empty.
 

white95

Apex Junky
Admin
Joined
Dec 30, 2007
Messages
20,630
Reaction score
8,814
Location
Prairieville, LA
No worries! Glad my thread is helping you figure out your bumper!

As long as the discussion in here stays Mustang related I don't care haha. Just don't start talking about ponies or something on me. lmao

Your thread has inspired me to forget about the issues I'm having with my car and to tackle some other areas that have been horribly neglected.

Not at all. All you need is a ratchet set. 2 bolts behind the sidemarkers on each side, one in the middle, and i think behind the headlights

Dope.. I'm psyching myself up to really get my body work straight..
 
OP
OP
FivepointSlow

FivepointSlow

Well-Known Member
Joined
Oct 22, 2013
Messages
2,646
Reaction score
60
Location
Enfield, CT, USA
Glad I'm inspiring! Lol
Also I just noticed that the picture broke when I tried posting it in a previous reply...
So here it is Orange94 (it refuses to let me tag orange for some reason. any idea why?)
Hopefully not another broken picture..
lSYvwcR.jpg


Sent via swagPhone 5.0 using Tapatalk
 

RonBurgandy

Active Member
Joined
Apr 4, 2012
Messages
838
Reaction score
8
Location
Pikeville, Nc
Gt40 intakes come off of 90-99 explorers and moutaineers. Maybe earlier years too but idk. And around here there are plenty to be had upper and lower for around $60-70. They are a cheap and great uprgrade for the budget builder. And later they can be ported to flow just as good or better than some of thr lower end expensive name brand intakes.

I'd like to have a step by step if possible lol and what leds you used. I like the look and what to do this myself.

Brought to you from a a land far far far very far veryy very far away
 

Latest posts

Forum statistics

Threads
77,543
Messages
1,504,661
Members
15,007
Latest member
Isaac cerr

Members online

Top