My 351w Swapped 1995 Mustang GT

OP
OP
Chris Stephens

Chris Stephens

New Member
Joined
Dec 16, 2019
Messages
80
Reaction score
55
Location
Little Rock, AR
Thats badass!! I bet that thing sounded amazing at 7300. How much in total do you think you have into this engine? It's a pretty tempting setup with those numbers.

Welll....More than I should for the power level, in a way... Obviously, you could slap on a supercharger or turbo and make about the same or more, but I wanted a bada$$ naturally aspirated build. I overpaid on some things, I know for sure, but for the price I paid, I was satisfied knowing a VERY reputable shop did all the work. Plus getting to hear it on the dyno was very worth it.

In total, I am aboouuuut $15,000 into this engine build. The bill from the machine shop for ALL parts (including the Dart block, forged internals, and heads)...except the oil pan ($507), rockers (came with old engine), and intake (came with old engine) was about $12,600 (that included engine dyno time and tuning). Then you add in upgraded clutch, aluminum flywheel, that $507 FRPP oil pan, new low-mount alternator kit, etc, and its definitely around $15,000...

Any possibility of a video of how it sounds? :)

Absolutely! I will get some videos uploaded in the next few days....got to get some sleep tonight, the plan is to drop the engine in tomorrow afternoon!
 
OP
OP
Chris Stephens

Chris Stephens

New Member
Joined
Dec 16, 2019
Messages
80
Reaction score
55
Location
Little Rock, AR
Got some small things done today. Test fitted everything and got the accessories mounted. I really like the low-mount alternator bracket. Looks killer. I wish the guy who makes this would finish the power steering bracket so I can get rid of the ugly bracket on the other side.

183849126_2266604166808748_1501875426267922347_n.jpg 184051425_474028727144530_3918895836138605001_n.jpg
183571939_368619564579066_8526281556012607077_n.jpg 183876621_530136381726809_1094348829009885171_n.jpg


We had a problem on the dyno that took a little figuring out. On the first couple pulls, the Sniper was saying that the Injectors were operating at 164% duty cycle and something like 660 lb/hr of fuel. Obviously, that wasn't right...the Sniper is only capable of 400 lb/hr of fuel. Turned out that the passenger side rear injector had come unplugged! This is apparently a fairly common issue and the solution is just to put a zip tie on the injector and wire. I still have my doubts as to whether the piston in the old engine cracked only recently, but if it did, that was likely the cause. I had the O2 sensor in the driver-side collector. So if they were getting more fuel than the passenger side, it's possible it was leaning out the rear passenger side and the Sniper had no idea. You would think that a shared plenum like a single plane Vic Jr would still be ok, but at high RPM, maybe the injectors simply couldn't keep up. Hard to say for sure. Thankfully, we figured that out quick on the dyno since we had an O2 sensor in each header collector and the Sniper sensor in the #3 cylinder header tube.

So I cracked open the Sniper today and went ahead and zip-tied them all on to eliminate the possibility that it happens again.

183978783_256292376284613_9089084700151543799_n.jpg
 

Burninrock24

Active Member
Joined
Mar 19, 2013
Messages
644
Reaction score
71
Location
Minneapolis, MN
In total, I am aboouuuut $15,000 into this engine build

That’s not far off the number I had in my head. Money is just that, money. But to create something unique and special like this and taking the time to do it right. The accumulation of those efforts transcend forcing boost and spray into it. Great build!
 
OP
OP
Chris Stephens

Chris Stephens

New Member
Joined
Dec 16, 2019
Messages
80
Reaction score
55
Location
Little Rock, AR
Busy day yesterday. Installed the MGW shifter which, since the TR-3550 has two forward bolts for the shifter that sit under the tunnel, required removing the trans cross member and dropping . Got the flywheel, clutch, pressure plate installed.

6FE3ACC4-4296-4E99-9B5E-31BBD3803B73.jpeg

Then got the engine thrown in, bolted up.

Even got the PITA headers completely installed. And a bunch of other smaller things. I didn’t stop and take photos, it was go go go all day. I’m on a bit of a time limit.

A35C6A1E-64BE-4845-A29D-B9E48CED1BBA.jpeg 7BA39765-1F2A-4649-A131-8BC1B6E41905.jpeg E0D47174-ADAA-4EDA-B6B1-88C6908CADC8.jpeg

Also picked up the correct length belt. And installed the fan assembly and overflow bottle. I’m officially to the “piddly” stuff. I went ahead and filled it with oil to make sure I don’t forget later lol.

I still have a pretty good amount of stuff to do. The brake system needs a prop valve still. The starter needs installed. Pinion angle needs checked and adjusted. Clutch cable needs adjusting. I need to properly install the Holley Sniper wiring. I have a full set of mechanical gauges that need installed. Still have some wiring in the engine bay that needs to come out. New mount for the alternator means I need to redo the alternator wiring a bit. Needs some hoses and things. Wiring still looks junky, so that still needs some work. Need to get the new rear lower control arms on.

Exhaust will need work. One of my issues with the 1-3/4” headers I have is that the collector is a full 3”, but the flange necks down to 2.3”. Would that have made a difference? I have no idea. But I’m going to a mandrel bent 3” exhaust with x pipe and DynoMax Bullets, so I want a full, real 3” exhaust. I’m going to have the flanges cut off and V Band clamps installed.

And that’s just what needs done before I take it AutoCrossing next month.
 
OP
OP
Chris Stephens

Chris Stephens

New Member
Joined
Dec 16, 2019
Messages
80
Reaction score
55
Location
Little Rock, AR
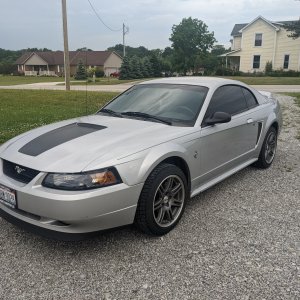
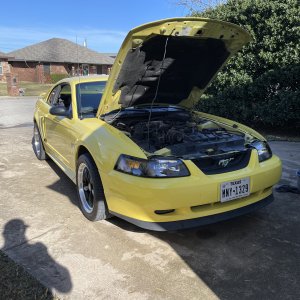
I got the Mustang started last night!


I took my time and made sure everything looked decently nice and, most importantly, would work properly. I didn't want to spend a bunch of time chasing gremlins because I didn't do things right in the first place. I guess I did well enough with it, because I finally got to take it for a test drive last night to the gas station and then over to the exhaust shop this morning!

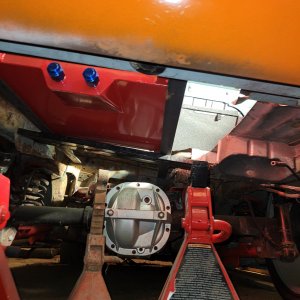
I definitely wasn't gonna choke down a 635hp engine with the old 2.5" X Pipe kit I had before. And that 2.3" flange on the header wasn't gonna cut it either. It got treated to a pair of V Band clamps on the collectors, 3" pipe with X, DynoMax Race Bullets, and turn downs.

I have a pretty great exhaust guy...he's a little gruff, definitely not the go-to guy for a show car, but if you want a good, cheap exhaust, he's the man! Because I knew routing a 3" exhaust and massive X-Pipe around the driveshaft, DS loop, cross member, torque arm, etc, was going to be a pain without going too low to clear speedbumps and some parking lots, I actually gave them permission to remove the driveshaft loop (it's not really needed with a torque arm) or even just install the 3" pipes and Race Bullets without the X pipe (I figure I wouldn't notice power loss or anything from not having it)...but they made it work and still look pretty good. Shouldn't hang much lower than anything else on the car either.

191083464_984585715656128_6607140383813881187_n.jpg
191251453_5635324663175410_74381872108787597_n.jpg

I haven't heard it run with the new exhaust yet, the exhaust guy just sent me these photos, so I may hate the way it sounds lol...but at least it ought to be a little quieter and still make good power.

The most important thing about getting the exhaust was tuning. The O2 sensor installs into the collector, so with open headers, it doesn't read the exhaust properly, it just reads fully lean. I went in and shut the Closed Loop and the Learn off completely, and thankfully the idle and lower RPM tuning that we did on the dyno was good enough to drive it on. Now I can really start tuning the stuff we couldn't do easily on the dyno, like part throttle, acceleration enrichment, etc.

The first AutoCross with this new setup is in two weeks, then its first track event is June 17 and 18! Not a ton of time to drive it and make sure all the bugs are worked out, but hopefully just enough.
 
OP
OP
Chris Stephens

Chris Stephens

New Member
Joined
Dec 16, 2019
Messages
80
Reaction score
55
Location
Little Rock, AR
We tuned up all the wide-open throttle stuff on the dyno, but I have been playing with and tweaking all the other idle and drivability stuff off and on for the past couple weeks. Since my first event is only a week out, I decided to throw in the towel on my own tuning effort. I was scared to change much myself because I am definitely not a pro tuner and REALLY don’t want to mess up this nice new engine. I had previously used the guy that I bought my Sniper through, who I reached out to again, but he wasn’t available to get it done on short notice, so I reached out to another gentleman I had heard good things about. He was able to jump on the next day (last night) and play with it a little. After I sent him my tune file, he wanted to “see” it run using TeamViewer and my connected laptop before he committed to tuning it, since it’s a pretty racy combination. He made some tweaks and adjustments and got it running and driving way better than it was before.

I did finally order some seats, Corbeau LG1s. My cousin has been bugging me about them for over a year, because mine really weren’t very good. But I think I posted here about my seat bolt (the front left one that holds the seat to the seat track) coming out while on the AutoX course back in December. I put it back in in December, but then started the engine tear down. Well, I reached to the back seat to grab something the other day and it popped out again. I guess the seat bolt hole in the seat itself is stripped out. Rather than fiddle with it and hope I can make it work, it seems like a good time to make the upgrade to the Corbeaus. I won’t have a roll bar to install harnesses, but I’m sure it’ll still be better than before.

I got the nice Maximum Motorsports Extreme Duty rear lower control arms installed last week while I had the car on the lift to swap wheels and tires. The old urethane bushing lower arms were probably as worn as the uppers were when I removed them. The MM ones are significantly heavier than the old ones, since they are stouter and have spherical bushings on both ends, but they should still be a worthwhile upgrade.

I have to say, I am REALLY impressed with the straight line traction of this rear suspension. With the old suspension setup, and the setup on pretty much every Mustang I have owned in the past, I had some wheel hop and the car would try to turn to the right as you were taking off. I have been driving this thing hard on the backroads, and it’s so much better than before.

I also have some new gauges that should be here today that I am hoping to have completely installed this weekend. Holley EFI Analog gauges for the GPS Speedo and the Tach, Autometer water temp and programmable fuel level. I already have an Equus voltage gauge and oil pressure gauge. It’ll be a little mismatched in branding and font, but at least they are all white face and..hey, it’s a racecar.
 
OP
OP
Chris Stephens

Chris Stephens

New Member
Joined
Dec 16, 2019
Messages
80
Reaction score
55
Location
Little Rock, AR
well now everybody loves M&M :)

Ok, after a drive to go get some Chick-Fil-A today, I do have to back off my claim that it doesn't try to break loose: if you stomp it hard in first, it'll still spin them and the car will still try to point to the right...but that was under a LOT of throttle (more than I would normally give it trying to take off in AutoX or something) with a 600 horse engine. So I am still very impressed.
 
OP
OP
Chris Stephens

Chris Stephens

New Member
Joined
Dec 16, 2019
Messages
80
Reaction score
55
Location
Little Rock, AR
Got all the gauges installed and functioning...they don't match, but they will do for now. The Holley gauges look AWESOME, so I may slowly get more of those until I have a matching set. Once you run one wire from the Sniper, they can output anything the Sniper outputs like water temp, RPMs, etc.

198700068_477796119990921_5463407827521699283_n.jpg
197863571_329720542086441_6924694989616543175_n.jpg 197842668_910346126569056_4543410159951569336_n.jpg

New seats are installed and they fit me peeeeerfectly

197886913_865505800842979_5114270046769833648_n.jpg


Race Louvers installed, too...I enlisted the help of a friend with a grayer beard, steadier hand, and better eye for detail.


197602647_1044498579287237_3884654390735031916_n.jpg 198303886_482675899702875_115152737937785059_n.jpg 197842396_1004583837016901_8276662354115451921_n.jpg 197783585_239999340809881_6481040607199215627_n.jpg 197814415_197832112212801_3147238263996825291_n.jpg 198319188_387783002601414_363409624753907439_n.jpg
 
OP
OP
Chris Stephens

Chris Stephens

New Member
Joined
Dec 16, 2019
Messages
80
Reaction score
55
Location
Little Rock, AR
A couple weeks ago, I pulled out one of the spark plugs that the engine shop had put in before we put it on the dyno. They were NGK non-resistor plugs. Anytime you're running fuel injection, resistor-type plugs are recommended to avoid RFI issues (something the Sniper is known to be susceptible to). I called NGK to get them to cross the part number that was in the engine over to a resistor style of the same reach/heat range/threads, etc.

When I told her the part number on the plug, the woman from NGK asked if I was running boost or nitrous. I said no, and she asked if this was a 14-15:1 compression NA engine...I said no. She then said that the plug I had is way too cold for even a higher dynamic (200 PSI cranking) compression naturally aspirated engine. She said they recommend a 6 heat range for most NA engines in the 10.X:1 range, and a 7 heat range for 11.x:1 to be on the safer side since I am at about 10.8:1.

While I had her on the phone, I got to thinking about a drive a took the car on a previous day. I started it up and let it idle for a few minutes to warm up a bit. Then got in and took off. The car was running terribly. Chugging and breaking up just driving normal even though it showed the coolant was fully up to temp. I waited until I got on the interstate, then laid into it on the on-ramp. It came to life and ran beautifully! And continued to run beautifully the rest of the drive. I have tried it a couple of times since then, and it does this same thing pretty much every time. I had always assumed it was the cold start enrichment needing some tweaking, but then I got to thinking...

I asked the woman from NGK if these two things could be related; could too cold of a heat range be causing it to try to foul plugs at lower RPM and idle, and then when I really jump on the throttle and hammer it, that gets them up to temp and lets them burn off the crap? She said absolutely and said again that I didn't need to run anything colder than a 7 NGK heat range and a resistor-style for the Sniper's sake. She recommended the BKR7E or 4644 part number.

I contacted my tuning guy just to get his thoughts, and he fully agreed with NGK.

I put those in and BAM! engine starts cold every single time and runs nicely. Still has a bit of a hiccup when cold, but I'm not gonna be the hot rodder that complains about a "bit of a hiccup" on a 635hp engine doing what it's not built to do.
 

Latest posts

Forum statistics

Threads
77,439
Messages
1,502,159
Members
14,920
Latest member
marktuck99

Members online

Top