Project Red Headed 3v

dirtyred11

Active Member
Joined
May 15, 2012
Messages
338
Reaction score
0
Location
Jacksonville FL
I saw this stang on my local craigslist, nice to see it fell in the hands of a good owner that can bring out its potential. I will definitely be checking in for updates
 
OP
OP
T

Thomas_W

Well-Known Member
Joined
Jan 25, 2007
Messages
1,485
Reaction score
62
Location
Capon Bridge, WV
I saw this stang on my local craigslist, nice to see it fell in the hands of a good owner that can bring out its potential. I will definitely be checking in for updates

Haha. If only the craigslist ad would of been a little more informative... Oh well. I probly woulda still bought it, just for less... LOL
 
OP
OP
T

Thomas_W

Well-Known Member
Joined
Jan 25, 2007
Messages
1,485
Reaction score
62
Location
Capon Bridge, WV
So a few buddies were over this past weekend to help do some sanding in an airplane and they notices how horrible the cowl hood was. So one of them posed the question:

"Why dont you mold it and make a Carbon fiber one?"

This is actually something i had thought of doing. I havent been able to find anyone who does a 4" conra R style hood for a 99-04 in Carbon...
Another thing that makes this a little more feasible is that the roof will need repainted, the decklid needs replaced (and repainted) and of course the hood. So basically the entire top of the car. I have been thinking of doing a black or very dark Grey two tone similar to this photo i found on the net:

2000_00022_01.jpg


So, im looking for opinions on how you guys think that would look? Of course it'll be wingless, 03/04 cobra bumper and it'll probably end up getting bigs n littles after the current stuff is done.
 

RedTwilight

Active Member
Joined
Jun 12, 2011
Messages
635
Reaction score
56
Location
Roxboro, NC
So a few buddies were over this past weekend to help do some sanding in an airplane and they notices how horrible the cowl hood was. So one of them posed the question:

"Why dont you mold it and make a Carbon fiber one?"

This is actually something i had thought of doing. I havent been able to find anyone who does a 4" conra R style hood for a 99-04 in Carbon...
Another thing that makes this a little more feasible is that the roof will need repainted, the decklid needs replaced (and repainted) and of course the hood. So basically the entire top of the car. I have been thinking of doing a black or very dark Grey two tone similar to this photo i found on the net:

2000_00022_01.jpg


So, im looking for opinions on how you guys think that would look? Of course it'll be wingless, 03/04 cobra bumper and it'll probably end up getting bigs n littles after the current stuff is done.

I think it'll look Sweet! Go for it!
 
OP
OP
T

Thomas_W

Well-Known Member
Joined
Jan 25, 2007
Messages
1,485
Reaction score
62
Location
Capon Bridge, WV
I started the wire tuck today, which involves removing basically every front body panel minus the hood. Not alot of pictures as im not even close to buttoning it back up, but heres a few:

Driver fender removed:


radiator upper mounts removed so the wiring harness between the core support and radiator can be removed (im going to have to replace this core support eventually)


the harness behind the radiator has now been pulled through the hole the washer reservoir pokes through:


I now need to open up the main harness to free some wires and make it easier to route it all. My plan is to leave the fuse box under the hood as i dont want to lose the windshield washer or clutter under the fender as ill need that space for the twin turbos later on.
 
OP
OP
T

Thomas_W

Well-Known Member
Joined
Jan 25, 2007
Messages
1,485
Reaction score
62
Location
Capon Bridge, WV
It is very tedious. It would of been MUCH easier had i not had the restrictions on how i wanted it done.
 
OP
OP
T

Thomas_W

Well-Known Member
Joined
Jan 25, 2007
Messages
1,485
Reaction score
62
Location
Capon Bridge, WV
I FINALLY get to do something other than repairs... For now. Parts arrived today:


-12AN stainless braided hose and Two 90* fittings for re-routing the upper radiator hoses
driver side valve cover breather
3 1/2" OD Carbon fiber tube
4 1/2" to 3 1/2" reducing 90* silicon elbow
4 1/2" T-bolt clamp
3 1/2" T bolt clamps
45* 3 1/2" silicon joiner
Steeda 4 bolt Caster/Camber plates (BNIB ebay steal at $150!)


all this stuff is basically things needed to finish up phase 1 of the build.

Here is a before picture of the engine bay:


The super short passenger side upper radiator hose blocked the way of a CAI on the passenger side, so i had go reroute it. The radiatoe filler port also needed to raise up to prevent an air lock in the hoses above it. The CAI was a C&L elbow for a 3v car. It worked, but i didnt like it, nor did it perform well sucking in hot engine bay air, so its got replaced as well.

Here we are now:


No a huge difference, but its a step in the rigt direction. The Steeda C/C plates will get put on with the coilovers, which i hope to order in the next week or two along with the tubular front suspension, battle boxes, through the floor subframe connector materials and new upper/lower rear control arms.


I also have to replace a AC clutch, clutch cable, Throw out Bearing and find out why the FRPP aluminum driveshaft is completely bottomed out in the transmission.


Slowly making progress :)
 
OP
OP
T

Thomas_W

Well-Known Member
Joined
Jan 25, 2007
Messages
1,485
Reaction score
62
Location
Capon Bridge, WV
Yeaterday i drained the Diff and put in some Mobile 1 diff fluid and friction modifier. I also went to replace the trans fluid, but when i pulled the fill plug out of the T45, 5 1/2 quarts of fluid came pouring out of the FILL port! Lol. Whoever did that... Wow... Anyways, the fluid was really clean and clear, so i didnt bother replacing what was left. Its amazing how much nicer the transmission shifts now. Lol

so today I FINALLY got to drive the car. Overall it ran about as well as i expected. It badly needs a tune. It also needs some reae control arms, anytime you downshift the rear of the car swings to one side. Not surprising seeing as how the bushigs look shot. So I'll likely order some pro series UPR upper and lowers.

As far as the ones that are in the car, ill probably give them away for the price of shipping as i think the bushings are around $100 for all four.

I also ordered a UPR triple hook clutch quad, firewall adjuster, stock clutch cable and a spanner wrench.
 
OP
OP
T

Thomas_W

Well-Known Member
Joined
Jan 25, 2007
Messages
1,485
Reaction score
62
Location
Capon Bridge, WV
I spent yesterday and today getting the UPR clutch stuff installed and adjusted. I always try and keep a bit of gap between my TOB and pressure plate as Its not supposed to spin all the time and IMO is one reason why they always go out so quickly.

I typically run Steeda double hook Quadrants, firewall adjuster and a stock cable. Problem is i never was able to get a small amount of slop in the pedal with it nearly level with the brake pedal And have it grab close to the floor.


Which is why I just put a UPR triple hook, extreme FWA and a stock cable in this time.
Everywhere i found (directions included) said to use the center hook. With the cable here, there was constant pressure on the pressure plate, the clutch pedal in the factory stop location (in your nuts! Lol) and the clutch didnt grab until the last 1" of pedal adjustment. I had constant TOB squeek as well. This was with the FWA all the way in as well.

I put it on the hook closest to the firewall and was able to move the pedal stop (UPR clutch pedal adj. stop) to just above the brake pedal. I then pulled the clutch cable out so the slop was taken up and the TOB tight to the pressure plate. The FWA was then adjusted to fill the gap, then turned back in about 2-3 turns to provide some slop at the pedal.
Clutch grabs about 1" off the floor and no TOB squeek.


Long story short: leave some gap. Lol
 
OP
OP
T

Thomas_W

Well-Known Member
Joined
Jan 25, 2007
Messages
1,485
Reaction score
62
Location
Capon Bridge, WV
I pulled the hood off today so i could degrease the underside and start the inner reinforcement panel repair.

Here it is on my main work table after cleaning it up:


I'm 95% sure this is a cinicannti composites hood. Which knowing so isnt surprising it failed. The inner reinforcement panel is only .030" thick of fiberglass, i would of expected it to be at minimum .080-.090". The glue joint between the inner and outer panels is also pretty horrible. Whatever homemade concoction they used is extremely brittle as the glue cracked and broke. Its extremely likely that just opening and closing the hood and having it rest in the prop rod would have caused a glue joint failure over time.

These are all the reasons why spending the extra $$$$ on a quality hood is worth it. I'll probably spend $125-150 worth of materials repairing this hood and another $500-800 worth of body work to repair the roof. With the front bumper, hood, roof, decklid, rear bumper and side skirts (im going to put 03/04 cobra's on) I am very seriously thinking about just color swapping the entire care. The cost of Laser red metallic paint is ridiculous (about $650 for a gallon of the base and mid coat).
 

lwarrior1016

Mr. Secondary Timing Chain
Staff
Joined
Sep 22, 2014
Messages
8,554
Reaction score
4,381
Location
South Mississippi
Take some good pictures of the hood repair, please. I will be finishing up some repair on my hood and your thread will be very helpful because ive never worked fiberglass before.
 
OP
OP
T

Thomas_W

Well-Known Member
Joined
Jan 25, 2007
Messages
1,485
Reaction score
62
Location
Capon Bridge, WV
Wow....030" thats not much at all.

Yea its ridiculous. This was in one of the areas that is the most stressed (front corners). The entire piece that runs side to side along the front is completely missing. Its unlikely it was any better.

This is where cheap gets you. Chopped strand glass cloth builds thickness very quicky, but if you just throw it in there, it doesnt do much for strength.
 
OP
OP
T

Thomas_W

Well-Known Member
Joined
Jan 25, 2007
Messages
1,485
Reaction score
62
Location
Capon Bridge, WV
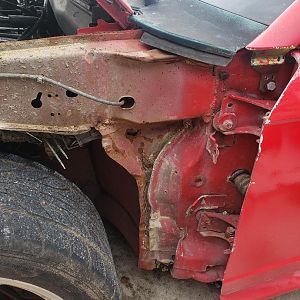
So today i continued on with the hold repair.

This hold is originally chopped strand fiberglass and polyester resin (aka fiberglass resin from the bondo cans sold in most home and auto stores).

I refuse to use polyester resin as if its not used properly and over time it'll cause some serious health problems (and it stinks), epoxy is slightly better, but still needs properly ventilation and working habits.

So first up is taking some 30 grit sandpaper and scuffing up all off the new bonding areas Very well. Epoxy needs a mechanical hold on polyester, so the coarser paper the better. This then all gets triple cleaned with Acetone.

For the areas of the inner liner that were only broken free at the glue joints, i cleaned those areas out with 30 grit and acetone as well.

I then used some Hysol E20HP to bond the inner reinforcements back to the outer skin. This is an adhesive that i keep on hand, but its expensive at $18 for a 50ml tube. So its not something most would have to use.


For the gaps along the side innee liner, i cut off the shredded edges and then sanded these edges to a taper about 1/2" wide. Then i super glued some balsa wood sheeting on the inside the liner panel. This provides a flat surface for the fiberglass to sit on.

I also roughened up 2-3" past the tapered areas and again cleaned with acetone.

6oz fiberglass was then cut to extended about 1/2 way into the roughened area past the taper on either side of the gap. Then more 6os glass was cut and places inside the gap only. This was all done with epoxy at once. After 3-4 pieces in the gap, another piece slightly smaller than the very first was put in. Then more glass in the gap only. Once the area of the gap was filled in enough to nearly match the original thickness, a piece of 6oz Slightly larger than the very first piece was put in place. I then placed a piece of 1.4oz fiberglass over the entire size of the roughened area on. Peel ply was then put in place and it was all left to cure.

Once cured, the peel ply was removed and the repaired areas are now ready for primer and sanding... Eventually (picture of the repaired areas coming tomorrow).


this now left just the front portion of the inner liner missing. Replacing this is similar to the gapped areas. You need a surface to apply the glass. For this i used some regular white styrofoam insulation. It was cut to a shape i liked and glued in place with a hot glue. After much test fitting, sanding, rinse, repeat, i had it fitting how i wanted with zero interference with the headlights and radiator support.


Then it was just a matter of putting some 6oz glass over the entire piece of foam and along the cleaned/roughened areas of the original hood. I used about 6 layers of 6os fiberglass and 1 layer of 1.4oz glass. This was all covered in peel ply as well.

Tomorrow the peel ply can be removed and some epoxy/phenolic microballoons applied to the front lip. This mixture of stuff is more an asthetic thing than anything as it'll be used to flatten the forward lip to provide a uniform thickness.
 

RedTwilight

Active Member
Joined
Jun 12, 2011
Messages
635
Reaction score
56
Location
Roxboro, NC
What epoxy resin are you using and where are you getting it from? I've been thinking of ordering up some West Systems resin for when I modify my H.O. Cobra hood.
 
OP
OP
T

Thomas_W

Well-Known Member
Joined
Jan 25, 2007
Messages
1,485
Reaction score
62
Location
Capon Bridge, WV
What epoxy resin are you using and where are you getting it from? I've been thinking of ordering up some West Systems resin for when I modify my H.O. Cobra hood.

The resin i recommend to most everyone who wont be doing huge quantities (i buy 5 gallons at a time) is the USComposites 635 Thin resin system with the Medium Hardener. Its substantially cheaper than West system and far better from my experience and research.

Most all of my fiberglass cloth comes from www.thayercraft.com

my Carbon fiber i import from germany
 

Latest posts

Forum statistics

Threads
77,517
Messages
1,504,122
Members
14,983
Latest member
robtalbott
Top