The shocks have been dropped off at ProParts USA this morning. Upon the initial inspection, everything looks ok, nothing is too damaged. The shocks will have to be nitrogen filled, and because the fronts don't really have a good place to mount the fill port, we might have to either notch the coilover sleeve a bit, to clear the bolt, or possibly mount it lower. I got a chance to see what the Fox strut looks like now, and you can clearly see where the difference is. The sleeve that mounts it on the spindle is about an inch higher on the strut than it is on SN95. The spring rate range has been chosen to 450 - 550 range for valving. Also depending on what the inside of the struts looks like, I may choose to shorten all 4 dampers 1.5 inches so I could get more travel out of them. I should get them back in about 3-4 weeks, really looking forward to seeing how they are like on the track.
You are using an out of date browser. It may not display this or other websites correctly.
You should upgrade or use an alternative browser.
You should upgrade or use an alternative browser.
ReplicaR's Time Trial Mustang build *Engine Rebuild*
- Thread starter ReplicaR
- Start date
Another update. I recently sold a pair of my old Sparco recliners to codfod, and that freed up a bit of budget to put in a new non recliner for passenger side. I went through Sparco catalog, and picked the cheapest competition non recliner seat, which ended up being Sparco Sprint. Going from the Torino 2 to Sprint will drop about 10 lbs or so, and on top of that the seat will work better with harnesses and rollbar.

While I was at Sparco, I've decided to try on a race suit or two, and ended up liking this one a lot. Victory RS-4, which is a super light, very breathable, single layer suit. Size 54 fit pretty well, but I would probably get it tailored a bit to remove some of the bulk from legs and arms, so it would fit a bit better. Might be some time before I buy it, but I'm definitely convinced this is the suit for me. I will get a different color combination, with red stitching.

While I was at Sparco, I've decided to try on a race suit or two, and ended up liking this one a lot. Victory RS-4, which is a super light, very breathable, single layer suit. Size 54 fit pretty well, but I would probably get it tailored a bit to remove some of the bulk from legs and arms, so it would fit a bit better. Might be some time before I buy it, but I'm definitely convinced this is the suit for me. I will get a different color combination, with red stitching.
chris91
Well-Known Member
Funny you say something about the Fox strut. I was further inspecting the 6 struts I have and noticed two of them had what you mentioned with the mount up higher. Was wondering the difference, now I know. And now I know which ones I'll be having rebuilt first.
Sweet hair bro!
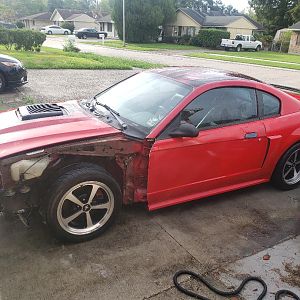
You should do a good walk around for us soon so we can really check out the whole inside and outside of the car.
You should do a good walk around for us soon so we can really check out the whole inside and outside of the car.
Sweet hair bro!
You should do a good walk around for us soon so we can really check out the whole inside and outside of the car.
You mean like a video or something like that?
You mean like a video or something like that?
Yes. I thought I said walk around video this morning. Forgive me, it was a long night lol
So, I was looking at some pictures today, and realized that I have Sparco street seats and my new Sparco race seats photos taken in almost the same position. So I put the two photos side by side, and ended up with almost a before and after type of photo.
On the left, Sparco Torino 2 for both driver and passenger seats. Comfortable, supportive, and great styling, the seat matched the car perfectly, both being produced in the 90s. On the right, Sparco Circuit 2 on the driver side, and Sparco Sprint on the passenger side. Sprint is an excellent budget competition seat, light and afforable. Circuit 2 is a very comfortable competition seat, which also includes driver head and neck safety halo and angle adjustability thanks to side mount.

On the left, Sparco Torino 2 for both driver and passenger seats. Comfortable, supportive, and great styling, the seat matched the car perfectly, both being produced in the 90s. On the right, Sparco Circuit 2 on the driver side, and Sparco Sprint on the passenger side. Sprint is an excellent budget competition seat, light and afforable. Circuit 2 is a very comfortable competition seat, which also includes driver head and neck safety halo and angle adjustability thanks to side mount.
This is an informative thread and leads to the recurring SN95 headache of what class do I run in. Turning this pig's ear into a silk purse follows a common theme here to get this car up to competitive form. Running CAM requires a stock interior after you tear everything out to get the weight down but the rest of the car can be F1 tech ?? SCCA C prepared is where many of us end up and the winners are stripped clean cars with 600 pound springs and are welded up bricks, large go-karts really. I know both the mid atlantic MARS winner and the SCCA solo winner for multi years and the cars are Ford shaped only. Between the 2 of them they own 3 Mustangs but 8 MX 5 Miatas, that says alot right there. Our cars are short wheel base with a V8 and manual trans and should be the cheap go to platform for budget racing compared to all the BMW's I have to deal with. Your car with 365hp is right at the sweet spot for speed and reliability but gets shoved into the unlimited class around here and then you are out classed by big money GT3's, Vettes and Vipers and end up living in the right lane. I am not *****ing for a new class all our own, just not that many SN95 cars around but turning our Ford Fairmonts into something safe to run at triple digit speeds should not get us banished to hard to comply classes. You have a tough choice to make.
I've actually chatted a bit with some AI racers, and they've suggested a few things I can do as far as the detuning and classification goes for NASA TT. I will still try to make TT3, hopefully the car will classify. I know I'm not allowed certain points even though I think the rules are ridiculous regarding the stock aero bonus points not being allowed because I'm running an aftermarket K-member. To that I say, whatever, just gives me a reason to slap on a huge wing and a splitter and go even faster.
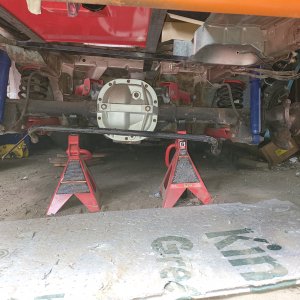
Spent about 3 hours yesterday swapping the left axle shaft. At first I was going to get the shop to do it that changed them 5 years ago, but they kept lagging on a quote, until I did a little research on my own and found the exact replacement part I need. This way I would only have to change one side rather than both. I was a little concerned about taking the c clips off with Torsen, but it was actually easier than I thought it would be. You have to remove 8mm bolt, then the retained block slides right out, and you have full access to the c clip. ABS wheel and studs had to be pressed off and on, so I took it to a nearby part store, that did it for 35 dollars. Add about another 50 dollars in parts (fluid, lock tite, silicone gasket maker, shop towels, brake cleaner) and 120 dollars for the axle shaft from Summit Racing, and I was done for just about 200 dollars. Not bad at all. Shocks should be done soon, so that's the next update.
The ABS reluctor wheels come right off and on with big heat. Just heat the outer edge and let the heat run to the inside, I did 3 sets so far this way.
I assume something like a blow torch is necessary? I didn't have it, and it was just simpler for me to take the axle shaft in. Maybe if I do it again in line 5 years or whatever it will be before I have to change the axle shafts again.
I just used a propane torch, took time to get it hot enough but it will lift right off. I do own a hydraulic press too but when my cheap buddy did it this way in 2 minutes I was hooked. You must take a wire brush and clean off the junk first but you still do that with a press too.

Nice! I hope they work out well for you
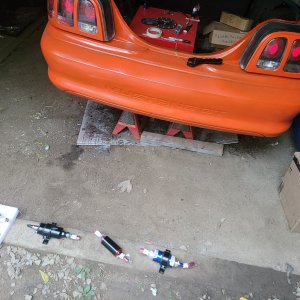
Well, the shocks are done. Here is the list of things that was performed.

As you can see, there was some substantial work done to the shocks and struts. What does it all look like, you may ask? Well like this.

The company has also provided a shock dyno sheet for each shock. If you look at the graph, you will see that shock was dynoed moving up and down one inch from the set point, and the force that it can handle. The top curve is compression, and bottom curve is rebound. Since these are single adjustable shocks, the adjustment doesn’t change the compression, but rebound only. Even so, you can see how much room in adjustability I have for rebound. Currently I’m running 450 lbs F / 300 lbs R setup, but even if I decide to add aero or stickier tire and compensate with more spring rate, I have more than enough room to do it all. That’s the beauty of the adjustable shocks.


As you can see, there was some substantial work done to the shocks and struts. What does it all look like, you may ask? Well like this.
The company has also provided a shock dyno sheet for each shock. If you look at the graph, you will see that shock was dynoed moving up and down one inch from the set point, and the force that it can handle. The top curve is compression, and bottom curve is rebound. Since these are single adjustable shocks, the adjustment doesn’t change the compression, but rebound only. Even so, you can see how much room in adjustability I have for rebound. Currently I’m running 450 lbs F / 300 lbs R setup, but even if I decide to add aero or stickier tire and compensate with more spring rate, I have more than enough room to do it all. That’s the beauty of the adjustable shocks.
So, yesterday I spent about 5 hours working on the mustang. The work consisted of resealing the diff cover, and reinstalling the dampers. The cover was my fault. I didn't use a gasket, and didn't seal the cover well enough, and surely, it leaked. This time I sealed the diff cover with a gasket, and put the Ultra Black on both sides, so hopefully this does it. I'll check back again in a couple of days to make sure that there are no leaks. I used similar procedure for thermostat, and no leaks there with thinner fluid and under pressure.
The shock install was pretty time consuming. I had to trim down the bushings in the rear shocks, so I could even mount the damn thing, put the rear coilovers on, take them off realizing that shortening the body meant that I had to adjust the ring, putting them on again, taking them off one more time, because the rear was too low still, install front ones, mount all the wheels, lower the car, raise the car, adjust front left, and finish. Definitely not my favorite task as far as installation goes. The rear coilover sleeves spin freely on the shock, so that means you have to hold the sleeve in place with something, and the right side has no room to work on between the panhard rod and rear exit exhaust, so taking the shocks off was honestly, the fastest way to adjust them. Anyway... done venting.
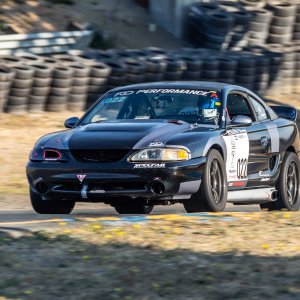
The impressions: The damper rebuild made a huge difference in how the car feels. Even at full soft settings, I can tell the shocks are much firmer than they used to be previously. I tried it just around a few slow corners, over some slow bumps, and quick direction changes. Even at full stiff on the original dampers, the car felt a little floppy. It was firm, but it didn't feel controlled. That's definitely not the case anymore. The body motion feels controlled and smooth, it doesn't flop around like it used to. The car feels much more composed, doesn't feel like the rear axle acts as freeweight anymore, just bouncing around at its own will. I am very much looking to see just how confidence inspiring the car will be at the track. More updates to come. No pictures, because I was in a rush to finish it.
The shock install was pretty time consuming. I had to trim down the bushings in the rear shocks, so I could even mount the damn thing, put the rear coilovers on, take them off realizing that shortening the body meant that I had to adjust the ring, putting them on again, taking them off one more time, because the rear was too low still, install front ones, mount all the wheels, lower the car, raise the car, adjust front left, and finish. Definitely not my favorite task as far as installation goes. The rear coilover sleeves spin freely on the shock, so that means you have to hold the sleeve in place with something, and the right side has no room to work on between the panhard rod and rear exit exhaust, so taking the shocks off was honestly, the fastest way to adjust them. Anyway... done venting.
The impressions: The damper rebuild made a huge difference in how the car feels. Even at full soft settings, I can tell the shocks are much firmer than they used to be previously. I tried it just around a few slow corners, over some slow bumps, and quick direction changes. Even at full stiff on the original dampers, the car felt a little floppy. It was firm, but it didn't feel controlled. That's definitely not the case anymore. The body motion feels controlled and smooth, it doesn't flop around like it used to. The car feels much more composed, doesn't feel like the rear axle acts as freeweight anymore, just bouncing around at its own will. I am very much looking to see just how confidence inspiring the car will be at the track. More updates to come. No pictures, because I was in a rush to finish it.
Glad to hear you like them so far. Really excited to see track results!
Also, I hear you on the rear seal. They are always a giant pain!
Also, I hear you on the rear seal. They are always a giant pain!
Similar threads
- Replies
- 57
- Views
- 5K