Console love & Canton oil separator.

Dalamar

Post Whore
Joined
Feb 3, 2006
Messages
13,823
Reaction score
133
Location
SLC, UT
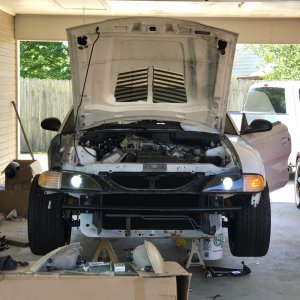
Here's my latest project on my car.

Got this console locally, it was in pretty good shape, was tan and a few holes drilled in it ;(
I did get it for free and want the cup holder, so here's what I did with it:


C1.jpg


Hmmm, what to do with this...

C2.jpg


C3.jpg


C4.jpg
 
OP
OP
Dalamar

Dalamar

Post Whore
Joined
Feb 3, 2006
Messages
13,823
Reaction score
133
Location
SLC, UT
I've had this CF lid for a while.
here's the process to get it on.


C5.jpg


C6.jpg


Trimmed the inside for the backing off of the 98...
C7.jpg


Filled with sound deadening foam
C8.jpg


piece fits in like so.
C9.jpg


The lid has some nuts cast into it for the hinge and trim. screws that came with it were panheads....
picked up some countersunk head screws, same thread.

C10.jpg


C11.jpg
 
OP
OP
Dalamar

Dalamar

Post Whore
Joined
Feb 3, 2006
Messages
13,823
Reaction score
133
Location
SLC, UT
Re wired everything, the main harnas plug was in a different spot, fog light & 12V power source....
The switches i've added:
Covered switch with the plate over the holes: dual boost controller switch.
Red switch on base of console: Overdrive on/off
yellow switch on the side: trunk

Rewired
C12.jpg


Picked up some matched Dye paint from a paint supply store.
1 coat of adhesion promoter, 2 coats dye/paint.
C13.jpg


Switches and lid attached.
C14.jpg


Next the interior doner car for the 67 had this nice leather e brake boot on it I saved.
Here's the process to switch it out.

remove old piece from under side of console - plastic trim ring is stapled on...

C15.jpg


pulled out all the staples.
C16.jpg


coat each side with rubber cement, let dry, and press together. cut holes to line up with anchor studs.
C17.jpg


finess into place, and reattach:
C18.jpg


after all these shenanigans, put her in the car and she's all done! :)

C19.jpg
 
OP
OP
Dalamar

Dalamar

Post Whore
Joined
Feb 3, 2006
Messages
13,823
Reaction score
133
Location
SLC, UT
thanks guys.

Ferocious, i like it a lot better there. I'm tall and sit way back in my seat. so it's a stretch to reach that button where it is stock.
where it is now is ergonomic or something :)
 
OP
OP
Dalamar

Dalamar

Post Whore
Joined
Feb 3, 2006
Messages
13,823
Reaction score
133
Location
SLC, UT
Next item of business, Canton oil separator.

C20.jpg


Oow, shiny!
C21.jpg


Put it here.
C22.jpg


Didn't want the hose running across the IM and all that so I routed it below the expansion tank, along the front.
Had to pick up a new/longer hose. The connection by the turbo is a tight bend, so I got this bendy coil thingie to help with it.
will try to snap a finished photo after work today.
C23.jpg
 

JonBeast

Legend
Joined
Jul 19, 2006
Messages
6,275
Reaction score
143
Location
Boston
Nice work man looks good!

But...more importantly...you've done all this insane motor work, and body work...and you're still rockin stock cloth seats? WTF is up with that?
 

Venomized

Active Member
Joined
Jul 19, 2011
Messages
695
Reaction score
11
Location
Iowa
Hmmmm I like how you did the color. What was the exact product and stock number you used for the dye? I want to use it over the gauge shield or whatever to match the pass side instead of having one black piece out of place lol
 
OP
OP
Dalamar

Dalamar

Post Whore
Joined
Feb 3, 2006
Messages
13,823
Reaction score
133
Location
SLC, UT
Thanks JB.

I know man, WTF is my deal on that?!
I actually ordered a Corbeau A4 wide, micro swede seat last month! BUT it was too narrow in the shoulders. I want seats, but the need to fit me good.
my stock clothies look pretty good eh :)
 
OP
OP
Dalamar

Dalamar

Post Whore
Joined
Feb 3, 2006
Messages
13,823
Reaction score
133
Location
SLC, UT
Hmmmm I like how you did the color. What was the exact product and stock number you used for the dye? I want to use it over the gauge shield or whatever to match the pass side instead of having one black piece out of place lol

I had a paint supply store match me up 2 spray cans, used my old console as a sample.

If you're repainting here's the steps I did:
-scuff with scotch pad
-wipe down with prep all
-1 coat of bulldog adheasion promoter
-2 coats paint
 

Latest posts

Forum statistics

Threads
78,527
Messages
1,535,650
Members
16,185
Latest member
dmen76

Members online

Top