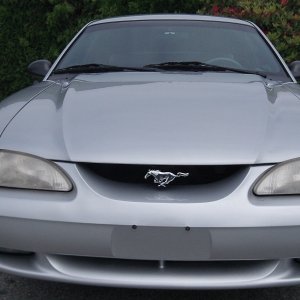
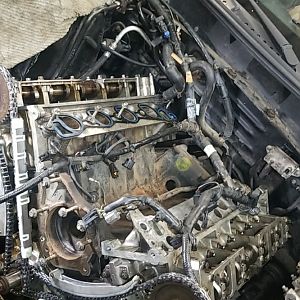
Elrod's 5.0 Revival

OP
OP
ElrodKTPQ_89

ElrodKTPQ_89

Legend
Joined
Aug 6, 2013
Messages
5,320
Reaction score
488
Location
Crossett, AR
One step closer to finally having the rear end in. Last week Matt and I moved it into my shop where I could work on it. Started off taking the brake lines off, pulled the axles and took the brakes off. Then got rid of the quad shock mounts and grinded all the welds down smooth. Cleaned everything up and painted away! As it sits now the rear is just ready to be taken to my friends shop along with my car so I can get started on the swap. Anyway onto the pics!

What I started with:


No more 4-lug axles!


Whole bunch of nasty..


Bye-bye quad shocks!


Can't tell they were ever there now!

 
OP
OP
ElrodKTPQ_89

ElrodKTPQ_89

Legend
Joined
Aug 6, 2013
Messages
5,320
Reaction score
488
Location
Crossett, AR
I made this awesome and totally safe rig to keep it upright while I painted it too:


Starting to look better!


I also took my caster camber plates to a friends house and bead blasted them back clean...I bought them used along with a set of tokico HP shocks and struts. The car they came out of had caught on fire but the parts I got were in good shape just a little tarnished from smoke and heat. The CC plates turned out to be SVE brand plates, I think $150 new from LMR. I got everything for $250 shipped! I'm just gonna paint them black which I will probably do tomorrow.

Last but not least, I went lastnight and bought two quarts of Royal Purple 75/90 gear oil, one 4oz bottle of friction modifier, and two cans of rubber undercoating to spray the underside of the car while I have the rear end and everything else out. I know it won't last but hopefully for a short time anyway everything on the rear suspension of the car will look good once it's done...new red control arms, fresh black rear end, blue shocks and I also plan on repainting my Sportlines back red again as they are faded right now.

Hopefully next weekend while while in off for New Years I'll be setting a day aside to knock out this suspension overhaul and then move on to the next step which is gonna be beefing up the old AODE!
 
OP
OP
ElrodKTPQ_89

ElrodKTPQ_89

Legend
Joined
Aug 6, 2013
Messages
5,320
Reaction score
488
Location
Crossett, AR
Rear Suspension Overhaul
1-3-14

So yesterday I finally decided it was time to get the rear end swap under way. We got off to a late start due to the rain, started around 1 and finished around 10 that night. Of course we ran into a few complications along the way but they were mostly just time consuming, nothing major that couldn't be fixed or overcome. All in all, it was a pretty good project. Learned a lot, smashed a few fingers, but most importantly I knocked out a huge project that I've been looking forward to for a while. Here's a list of what's new, and a run down of what all we did, which of course will be followed by pictures:

1. 8.8 from an 86 fox, recently rebuilt with 3.73's.
2. SVE Tubular upper and lower control arms.
3. Tokico blue shocks.


First was putting the car up on the lift, getting the wheels off, and surveying everything to see what we had to work with...which wasn't pretty.


Then we removed the shocks and quad shock brackets and the sway bar, put a transmission jack in place under the rear end, and removed the lower control arms.


Next we opened the cover up, drained the fluid, and fought for about an hour to get the c clips out...long story..


Once we finally got the axles out we were then able to pull the brake brackets off, take the lines off and the upper control arms loose and do away with the old rear end.


More in the next post!
Orange 94 if you're online and could help me out, would you change the dark font in the first part of this post to something legible for me? I'm on my phone and having a lot of trouble with it. Thanks if you can! You can delete this afterwards as well.
 
OP
OP
ElrodKTPQ_89

ElrodKTPQ_89

Legend
Joined
Aug 6, 2013
Messages
5,320
Reaction score
488
Location
Crossett, AR
Next step was cleaning all of the dust and other funk out from under the car, and spraying it with rubber undercoating. This part was fun.

The 50 calibers!!! 4" Magnaflow tips, that need to be polished.


After hitting it with a grinder and cup brush...after this I took a wire brush to all of the hard to reach places and then sprayed it all off with an air hose.


And here's the results!


Next came the reassembly, which I'll cover in the next post.
 
OP
OP
ElrodKTPQ_89

ElrodKTPQ_89

Legend
Joined
Aug 6, 2013
Messages
5,320
Reaction score
488
Location
Crossett, AR
Final steps! After we got the undercoating sprayed and let it set up and dry, we began putting everything back together. First we got the new rear end up on the jack stands, with a jack underneath it as well. We then bolted the upper control arms on the body side, and maneuvered the rear end into place so we could bolt up the axle side. Then we followed along with the lower control arms, followed by re-installing the springs.


Snapped a pretty cool shot too!


Next came putting the brake brackets back on, where we ran into a little problem....since the fox originally had drum brakes, there was no provision for the ABS sensor. No worries though, a grinder took care of that!


Once they were in, we started on getting the axles back in, where we ran into another delay. We wound up having to pull the S-clip (for lack of a better name, whatever it's called) and the spider gears in order to get the C clips on the axles, then reassembled everything else and were ready to put the cover on and fill her up!

And yea I know the brake brackets look terrible and needed to be repainted but at that point we were tired and just wanted to get done. So it may be getting done in the future.


After the brakes were put back together, I went ahead and put the new shocks on, bolted the drive shaft back up, and reconnected all of the brake hard lines in their appropriate places. Then em lowered the car back down so we could bleed the brakes.


The only other snag we hit was with my shocks, they didn't have any of the top hardware so I had to reuse everything off my KYB shocks...which meant the bottom washers had to be drilled out to fit the top of the shock, and my nuts weren't the right thread size, so I left them unbolted and drove home very slowly. Today I went to the store and got the right size nuts and got them put on so everything is good to go now! The car is completely different now! The gears, shocks and control arms made a huge difference! I'm very pleased with the outcome!
 
OP
OP
ElrodKTPQ_89

ElrodKTPQ_89

Legend
Joined
Aug 6, 2013
Messages
5,320
Reaction score
488
Location
Crossett, AR
A new list of issues has already started to arise though and will definitely be my next order of business. To begin with, while my friend Nate was working on getting everything put back together in the rear end, I decided I'd go ahead and change out my fog lights to my new smoked lights. Every one of the speed nuts that hold the bracket on broke off when I took the bolts loose, so now I'm on the hunt for new speed nuts and bolts so I can get my fog lights put in.

The he real money issue is my power steering rack. In the last week it has developed a horrible squeaking noise. I'm thinking the bushings must be worn out. Also it's way past time for some new ball joints, and possibly control arm bushings as well. So I checked today on parts at O Reilly's. I can get a rack rebuild kit with bushings and seals for $40, 1 year warranty...or for $110 (after a $60 core refund) I can get a complete rack with a lifetime warranty. Also checked on a set of MOOG ball joints, $60 each with a lifetime warranty versus 'Master-pro' for $15 each also with a lifetime warranty. Anyone have any suggestions on what parts I should go with instead or in addition to what I listed. I want to get everything I need together so that when I tear the front end apart I will only have to do it once. At that time I will also be changing to a set of Tokico HP struts and SVE caster/camber plates.
 
OP
OP
ElrodKTPQ_89

ElrodKTPQ_89

Legend
Joined
Aug 6, 2013
Messages
5,320
Reaction score
488
Location
Crossett, AR
Highs for the next few days won't be out of the 40's with lows in the teens.....sooo that means the pony finally gets to spend some time in the barn to stay warm. Now I know how you guys up north must feel.

567670cc95fb1a1ccc2d37a453967919.jpg


4318f1ff37a01030ee928d878b589b14.jpg
 
OP
OP
ElrodKTPQ_89

ElrodKTPQ_89

Legend
Joined
Aug 6, 2013
Messages
5,320
Reaction score
488
Location
Crossett, AR
How big is that exhaust piping?

It's kind of a hack-job at the moment since it had to be changed up a bit to fit under the car. But I think from the collectors back to the h pipe is 2.25", then 2.5" going into the mufflers, the magnapacks are 4" OD and the tips are 4".

I'm tossing the idea around of going to an X pipe in the future.
 

the5.ohh

Legend
Joined
Oct 15, 2012
Messages
9,561
Reaction score
129
Location
Shaolin, NY
I'm in the same boat as you know already on the front end. $79 and $80 for brand new moog front lca's, with balljoints loaded, and new control arm bushings. I'm gonna get those and get poly bushings for the control arms. Seems more feasable for me
 
OP
OP
ElrodKTPQ_89

ElrodKTPQ_89

Legend
Joined
Aug 6, 2013
Messages
5,320
Reaction score
488
Location
Crossett, AR
I'm in the same boat as you know already on the front end. $79 and $80 for brand new moog front lca's, with balljoints loaded, and new control arm bushings. I'm gonna get those and get poly bushings for the control arms. Seems more feasable for me
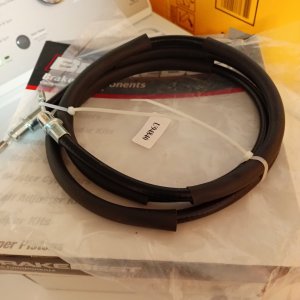
I've been thinkin about getting a price on new control arms with bushings and ball joints as well. Agreed it definitely seems like a better route.
 

Latest posts

Forum statistics

Threads
77,545
Messages
1,504,690
Members
15,009
Latest member
bwiz760

Members online

Top