You are using an out of date browser. It may not display this or other websites correctly.
You should upgrade or use an alternative browser.
You should upgrade or use an alternative browser.
Original color of convertible top rear trim
- Thread starter GTamas
- Start date
ttocs
Post Whore
tire shine...
95opal
Well-Known Member
- Joined
- Jun 21, 2007
- Messages
- 3,028
- Reaction score
- 1,614
SEM trim paint. Dont waist your time with the gimmick rub on crap. Do it once do it right.
07GtS197
Well-Known Member
I’ve never used it but I’ve seen videos of people using a heat gun on black trim to bring it back.
Snorky
Active Member
- Joined
- Feb 10, 2022
- Messages
- 828
- Reaction score
- 696
SEM 39143 Trim Black Aerosol (2) https://www.amazon.com/dp/B073T7FQ23?ref=ppx_pop_mob_ap_share
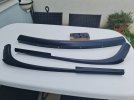
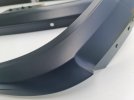
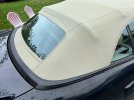
This is the SEM trim paint. Just painted my wrap around. Not on the car yet but this is how it look. It's a nice semi gloss, to me it looks fantastic and I'm a high gloss guy all the way.
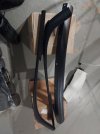
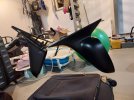
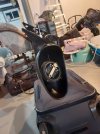
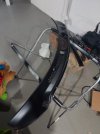
This is the SEM trim paint. Just painted my wrap around. Not on the car yet but this is how it look. It's a nice semi gloss, to me it looks fantastic and I'm a high gloss guy all the way.


Snorky
Active Member
- Joined
- Feb 10, 2022
- Messages
- 828
- Reaction score
- 696
I just scuffed it with red scotch bright,washed it with soap and water,blew it off. Wiped it with alcohol, and laid the paint.Thanks everyone!
Snorky, the paint looks great! Did you use something for primer?
Essentially the paint that's down is the primer. And scuffing the original paint opens up the surface matrix and allows the new paint something to bite onto.
Snorky
Active Member
- Joined
- Feb 10, 2022
- Messages
- 828
- Reaction score
- 696
I did Amazon prime for mine. Easy peasy.. not that I like supporting Amazon lolThanks, I will do the same. I just can't find SEM paint locally. I'll use some acrylic semi gloss paint.
ttocs
Post Whore
you can also have them order it at oriely's autoparts store. They do not stock it but they can get it.
Thanks, but I'm in Europe and it would be expensive to import it.
Usually if I order parts from the US, it costs 2x the price when I add freight costs and taxes.
For paint I will just stick with what is available here. :-)
Usually if I order parts from the US, it costs 2x the price when I add freight costs and taxes.
For paint I will just stick with what is available here. :-)
Snorky
Active Member
- Joined
- Feb 10, 2022
- Messages
- 828
- Reaction score
- 696
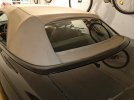
More of that top!!I put them on the car, I'm happy with it :-)
View attachment 27404
Mustang5L5
Active Member
- Joined
- Aug 1, 2023
- Messages
- 593
- Reaction score
- 646
Need to do the same. Does that trim remove easily without having to undo the top in anyway? Mine are faded with some rust spots, so need to sand and hit with SEM trim black.
The screws on the side are a pita, but the ones in the back are easy. Look in this thread:Need to do the same. Does that trim remove easily without having to undo the top in anyway? Mine are faded with some rust spots, so need to sand and hit with SEM trim black.
Reattaching a separated convertible rear window panel
The rear window of my 94 Convertible started to separate from the rest of the top. The same happened a few months ago, then I re-stapled them, but I think I used to sort staples because it started to come apart again. I will post here since pubs and description how I (try to) fix it, maybe it...
Mustang5L5
Active Member
- Joined
- Aug 1, 2023
- Messages
- 593
- Reaction score
- 646
maillemaker
Active Member
- Joined
- Mar 5, 2023
- Messages
- 419
- Reaction score
- 218
Wow, that looks fantastic! Mine is kind of faded also.
Glad to hear they can be removed without undoing the top.
My problem is my right rear quarter panel has been re-painted at some point. The paint wicked up to touch the trim piece at some point, and then chipped away. Trim should have been removed for painting. Now it will have to be removed to sand and re-paint the affected area.
Mustang5L5
Active Member
- Joined
- Aug 1, 2023
- Messages
- 593
- Reaction score
- 646
Removal is easy.
Pop the trunk. 7 screws for the center trim panel accessed under the edge of the raised trunk lid.
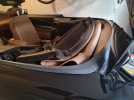
Lower the top down. There is one screw on the inside curve on the "hockey stick". Look inside from where the top is and you will see that 1 screw here
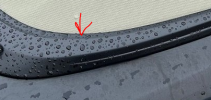
Drop the 1/4 window down. Push the inner felt belt down and you'll see two screws there. You can get them out with a phillips by carefully pushing the felt strip down. You don't need to pull the interior quarter panels to access them. However, if they are really tight, you may need to in order to get a better grip on the screwhead with your screwdriver.
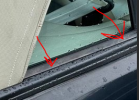
The side trim slips into the center trim from each edge. Once unscrewed, you can lift the entire thing up as one part, or just pull the "hockey sticks" out of the rear trim and take them off separately.
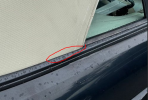
Also, Ford put a small bit of clear "tape" on the trim right at the corners of the top. I removed this and wondered what it was for but now I see that it's an area where the top chafes a bit when lowered. I do noticed a little paint rubbing on the top here. Nothing bad, but i'm looking for a equivalent strip to reinstall here
I actually purchased a different set of trim off ebay. $100 for all three parts. That way i could take my time in prep and paint and not have to rush since the top needs to stay down until you get the trim back on. I saved my original trim just in case the paint doesn't hold up. In that case, i'll send the trim to a guy I know who can powdercoat it for me.
Pop the trunk. 7 screws for the center trim panel accessed under the edge of the raised trunk lid.
Lower the top down. There is one screw on the inside curve on the "hockey stick". Look inside from where the top is and you will see that 1 screw here

Drop the 1/4 window down. Push the inner felt belt down and you'll see two screws there. You can get them out with a phillips by carefully pushing the felt strip down. You don't need to pull the interior quarter panels to access them. However, if they are really tight, you may need to in order to get a better grip on the screwhead with your screwdriver.

The side trim slips into the center trim from each edge. Once unscrewed, you can lift the entire thing up as one part, or just pull the "hockey sticks" out of the rear trim and take them off separately.
Also, Ford put a small bit of clear "tape" on the trim right at the corners of the top. I removed this and wondered what it was for but now I see that it's an area where the top chafes a bit when lowered. I do noticed a little paint rubbing on the top here. Nothing bad, but i'm looking for a equivalent strip to reinstall here

I actually purchased a different set of trim off ebay. $100 for all three parts. That way i could take my time in prep and paint and not have to rush since the top needs to stay down until you get the trim back on. I saved my original trim just in case the paint doesn't hold up. In that case, i'll send the trim to a guy I know who can powdercoat it for me.
maillemaker
Active Member
- Joined
- Mar 5, 2023
- Messages
- 419
- Reaction score
- 218
I have found numerous places now where Ford put some kind of anti-squeak tape in strategic places. Thanks for the info on the trim removal.
Last edited:
Similar threads
- Replies
- 3
- Views
- 763
- Replies
- 5
- Views
- 874

