rw95gt gts build

OP
OP
R

rw95gt

Member
Joined
Sep 5, 2012
Messages
104
Reaction score
0
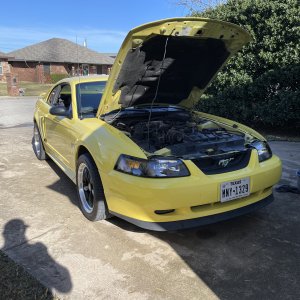
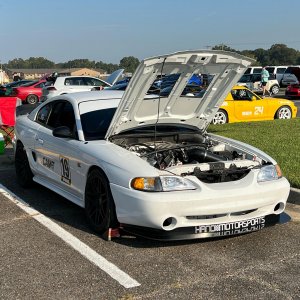
The door jambs and trunk jamb aren't black. They where painted when I painted the car. All the body panels where removed removed for paint. The original black is still under the hood.

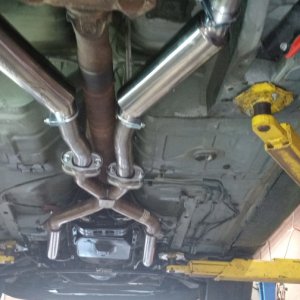
I'm not sure if the engine bay will be painted to match the exterior or not. I might clean it up and paint it flat black. I have no plans to weld up any holes or anything but I will be tucking some wires and cleaning up the clutter under the hood when the engine is out for sure.

Thanks for the kind words everyone.

Sent from my RM-877_nam_att_205 using Tapatalk
 
OP
OP
R

rw95gt

Member
Joined
Sep 5, 2012
Messages
104
Reaction score
0
Sadly I had family in town this past weekend and I wasn't able to work on my car. But I did find a 96-98 Cobra hood for sale. I'm considering it for my car. It has the scoops and is in good shape. I've always liked this hood. What do you guys think. Cobra hood or keep the gt hood?

I also ordered a set of the she seats for my car. I will get pictures up of my stash of parts I've collected.

Sent from my RM-877_nam_att_205 using Tapatalk
 
OP
OP
R

rw95gt

Member
Joined
Sep 5, 2012
Messages
104
Reaction score
0
*SVE s1 seats....

Sent from my RM-877_nam_att_205 using Tapatalk
 
OP
OP
R

rw95gt

Member
Joined
Sep 5, 2012
Messages
104
Reaction score
0
I finished up my battery relocation project today. I wanted it to be functional, safe and easy to access everything if need be. I have no plans to install any trunk interior in the car. It didn't have any when I picked up the car and its just extra crap that does nothing to benefit me. Parts: UPR battery relocation kit, Flaming river cut off switch, 120 amp circuit breaker, fox starter solenoid, 30ft of 6 gauge cable, ignition wire and necessary connectors. I made a diagram of how to run everything and got to work. The main positive battery cable comes off the battery and goes directly to the starter solenoid. On that same lug a cable runs to the circuit breaker and then to the on/off switch. on that same side of the on off switch a cable runs to the alternator. On the other side of the on off switch a cable runs to the fuse box. the on/off switch can kill the power to the fuse box under the hood this kills the car when its running and any rpm. Back to the starter solenoid on the other side of it a cable runs to the starter. I also spliced into the ignition wire and ran it to the fox starter solenoid. This allows both the factory and the fox starter solenoid to be functional. So the 2 gauge starter cable has a 1.5 foot always hot section and the rest of the cable is dead until your turn the key to crank the car. The rest of the 6 gauge cable is protected with the circuit breaker and the on/off switch. Hopefully this makes sense. I tossed my diagram but I might re draw it so its easy to fallow. Anyways here are some pictures of how I ran everything. I will eventually install the on/off rod through the bumper.
Trunk:

Driver side showing the alternator, ignition and fuse box routing. They go under the dash and through the rubber fire wall grommet too the engine bay.


Passenger side showing the 2 gauge starter cable routing. I used a moroso through fire wall lug to get through to the outside of the car.


And a ugly engine bay picture for the fun off it


The engine bay will look nice when all this is installed.


A before and after:

 
OP
OP
R

rw95gt

Member
Joined
Sep 5, 2012
Messages
104
Reaction score
0
from this:


motivated by this:


fueled by these:


lead to this:


Sent from my RM-877_nam_att_205 using Tapatalk
 
OP
OP
R

rw95gt

Member
Joined
Sep 5, 2012
Messages
104
Reaction score
0
I also installed my seats and I'm working on getting my used but in new shape steering wheel covered and installed.


I ordered $250 worth of arp hardware for my engine build. The engine has never been in. Still had the factory water pump on it. The short block looks like it has 50 miles on it. Clean and you can still see the cross hatch marks in the bores.
Intake bolt kit
Upper intake bolt kit
Water pump bolt kit
Timing cover bolt kit
Head bolt kit
Tfs head bolt adapters
Crank bolt

Bunch of money in bolts!


Sent from my RM-877_nam_att_205 using Tapatalk
 

Burninriverdiver

Well-Known Member
Joined
Jan 1, 2014
Messages
2,770
Reaction score
234
Nice work!! Gotta love the miller light fuel, it works as long as you don't throw any Jameson shots along with it... Those seem to slow me down. Good luck on the new motor man
 
OP
OP
R

rw95gt

Member
Joined
Sep 5, 2012
Messages
104
Reaction score
0
Worked on it for a few hrs today. Cleaned the short block and removed all the carbon build up on the pistons. Painted it and started to put some parts on it.


Sent from my RM-877_nam_att_205 using Tapatalk
 

Lanter

Active Member
Joined
Jan 14, 2015
Messages
372
Reaction score
1
Location
Indiana
Awesome work, car looks great. One question, what do you think of the SVE seats. I'm considering them but haven't heard much feedback from people that actually have the seats.


Sent from my iPhone using Tapatalk
 
OP
OP
R

rw95gt

Member
Joined
Sep 5, 2012
Messages
104
Reaction score
0
I like them. They are a little tight for me though. I'm 6'3 and 210. The look great and look well put together. Bolted right up. I thought about getting a different set and selling them only because they are a little small for my size.

Sent from my RM-877_nam_att_205 using Tapatalk
 
OP
OP
R

rw95gt

Member
Joined
Sep 5, 2012
Messages
104
Reaction score
0
Today I ordered a few more small things. Headman aluminum headers gaskets, clock location gauge pod and sport comp oil pressure and water temp gauges to fill it. My clock didn't work and I couldn't handle spending $80 on a new one and decided the gauges made more sense.

Sent from my RM-877_nam_att_205 using Tapatalk
 
OP
OP
R

rw95gt

Member
Joined
Sep 5, 2012
Messages
104
Reaction score
0
More progress. I worked on it some here and there this past week and today. I have really enjoyed installing this top end in my garage. This is how she looks currently:


This is the run down of the engine build:
-Stock short block with 120,xxx miles plus. (od didn't work when I purchased the car)
-Ford Racing std volume oil pump
-ARP oil pump drive shaft
-TFS 19011R heads (street port)
-Comp Cams XE270HR-14 cam
-Ford Racing hr lifters
-TFS 7.2" hardened pushrods
-Scorpion 1.6 roller rockers
-TFS valve covers and oil fill tubes
-1995 Cobra intake ported by Tmoss
-BBK 70mm throttle body
-rebuilt 24lb injectors
-BBK 75mm maf
-a CRAP load of ARP hardware

I need to clean up the engine bay tomorrow and get it ready for paint. I want to relocate some wiring also. I have a new starter, power rack, and power steering pump also that needs to be installed. MIGHT get it back in next weekend if I have the time.
 
OP
OP
R

rw95gt

Member
Joined
Sep 5, 2012
Messages
104
Reaction score
0
Well I really wanted to work on the engine bay today but with the cold weather I didn't want to have the garage open to clean it. The chemicals would have been a bit much. However I did work on mocking up some things. I hate the stock metal heater core tube lines on these cars. Mine leaked a little also. I am working on away to run heater hose to keep heat and delete the hard tubes. Sounds simple but for some reason its not. I am also working on getting my mechanical sending unit installed for my water temp and oil pressure gauge without removing the factory sensors so the stock gauges keep working. I did figure out where to drill the hole in my valve cover for my TFS fill tube and I managed to clean and build my fuel rails.
 
OP
OP
R

rw95gt

Member
Joined
Sep 5, 2012
Messages
104
Reaction score
0
cede6ac67b98d9831ca724002f14481a.jpg


She is in and running. Ended up with a bit of a mess but things worked out. Figured I would share this picture real quick and give a update. First off, the car is a blast and runs great. So far I'm really happy. I actually had it all together a few months back and couldn't get it to run. It would crank randomly but not run. I ended up pulling it back out due to very poor compression on 6 cylinders. I think I ****ed up the ring seal from cleaning the carbon off the pistons and fuel wash from my used injectors that wanted to just hang wide open. To the machine shop she went for a rebuild that included probe forged pistons, arp rod and main cap hardware, Clevite bearings and new rings. Now she has 306ci and 10.5:1 compression. Back together she went and she fired right up! I also installed new injectors. I will post up a couple more pictures tonight.

Sent from my SAMSUNG-SM-G890A using Tapatalk
 

blackdemon007

Active Member
Joined
Aug 31, 2013
Messages
286
Reaction score
0
Location
Ohio
Sucks to hear about your little hiccup, but glad to hear it's all taken care of.
Looks awesome, should run like a top for unlimited burnouts and hard pulls :D.
 

Latest posts

Forum statistics

Threads
77,508
Messages
1,504,019
Members
14,979
Latest member
TN95gt

Members online

Top