You are using an out of date browser. It may not display this or other websites correctly.
You should upgrade or use an alternative browser.
You should upgrade or use an alternative browser.
Stprorolla49's 2001 DHG Bullitt Build Thread *Update 12/2/12-IRS REBUILD, STINGERS!"
- Thread starter stprorolla49
- Start date

OP
OP
stprorolla49
Active Member
UPDATE:
As some of you may remember, last year my buddy Tom (69clark) cast me a set of his Sinis Engineering gauge rings with some leftover resin I had lying around. I spent probably 15 hours on them getting them perfect and ready to install. 3 days after I installed them, the rings cracked as a result of shitty old resin, which resulted in the cluster glass to crack as well. No fault of Tom's at all, just shitty resin I gave him.

I was so pissed of with the damn rings, I never fixed them and they have been like that for over a year. On my recent quest to mintify my car, I asked Tom if he could cast me another set of rings to replace the originals. The great guy that Tom is, he had the resin ordered, rings cast, and they were sitting on my desk at work just over a week later!!
Here's a few quick pics of the process:
Fresh rings after I cleaned away all the mold flashing and sanded them to 320...

New bezel from American Muscle with the glass CAREFULLY separated (an hour with a dremel and a cutoff wheel on low speed)...at this point I had also sprayed a coat of guide coat on the rings to help find all the imperfections before bondo...

Initial test fit of the painted rings in the new bezel. I primed, sealed, and painted the basecoat with Dupont Nissan Silver Frost that I mixed with our new mixing system at work...


Rings glued in place...I placed plastic wrap between the bezel and the gauge cluster so that any glue that splooged out would go on the plastic wrap, not the gauge faces...

Glass expoxied in place...

FINAL PRODUCT!!!

Installed pics to come tomorrow!!
Monday my brushed stainless rad cover is coming in, as well as an order of detailing supplies from CG to prepare for a full paint correction next weekend for the American Muscle show! I also scored a set of almost new Magnaflow low profile metallic spun cats to replace the gutted ones that I currently have. The car is just slightly too loud right now for a daily driver.
STAY TUNED!
As some of you may remember, last year my buddy Tom (69clark) cast me a set of his Sinis Engineering gauge rings with some leftover resin I had lying around. I spent probably 15 hours on them getting them perfect and ready to install. 3 days after I installed them, the rings cracked as a result of shitty old resin, which resulted in the cluster glass to crack as well. No fault of Tom's at all, just shitty resin I gave him.
I was so pissed of with the damn rings, I never fixed them and they have been like that for over a year. On my recent quest to mintify my car, I asked Tom if he could cast me another set of rings to replace the originals. The great guy that Tom is, he had the resin ordered, rings cast, and they were sitting on my desk at work just over a week later!!
Here's a few quick pics of the process:
Fresh rings after I cleaned away all the mold flashing and sanded them to 320...
New bezel from American Muscle with the glass CAREFULLY separated (an hour with a dremel and a cutoff wheel on low speed)...at this point I had also sprayed a coat of guide coat on the rings to help find all the imperfections before bondo...
Initial test fit of the painted rings in the new bezel. I primed, sealed, and painted the basecoat with Dupont Nissan Silver Frost that I mixed with our new mixing system at work...
Rings glued in place...I placed plastic wrap between the bezel and the gauge cluster so that any glue that splooged out would go on the plastic wrap, not the gauge faces...
Glass expoxied in place...
FINAL PRODUCT!!!
Installed pics to come tomorrow!!
Monday my brushed stainless rad cover is coming in, as well as an order of detailing supplies from CG to prepare for a full paint correction next weekend for the American Muscle show! I also scored a set of almost new Magnaflow low profile metallic spun cats to replace the gutted ones that I currently have. The car is just slightly too loud right now for a daily driver.
STAY TUNED!
Gregor185
Well-Known Member
Can't wait Mike!!
sleepn_sn95
Well-Known Member
I want those so bad! They look amazing and great work!
Gregor185
Well-Known Member
Let the countdown begin
sleepn_sn95
Well-Known Member
I think I tried before but you should try to talk to him about making a run of those bezels. I know I would buy some right now and I'm sure there would be others
g36 monkey
Post Whore
love it
twovalveterror
Active Member
I'm down for at least one set, maybe two if you decide to make a small batch. car looks great!
OP
OP
stprorolla49
Active Member
I think I tried before but you should try to talk to him about making a run of those bezels. I know I would buy some right now and I'm sure there would be others
I'm down for at least one set, maybe two if you decide to make a small batch. car looks great!
I will talk to Tom this week and see what he thinks.
OP
OP
stprorolla49
Active Member
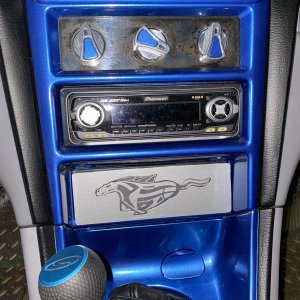
this is tasteful and appealing. i dig it.
Thanks a lot dude.
Here's a shitty iPhone pic after installing the cluster today...

g36 monkey
Post Whore
I've seen em before, long time ago. still love them.
OP
OP
stprorolla49
Active Member
UPDATE:
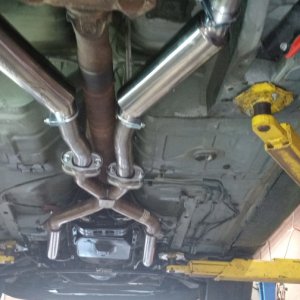
I took a few days off work prior to Thanksgiving weekend this year and gave myself a nice 5 day weekend to work on the car down at my parents house in their new garage! I've needed new bushings and to reseal my diff cover for way too long, and while I had everything apart, I switched to a Borla Stinger catback. When I removed the diff cover, I noticed a hairline crack running down the entire length of the cover where it mounts to the rear bushing mount, so I picked up an FRPP diff cover to finish the install. I also installed new rear brake hoses on either side because they got slightly torn from the brackets on the IRS. I also re-undercoated my rear wheel wells, and repainted my caliper brackets. Here's some pics from the project, and a teaser vid (cold startup) of the Stingers!
Side note: Before anyone says "Should have used the FTBR bushings", save it please. I know they are better but I can't afford them and I got the MM ones as a gift.
ENJOY!!
IRS removed, halfshafts and diff removed...

Welp, cya later!

Bushings drilled out...

Subframe and rear diff mount bushings installed...

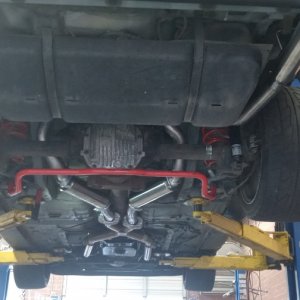
Diff all sealed up with Lubelocker gasket and FRPP cover (NICE PIECE!!)


And a cold startup teaser video with the Stingers installed...
[video=youtube;_s7J6PBpHJA]http://www.youtube.com/watch?v=_s7J6PBpHJA&feature=plcp[/video]
I still have to re-align the tailpipes and take them off to polish them, but I was way too giddy to not at least fire it up :beer:
I took a few days off work prior to Thanksgiving weekend this year and gave myself a nice 5 day weekend to work on the car down at my parents house in their new garage! I've needed new bushings and to reseal my diff cover for way too long, and while I had everything apart, I switched to a Borla Stinger catback. When I removed the diff cover, I noticed a hairline crack running down the entire length of the cover where it mounts to the rear bushing mount, so I picked up an FRPP diff cover to finish the install. I also installed new rear brake hoses on either side because they got slightly torn from the brackets on the IRS. I also re-undercoated my rear wheel wells, and repainted my caliper brackets. Here's some pics from the project, and a teaser vid (cold startup) of the Stingers!
Side note: Before anyone says "Should have used the FTBR bushings", save it please. I know they are better but I can't afford them and I got the MM ones as a gift.
ENJOY!!
IRS removed, halfshafts and diff removed...
Welp, cya later!
Bushings drilled out...
Subframe and rear diff mount bushings installed...
Diff all sealed up with Lubelocker gasket and FRPP cover (NICE PIECE!!)
And a cold startup teaser video with the Stingers installed...
[video=youtube;_s7J6PBpHJA]http://www.youtube.com/watch?v=_s7J6PBpHJA&feature=plcp[/video]
I still have to re-align the tailpipes and take them off to polish them, but I was way too giddy to not at least fire it up :beer:
pilks
Active Member
- Joined
- Jun 5, 2009
- Messages
- 590
- Reaction score
- 11
Winner
MustangChris
Mythic Level
wow. those rings are killer.
And thats a sweet build man! It sounds great!!
And thats a sweet build man! It sounds great!!
Ruddersdhg01
New Member
- Joined
- May 24, 2012
- Messages
- 90
- Reaction score
- 0
Looks and sounds great as usual. Probably be in another mustang in a few weeks
bonestock3.8DTH
Well-Known Member
Any updates for this car? I remember it being such a sick build, anything going on with it lately?