the momstang rebuild begins TOOK A TRIP AROUND THE BLOCK!

chris91

Well-Known Member
Joined
Apr 20, 2007
Messages
3,762
Reaction score
201
Location
Cincinnati, OH
Don't let it get ya too down man. Glad to hear things are coming together for ya. Sorry to hear you're sick again though! Hope you get to feeling better and outta that hospital ASAP!
 
OP
OP
ttocs

ttocs

Forum's #1 poster
Joined
Oct 9, 2009
Messages
37,664
Reaction score
7,776
Location
Evansville Indiana
I don't let it get me down too much just because I have become use to it over the years now. I think the only reason that I have not gone completely insane and ended it all is because I was the biggest optimist you could have ever known prior to all this. My mantra use to be that if you don't like something about yourself change it. Well I learned that you do not have control over everything no matter how much you would like too so my new mantra is that if I keep my expectations low I am not as disappointed in the end.

but enough belly-aching(literally :) ) what dude on here isn't cheered up a little bit by the arrival of shiny new car parts?! My catch can came in yesterday so of course I had it brought in to look/play with. The nurses were a bit confused by it of course but I am payin for this room.... I am going to polish the top/bottom to match the rest of the polished stuff under the hood and might try to add a little more carbon fiber under the hood with out going overboard.
16333997_large.jpg
 
OP
OP
ttocs

ttocs

Forum's #1 poster
Joined
Oct 9, 2009
Messages
37,664
Reaction score
7,776
Location
Evansville Indiana
yup who doesn't love the Ups guy when he pulls up outside? I can remember as a kid I use to hope that they would stop at my house as with my grand parents out of town he brought gandma and grandpa's gifts. Funny now 30 yrs later I am still getting excited when he stops in front of the house.

Happy to say that the meds have started to work and now and I was able to finally hold stuff down. hopefully I can go home tomorrow and have the car on its way back to the garage and get back to work after catching up on some sleep. Need to start arranging pulling the motor next. Never done that before either and always wanted too so that should be fun learning.
 

chris91

Well-Known Member
Joined
Apr 20, 2007
Messages
3,762
Reaction score
201
Location
Cincinnati, OH
Pulling the motor in a 5.0 is cake. You should have some fun.

Glad to hear the meds are doin their job man!
 
OP
OP
ttocs

ttocs

Forum's #1 poster
Joined
Oct 9, 2009
Messages
37,664
Reaction score
7,776
Location
Evansville Indiana
should be even easier with the radiator, the bumper and the fenders off as well. Should make for some good video....
 
OP
OP
ttocs

ttocs

Forum's #1 poster
Joined
Oct 9, 2009
Messages
37,664
Reaction score
7,776
Location
Evansville Indiana
been a busy weekend but it doesn't show. Must have put the condenser/rad/fan/overflow tank in/out 20 times. The 96 core support is just a bit off from the 94 so I had to get a little creative, move/weld the lower rad mounts over a bit as well as the overflow tank mount. I didn't like the upper overflow tank mount as it stuck up too far so I cut it off and welded a new one on that is flatter and will not stick up. Still needs some adjustment but its in, it fits, now I can start on the bumper....
16337858_large.jpg
 
OP
OP
ttocs

ttocs

Forum's #1 poster
Joined
Oct 9, 2009
Messages
37,664
Reaction score
7,776
Location
Evansville Indiana
its nice to be well enough to work on it again. Was killing me sitting in the gohospital when it got back. After some thought I am going to make so that none of the mounting brackets go on top of the core support so I can make a nice smooth cover later out of aluminum. This for now will allow me to start with the wire tuck to get all that sorted out as well as to get the bumper mounted. Need to dry fit it so I can get the chin spoiler in the right place to start smoothing it in. This should all keep me busy till I can get my friend to show me how to pull the motor to do the engine bay panels.
 
OP
OP
ttocs

ttocs

Forum's #1 poster
Joined
Oct 9, 2009
Messages
37,664
Reaction score
7,776
Location
Evansville Indiana
16338726_large.jpg

NEVER did I think I would be the least bit happy too see it with 4 different colored parts on it, but I almost did a little dance today. And then started to take it right apart to start on the wire tuck....
 
OP
OP
ttocs

ttocs

Forum's #1 poster
Joined
Oct 9, 2009
Messages
37,664
Reaction score
7,776
Location
Evansville Indiana
jesus I just have to say that sometimes, often now in fact my life just plain sucks. Not sure who/what I pissed off in a former life but its getting even with me now. Spent the last two days tucking the ac condenser and the radiator into the core support just to gain some space between the motor/fan. Cut/welded/modified the upper brackets on the condenser and the radiator so that they ended pulled in about 4". Just finished up and had that moment when you finish a project and get to look at/enjoy the outcome, thinking about what I can do now/next before I started to feel sick. Wasn't sure why but I needed to throw up. So I did, over an over and over again and now I am again typing from a hospital room only 4 doors down from the room I had 2.5 weeks ago. 3 episodes now in just over 60 days sucks..... At this rate I will be lucky to ever finish the rebuild and who knows if I will be able to enjoy it afterwards.... Would post a pic of the before/after but can't load pics for some reason.

16341895_large.jpg
I loved the canton tank until I moved the rad/condenser forward tucked into the core support. Now it seems like it just like it sticks out so badly not sure how I feel about it. Will probably paint it black just to hopefully help it blend in and disappear .
 
OP
OP
ttocs

ttocs

Forum's #1 poster
Joined
Oct 9, 2009
Messages
37,664
Reaction score
7,776
Location
Evansville Indiana
been doing some work on the wire tuck that is long/tedius and no fun. Finally getting too the point of the engine bay panels are almost ready to weld in but still need to finish the fusebox mounting first. The power pipe is not looking too bad though some vac lines on the panels and I think its good.
16362523_large.jpg

NEVER cut soo much out of my car or anyone elses but had too make space for the stock fusebox access and for the secondary box I am installing as well.
16362524_large.jpg

16362525_large.jpg

Also made these brackets to hold the HID ballasts inside of the bumper. They will be painted with por15 and they will be ready to bolt up.
16362526_large.jpg

Also got the aluminum yesterday that I am going to use to mount the fuseboxes. Time to see if I can weld aluminum or not....
 
OP
OP
ttocs

ttocs

Forum's #1 poster
Joined
Oct 9, 2009
Messages
37,664
Reaction score
7,776
Location
Evansville Indiana
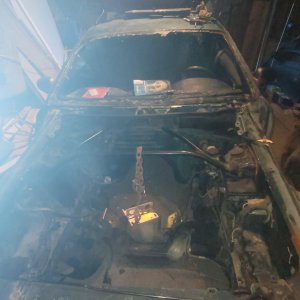
Like I said, been buried getting the wiring clean and straight.
16368220_large.jpg


I almost hate too show wiring pics as it never shows how much work it took too get it all nice and clean/tied up. I have a little more too do to mount the main hrns but after recovering it all, extending this wire(moved the spout up into the headlight hole for easy access), shortening that,

most of the stock loom just cracked off after dry rotting, this was just one session...
16368218_large.jpg

But was finally feeling well enough this afternoon, and got new tips for my spool gun after last weeks melt down to start my next part of all this. I am making a tray with a removable bottom so that I can still keep access to the stock fusebox and a 2nd one I am adding through a hole in the engine bay. This is the view from the top down although through the access door there will probably be not much of the "tray" showing. I went with aluminum too save some weight and this is my first time building with it. Took some time to get use too and thankfully the place I got the material from gave me some scrap pieces the same thickness to practice with. They are online and ship if you ever need something you can't fine locally. http://www.cut2sizemetals.com/

16368224_large.jpg

Was happy I dialed it all in by the end of it. The tabs in the corners will be used too hold some screws too hold the bottom plate too the ring.

16368222_large.jpg


More too come. Been worring about the aluminum welding so much I have not looked past this point much...
 
OP
OP
ttocs

ttocs

Forum's #1 poster
Joined
Oct 9, 2009
Messages
37,664
Reaction score
7,776
Location
Evansville Indiana
16369058_large.jpg

Needed to trim the hole a little more and then I welded some 1/8" mounting tabs to the top too hold it in place, as well as mounted some rubber on the front edge too prevent any metal/metal rubbing noises(I hate rattles). The nails in the bottom are just holding those holes in place(redneck plinco's). I will late on replace those with some stainless studs too go down through the plate on the bottom too allow for a nut on the bottom to hold it tight.

Back to staring at it and pics of it too figure out what too do next... I will need too cut a hole in the mounting plate too allow for the stock fusebox to mount through it and figure out how it mounts.
 
OP
OP
ttocs

ttocs

Forum's #1 poster
Joined
Oct 9, 2009
Messages
37,664
Reaction score
7,776
Location
Evansville Indiana
Cut the hole in the back plate too allow for the stock fuse box too mount through it. By moving the power lug and saving that space, it allowed me to turn it upwards and save a little more space for the secondary fuse/ground block I am mounting next too it. Tomorrow I will copy the mounting tabs from the stock mounting bracket for the fuse box out of aluminum and weld them too the back plate too allow the stock block to be nice and solid. After that I can figure out how I want the other 2 blocks to mount/look. one very small step at a time..
16370841_large.jpg

16370842_large.jpg
 

Latest posts

Forum statistics

Threads
78,556
Messages
1,536,158
Members
16,201
Latest member
jgib8795

Members online

Top