I was thinking about that but have too much going on behind the heads to route lines back there.I have a similar vac tree I am installing but on the pass side of the firewall. I faced my vac lines down and then used the flange that the cowl mounts on to mount the tree to it.
You are using an out of date browser. It may not display this or other websites correctly.
You should upgrade or use an alternative browser.
You should upgrade or use an alternative browser.
Venom 's Build Thread
- Thread starter venom
- Start date
ttocs
Forum's #1 poster
yes its full back there for sure. I smoothed out the bay and did a wire tuck so I had extra room on the passenger side where the fuel lines come up.
I thought that I had subscribed to your build but turns out that I had not. I can't even imagine doing any body work with all the mechanical stuff to sort out. I may seek out some advise on what products you are using as I want to smooth some stuff out as well.
ttocs
Forum's #1 poster
I have a couple of lists going now to help keep everything organized. I think I am up to 5 pages now but I will be surpised if I do not have to do some troubleshooting when I go to start it after moving everything around and upgrading....
Finally Got these panels installed and I am very pleased on how much they clean up engine bay. Word of advise you many have to remove some other around the heads as panels need space for installation and some trimming. I deleted the windshield washer tank as I live in a rainy climate and I never use it as it makes a mess all over my black paint. Something to consider as you will have to make the hole for the tank if you want to reuse. Panels are gloss black, the plastic wrap was left on to help protect them. Re-routing wires is up next on drivers side.
Current state.

Plastic rivets are used since there are easier to remove than metal ones plus since they are black they blend in.

Close up, holes had to be enlarged. The top rivets go in the sidewall of engine as well as two of the bottom rivets.

Another view

Rivets installed

Overflow

Closeup of rivets

Had to make some spacers so the overflow can could be level.

This is the mess to deal with next

Current state.
Plastic rivets are used since there are easier to remove than metal ones plus since they are black they blend in.
Close up, holes had to be enlarged. The top rivets go in the sidewall of engine as well as two of the bottom rivets.
Another view
Rivets installed
Overflow
Closeup of rivets
Had to make some spacers so the overflow can could be level.
This is the mess to deal with next
ElrodKTPQ_89
Legend
I'm gonna go back and read from the beginning but just from what I've gathered on this page this is a pretty awesome build! I love what you did with the vacuum lines and fittings!
Looking good.
Wiring! - the fun part /:
I am not looking forward to this part at all. I have been doing other projects around the house to avoid tackling this part of the build.
I'm gonna go back and read from the beginning but just from what I've gathered on this page this is a pretty awesome build! I love what you did with the vacuum lines and fittings!
Thanks, it came out better than what I expected. I am surprised how simple it was to setup.
Since Dalamar has brought up wiring here are some pics. I am using self fusing tape for the first layer and Tesa tape for exterior to wrap wires. Tesa tape is used in BMWs and other German vehicles for wiring. It is extremely flexible and looks real good plus easy to use.
This is easy compared to what I have to deal with the MS.

Here you can see that I left some of it wrapped with silicon tape and other with Tesa tape so you can see the difference. If you use thick silicon tape make sure not to wrap it super tight as it will cause the loom to not be flexible. You can use the Tesa tape by itself but I feel better wrapping it with both. I may use only the Tesa tape when it comes to interior and one or two wire runs that are not by the headers.

I cut out some of the factory cable's push tabs. You may wrap them up with Tesa tape and push them in existing holes.

Here is how I wrapped the drivers side. You can see the factory wiring main power cable to battery in the rear and -6 line for overflow canister.

Here is the Factory relay box. I don't plan on ever opening this guy up but if I do I can. Don't mount it where its going to be impossible for you to work on it as there is plenty of room under the fender. You can see the plastic rivets also some surface rust which I am going to sand and put some paint on it.

Make sure cable are high as the inner fender covers won't fit if anything is routed to close to the opening.

I ordered all these connectors today, hopefully this chart that I made will help someone as theres some digging you have to do to make sure you get correct ones. You can get these at RockAuto Motorcraft using WPT part number. IF you look at my IAC notice how its missing the clip in the front. Wonder if that was causing idle to drop after hard acceleration.

Still waiting on connectors. Removed some of the blue tape to see the color scheme. After wiring Ill have to tackle powder coating. So Far I like how everything looks. Going to be tough to decide whether to keep things polished with a clear powder coat or silver or chrome powder coat.


ElrodKTPQ_89
Legend
That engine looks amazing!
I already hate Tapatalk...
I already hate Tapatalk...
I scored locally a great deal on this new Kaenen 3" hood. Its the one from American Muscle. It looks exactly like my old 6" hood. As like my old hood this one is fully open in the rear which allows more air to escape compared to the Cervinis which is slotted. Since the underside is unfinished it is lighter than the Cervinis. This hood will also have move room underneath since it appears to have a bigger cowl. I really do not need this much clearance and I will most likely sell this one as well for a lower profile hood.


Fully open and like my other hood water will not go in since it slants towards the windshield


Fully open and like my other hood water will not go in since it slants towards the windshield
DavidBoren
Active Member
Venom, cowl induction hoods pull air into the engine bay, not vent air out.
Venom, cowl induction hoods pull air into the engine bay, not vent air out.
Yes that is correct. Let me clear things up. A cowl hood provides cool high pressue air inside the engine bay "while the car is moving". When you are stuck in traffic the cowl hood is not pulling any air and is venting air out of the cowl. The bigger the cowl opening and quicker that hot air escapes while idling. Any owner of a cowl hood will tell you that they can see the heat escaping out the vents while idling. It is an added side benefit which does not matter at the track but on a street car it matters when you live in a state that sees 95plus degree weather. Hopefully that clarifies what I was talking about when I said "allows more air to escape" which should of been "vents more air while car is idling (not moving)
")
whiplash473
Post Whore
Coming together, nice!
I have spent the last few months planing and ordering items for the wiring up of the MegaSquirt. Right now I am in the stages of running wires. First thing to do is separate the wires that you will be using from those that are not being used. Below is a few of the major components not including sensors. I opted to use all new stuff only retaining the TPS,IAC and crack sensors. I had a painless relay box which I modified and will use to run everything on the MS. DiyAutotune has a relay box that you may use as well.
I suggest that anyone tackling this to plan things out on paper. If you ever have an issue you need some sort of schematic to troubleshoot where issue may lie. It is extremely important to add fuses to everything. You don't want an electrical fire to ruin your hard work. Megasquirt gives you a generic layout but its up to you to wire everything specific to your vehicle.
There is no "this is exactly how you do it" guide. This process forces you to know your car's Fuel Injection system extremely well which is good a thing since you will be tuning the vehicle and need to know what everything does. The good news is that there are 2 books around 300pages each to guide you. The only other book that I have ever read with more pages is the Bible. I am not a person that likes reading but it is possible for anyone to learn this process as long as you like to research and learn.
Cpotts13
Well-Known Member
Can you tell me a bit about that catch can set up?? Looks good..
Can you tell me a bit about that catch can set up?? Looks good..
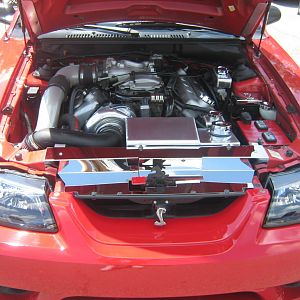
Its an Aerospace catch can. I got this since it uses -12 an fitting. I got 2 to avoid the lines crossing over from one side to the other . A bit overkill as far as catch can but I think it makes the bay look more symmetrical plus better too much than too little.
Cpotts13
Well-Known Member
Its an Aerospace catch can. I got this since it uses -12 an fitting. I got 2 to avoid the lines crossing over from one side to the other . A bit overkill as far as catch can but I think it makes the bay look more symmetrical plus better too much than too little.
Awesome thankyou for the info..
sick build btw..
Similar threads
- Replies
- 23
- Views
- 3K
- Replies
- 12
- Views
- 2K

![IMG_20140524_152057360_HDR[1]](/data/xfmg/thumbnail/0/66-1b90088565df25d76ff5bd73b7f47142.jpg?1623783787)