Busted Head Gaskets Repair

oemracing

Member
Joined
Mar 29, 2009
Messages
160
Reaction score
0
So recently I traded snakebit (will) my 95 gt for his 96 cobra with blown head gaskets. Yes some may say oh no! I wanted a domestic car that is more of a tune friendly car for the reason of the trade, plus I have 2 other 5.0 vehicles.
I am ruthlous with buying anything I haggle everything to my benifit, I had to ask when I seen the cobra though. Ummm... brother do you really want to trade your cobra for... that? Alright then, Loaded it and got it home.
I had planned on taking it to the shop, dropping the K member and zip-zip right through it.
My boy called me and said dont worry about it, we do it in the driveway. cool, he came over we got the intake, valve covers off. then it began to down pour.
Then my thought of just swapping out the engines to make the fix easier came to mind. That way I can go through the cobra engine and build it up a little. Just sold my motorcycle so a few extra mula's were laying around.
A guy that helped me out on putting my 5.0 and aode swap in my 69 came home from deployment last week came over on friday. Went to pick and pull and started on a 95 lincoln continental pull today. So just for refrence of anyone pulling a dohc out of a continental everything is straight forward like normal motor pulls, besides possibly the last bolt-
Bolt that goes from engine side to transmission side beside the rear exhaust manifold over the transmission is a bugger. We got everything done in an hour then spent 4 trying to get that bolt out. never happened.
We came home I said, when the sun starts going down we get at the cobra trying to remove the heads.
We got the timing cover off, timing chains off, and the right head off almost- still beating our selves up on the exhaust manifolds. haynes manual says to lift front of vehicle up to get to the exhaust manifold bolts.
Wow, dont see that being easy what so ever. Called up a buddy he said to remove it at the h pipe. May try that, but with food getting home from the girlfriend we were fat and just wanted to chill out.
The condition of the rest of the car-
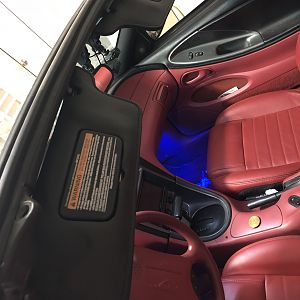
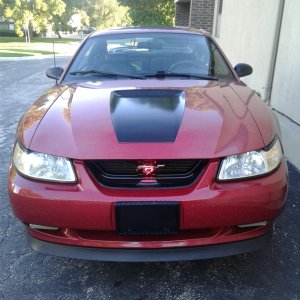
I have before and after shots of the car, wow. The paint was gritty gritty. i mean It felt like 120 grit sand paper. spent probably close to 30 hours of exterior detailing. wash, clay bar, polish, clay bar again, polish with auto armor, polish with color scratch- mequires, then nx 2.0, mequires show polish, then turtle wax ice. I can see myself in the car, Yaaaaaa! so smooth now. The interior is great shape compared to my 95 seats. The drivers seat is ripped, passenger seat is good, carpet looks good.
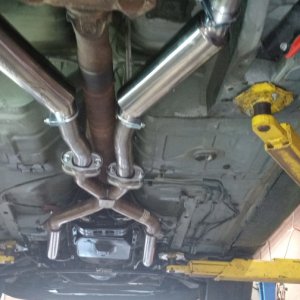
the underside- I dont think some people know what a pressure washer and simple green are for. I couldnt see any power steering lines, vagely tell where the steering cylinder is at. about an hour pressure washing and simple green did the trick.
I will post pictures up soon to show my progress.
I got the head gasket kit from summitt, one of my boys who owns a modification shop in va beach told me only ford racing products. and underdrive pulleys are here. have drilled and slotted rotors shipped out last night. My goal is to have it on the road next weekend, probably realistically is in a couple of weeks, but have to set goals high.
From what I read the 93-95 and the mark 8's will bolt right up in place of the cobra engine. Is this true? Flywheel- cobra to be used, right? Bellhousing will bolt right up or are there different bolt patterns to look for?
Thanks,
Chris
 

uncltrvlnmatt

Post Whore
Joined
Apr 8, 2006
Messages
14,939
Reaction score
35
Location
Pa.
I am pretty sure the lincoln flywheel is different. The Lincolns use a cast crank not a forged crank like the Cobra. The Cobra has a 8 bolt flywheel pattern, and I think the Lincoln has a 6 bolt flywheel pattern. Other than that, I believe only the intake manifold is different.

The Lincolns were also rated at 285hp and the Cobra is rated at 305hp at the crank.
 
OP
OP
O

oemracing

Member
Joined
Mar 29, 2009
Messages
160
Reaction score
0
sorry for no pics yet, I started putting them up on picture trail to link over here, but I didnt get any pictures of it after polishing it over and over. Thought I did, but guess otherwise.
I got the right head nearly off today after kicking myself in the butt. I was debating on taking it to a shop, then I thought, man screw this I have taken apart 2 tow tractors, swapped parts, but them back together in 17 hours out to sea. I can do this!
Plus the shop I have take my only other repair on a vehicle said they were backed up for 3 weeks. I was speaking to another shop closer to me that did the turbo manifold on my 4runner for a previous owner, but it was call tomorrow, call tomorrow for the past 5 days.
Plus that same shop said it was impossible to remove the heads while the engine was in the vehicle. HA-HA! That was a point for me to prove them wrong.
So anyways, got the head on the right side off. What you have to remember is to take up the last 3 bolts on the bottom out of the block, tape them up. Pull the head off. Remember though to disconnect the oil dipstick. It gets jammed between the exhaust manifold pipes.
The left side is the same, take up the third and second to last bolts out of the block tape them up and Well I will let you know how that works out tomorrow. It started sprinkling on me. Yep doing this not in the driveway, but the curb. park the truck just a little out more of the road so *****!!!!! dont run over me while under the car.
Hope to have it to the point of being put back together sunday.
I would say if I had to do it again this same way it would not be as long of a job. The power steering bolts killed me. While the heads are off I am going to port them a little more. Wish I could find some used aftermarket cams, but they are hard to find for dohc. I dont believe in using brand new parts except turbo's and clutches. I am also taking the heads to the NDI lab for a magnetic particle inspection. I took some jet chains there the other day and well good with the techs now. Saves me a couple bucks, why not.
I felt on the cylinder walls too for wear, damn, the engine seriously doesnt have a lip at all! I will take my measurements and post them see the differences between others are, if any further intrest of others.
I was not sure if this has been posted either, I tried searching it but nothing came up.
 
OP
OP
O

oemracing

Member
Joined
Mar 29, 2009
Messages
160
Reaction score
0
Here are a couple of pictures of when I picked it up. the 95 gt as stated previously is stangbit's now
363938583.jpg

363938475.jpg

363938537.jpg

The rampagous puppy! I am so dirty because my f150 was melting solenoid contact on the starters the way their, actually took the starter out the 95 on the road and put in the truck. so will got a new starter installed when i got to his house. I kept my bbs moda wheels since they are forged aluminum 2 piece rims I can find. found actually a pair of 14" moda's for 600 without tires so, the rims on the cobra are worth more than the car. plus will was wanting to do a cobra clone anyways.
363938424.jpg

The 95 was gorgeous, about every other day I was washing, polishing, and sealing it. not alot of original gt's that sat outside their entire life to look like it.
 

BruhBrahBrad

Well-Known Member
Joined
Jul 29, 2008
Messages
3,789
Reaction score
11
U will love that cobra one day... Are those rims going to stay on the cobra? They honestly look really bad but that's just my opinion? They remind me of something I would use for burnouts only. MAYBE they will look better with the cobra lowered?
 
OP
OP
O

oemracing

Member
Joined
Mar 29, 2009
Messages
160
Reaction score
0
Yeah man, the bbs wheels are not often seen. I think they look better than the stockers. Center caps are carbon fiber. They are about 5lbs a piece heavier than stock cobra's. Looking for a Local set of 03-04 for a deal, inless I find some new ones for the evo before. Lowering should be done soon too.... actually looking for coilovers used are always good. Even blown ones, just get them rebuilt inexpensivley.
 
OP
OP
O

oemracing

Member
Joined
Mar 29, 2009
Messages
160
Reaction score
0
aight heads are off today. Lessons learned though-
cut the damn water pump hose under the intake, and the oil dipstick ensure its out of the oil pan before you try remove the right head.
Left side wanted to give me some trouble, but it was just harness entanglement.
Seriously I do things the hard way the first time so other people can learn how do to do stuff easier.
But the heads are going to the machine shop tuesday and will be putting them back on hopefully next weekend.
I recommend using your buddy giving you a hand with the heads. If anyone says they are light, laugh. the right side was killing me taking it off myself. has to weigh about 80 lbs. kinda hard when your arms are nearly out extended and your leaned over. I go to the gym and shoulder raise 40 lbs an arm and this **** was not funny.
the Cylinders have their wear, shows a 150k mile engine, got the piston rock, but it wasnt bad enough for a rebuild in my opinion. shoot as long as it runs, I can build an engine after.
 
OP
OP
O

oemracing

Member
Joined
Mar 29, 2009
Messages
160
Reaction score
0
Yeah its a little hard, not that bad when you really think about it. My right index finger is mangled up from the sharp edges of the head trying to yank it out myself. This is only my 3rd vehicle doing a head gasket. honestly its alot easier than repairing a stripped bolt on a flywheel in a tow tractor- underway- in a tropical storm. yeah that was a sucky job.
But now I am on the turn around spot, so its all good.
I got the heads back from the machine shop I was really upset with there work this time. the other times I have taken heads to them they came back all ends cleaned and milled. this time it was just the bottom done. The guy said another hudred bucks and he would do the rest. I politley declined and loaded the heads in the evo. oh lord my dog farted....
I decided not to port and polish the heads on this set because it will just be a daily driver no forced induction, and not going bigger cams on this engine. My puppy shattered her elbow messing with my boys in the back jumping around running into crap, so all my play money will be going to her $2500 surgery.
 
OP
OP
O

oemracing

Member
Joined
Mar 29, 2009
Messages
160
Reaction score
0
aight, I really suck at just doing a job and not taking pictures.
Got off work early on thursday to work on the engine. My boy came over and we got the block and heads cleaned up to reassemble everything.
The Oil Dipstick I said hell no and decided not to fight the replacement oem one. I am picking up a flexible type from performance unlimited out here in norfolk, va.
We wanted to get the timing chains on, because I have no clue on how to retime them.
Anyone have idea's on how to put the timing chains back on?
 
OP
OP
O

oemracing

Member
Joined
Mar 29, 2009
Messages
160
Reaction score
0
Wow, my bad forgot to update this. Heads have been on for a few weeks now. The timing chain install is what is killing me. I continue to have valve interference.
I posted on a local forum, couple of guys gave me some guidance so should be tackling it tomorrow or today depending on what time I get home from work.
Thought the crank key was suppose to be in the 6 o'clock posistion, when its really the crank sproket timing marks.
 
OP
OP
O

oemracing

Member
Joined
Mar 29, 2009
Messages
160
Reaction score
0
nah brother, still no starting. timing chains are not on yet. I know I felt like a tard the other day when I thought about it. car has been at the house for over 2 months and still not done. I rebuilt a t5 and t45, swapped the t45 in a 86 fox last friday. Rebuilt a 22re and the rest of a 86 4runner, and did some other jobs on the side.
My hands shake for the last week ever time I sit in a mustang. I miss it, and putting to many miles on the evo. 3500 in 3 months! I drove it 2k in 2 years before now!
 
OP
OP
O

oemracing

Member
Joined
Mar 29, 2009
Messages
160
Reaction score
0
Finally got the timing chains on and the timing cover. Power steering pump is kicking my butt a little, just need to get it back on jackstands p/s pump, valve covers.
To properly install the timing cover and not loosen all the oil pan bolts is similar to a 22re, place the cover on the oil pan, push down about 15 lbs, push in on the top to line the top of the heads to the cover, and snap into place. I used copper rtv gasket sealant. Something about copper sealent I love. never had one leak using it.
Advance wanted 145 for a new timing cover gasket. I said, nah I am good. have to get a new valve cover gasket set since I cant find the Left banks valve cover gasket. the rest of the gaskets are reusable, Waiting for my 4runner to sell to buy cams. and redoing this again.
 
OP
OP
O

oemracing

Member
Joined
Mar 29, 2009
Messages
160
Reaction score
0
Summit Racing does not carry the 4.6L DOHC Valve cover gasket set! I got my gaskets in today, put the gasket sealent on the covers, went to place the gaskets on.... WTF!
So now I am out shipping and handling of 10 bucks, little money annoying that they sent the wrong part and wont cover their mistake.
 
OP
OP
O

oemracing

Member
Joined
Mar 29, 2009
Messages
160
Reaction score
0
Instake manifold installation! Anyone know how to install the intake manifold lower and upper? I dont have the coolant crossover tube installed and haynes manual sucks!!! I mean it sucks!
 
OP
OP
O

oemracing

Member
Joined
Mar 29, 2009
Messages
160
Reaction score
0
No one? I followed the haynes manual, place the studs in the runner holes to align the runners with the lower intake manifold..... how the crap are you to remove them if they are there for alignment!
 
OP
OP
O

oemracing

Member
Joined
Mar 29, 2009
Messages
160
Reaction score
0
aight I got it kind of, i think in the 3 months of doing this I misplaced the front stud bolts. probably used them on something else. going to pick and pull to grab a vaccum sensor that broke when I took the heads off. And a few other misc. bolts.
Haynes manual says to place the studs in the runners to line up the bolts. Well that leaves a gap, next step I seen was that it wants you to place the intake manifold on. Just line them up by sight then put the lower intake on after connecting the sensor, and cables.
When you place the runners on the 3 bolt holes in the center are to be towards the cylinder head, with the spring things at the back.
 

Forum statistics

Threads
77,525
Messages
1,504,304
Members
14,992
Latest member
dusky

Members online

Top