Forbidden Fruit, 6.8L PI 2v v10 build

OP
OP
Snorky

Snorky

Active Member
Joined
Feb 10, 2022
Messages
810
Reaction score
671
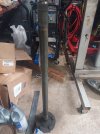
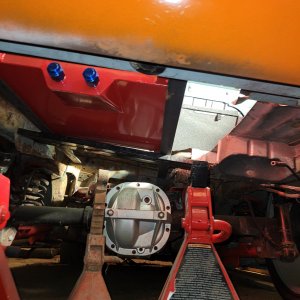
The last 3 sessions the project has been installing the Stifflers FIT system, because I'm a jacking rail slut. First thing was to out the car up in the air on blocks. If you do this method make sure your E brake is good.

20230121_174723.jpg

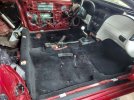
Interior was stripped so the carpet was out of the way. Loosely mount up the subframe connectors and trim everything down or off that will inhibit the "squaring" of the connectors. This includes body plugs and the tabs on the trans cross member. Then when it's square you tighten the rails down so they lay flat. Then tack and mig them in.20221230_160030.jpg

Excuse the welds. I am not very good at it. Give me a couple years.. maybe I will get better. Next being a convertible, I needed to chop an inch off of the front of the jacking rails.
20230121_174725.jpg20230121_181607.jpg
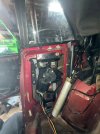
If the pinch welds are bent and the rail doesnt sit flush against it. Straighten it eith. A large hammer. Jack them up so they stick out from under the pinch welds 1/16-1/8" THE HOLES WILL ALIGN WITH THOSE ON THE PINCH WELDS AND LAY SOME BEADZ SON!20230121_212437.jpg

Then while the welder cools.. yes it was an original coors day. Havent had one of these in 10 years..20230121_181640.jpg

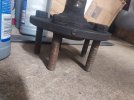
Then raise the web braces into place. One or two of mine needed some minor trimming at the front 2 tubes. I needed to remove 1/8" so the braces would fit. Support them with the jack and adjust them so they are splayed out as wide as possible to make contact. Also check the front to back position measurements.
20230121_215603.jpg
Then when satisfied tack the ends.
20230121_215811.jpg

Then weld outside of the car.20230121_220448.jpg


Then apply etching primer and paint before welding them into the car. Then paint the bare areas when complete. The finished product.20230128_234951.jpg
 
OP
OP
Snorky

Snorky

Active Member
Joined
Feb 10, 2022
Messages
810
Reaction score
671
Last night I did the last segment of the FIT system then started working on the window project. To start it off. A nice beer20230128_193753.jpg
20230128_234958.jpg
A little spritz of paint will fix the etching primer spots... next time.

So I drilled the rivets out on the passenger window and pulled the window out. Fitted up some 1/8"X1/2" bar to reinforce the window. This this bracket will also help me reglue the drivers window bracket back on. Drilled the glue slugs out of the holes. Held it up/marked it and drilled it with a #29 drill and tapped it 8-32.... used the passenger side as a template for the driver side.
20230128_223504.jpg20230128_223515.jpg

As you can see the glueless bracket. N ow I need to either A see if a friend has glass primer or suck the $60 glass primer D for a one time use.. half reinstalled the passenger window back into the door. Riveted the rear,but my rivet gun cannot reach the front rivet. Should I cut a slot for the rivet gun? Or just use a 1/4-20 nut/bolt/lock washer?

transferred the the car from blocks to jack stands. Next up I will drop the axle and start the next project.
 
OP
OP
Snorky

Snorky

Active Member
Joined
Feb 10, 2022
Messages
810
Reaction score
671
Used the rest of my vibration deadening I had laying around. Added a couple more pieces here and there to the inside wall of the doors as well. Happy with what little I could get out of the remainder of the box.20230213_203141.jpg20230213_203155.jpg20230213_203150.jpg20230213_203225.jpg
 
OP
OP
Snorky

Snorky

Active Member
Joined
Feb 10, 2022
Messages
810
Reaction score
671
Got to work last Friday and Saturday. Yanked the axle 20230216_230207.jpg

Used the MM press tool and pressed out the old bushings and the new ones in... that tool was worth every penny.

20230216_230210.jpg

Pulled the old mystery uppers and lowers. Out with the old. And soon to be in with the new. The MM lcas are out of my 01 gt, so they use 14mm bolts. So I drilled out the body mount and axle holes to .585", so next time I go to work on it they are going in with the Fresh stock uppers.20230216_230202.jpg

Disassembled the rear, looks like the Previous owner put some kind of Eaton or detroit posi in it 20230219_001842.jpg

As well as 31 spline axles with what appears to be thread in 3" studs.. wish they were regular press-ins, that way I could replace them with regular ones. Any suggestions on that?

I will be re shimming the pinion and carrier to obtain a better mesh pattern then the one that was in there. Looks like i need to pull some shims out of the pinion.20230218_230350.jpg20230218_230358.jpg
 

Attachments

  • 20230219_024047.jpg
    20230219_024047.jpg
    213.4 KB · Views: 2
  • 20230219_024053.jpg
    20230219_024053.jpg
    190.6 KB · Views: 3

NXcoupe

Well-Known Member
Joined
Aug 16, 2009
Messages
1,369
Reaction score
80
Got to work last Friday and Saturday. Yanked the axle View attachment 23959

Used the MM press tool and pressed out the old bushings and the new ones in... that tool was worth every penny.

View attachment 23960

Pulled the old mystery uppers and lowers. Out with the old. And soon to be in with the new. The MM lcas are out of my 01 gt, so they use 14mm bolts. So I drilled out the body mount and axle holes to .585", so next time I go to work on it they are going in with the Fresh stock uppers.View attachment 23961

Disassembled the rear, looks like the Previous owner put some kind of Eaton or detroit posi in it View attachment 23962

As well as 31 spline axles with what appears to be thread in 3" studs.. wish they were regular press-ins, that way I could replace them with regular ones. Any suggestions on that?

I will be re shimming the pinion and carrier to obtain a better mesh pattern then the one that was in there. Looks like i need to pull some shims out of the pinion.View attachment 23965View attachment 23966
Call Moser and tell them you need std length screw in studs and see what they can do for you.
 
OP
OP
Snorky

Snorky

Active Member
Joined
Feb 10, 2022
Messages
810
Reaction score
671
Call Moser and tell them you need std length screw in studs and see what they can do for you.
I'll have to dig out the thread gauge ij anticipation for the next probably question they would fire me. Lol
 
OP
OP
Snorky

Snorky

Active Member
Joined
Feb 10, 2022
Messages
810
Reaction score
671
Wednesday night I decided I needed to destress and burn the late night oil so I finished the gear setup. The final results.. which I think is okay for a used set of gears and bearings. The roller bearings snd races looked to be in decent enough shape to see how it sounds once installed.20230301_200156.jpg20230301_200216.jpg20230301_200223.jpg

Going to cut the studs at work today to save myself the $30.20230301_232857.jpg

Then I cleaned and primed the drivers glass20230302_214206.jpg

Then applied the windshield glue and bolted on the bracket. Ill check on it im a few days20230302_215735.jpg20230302_215813.jpg

Then I put the carpet back in a d started trouble shooting thr passenger quarter window. When it goes all the way down it seems like it goes off the track or the gear on the motor is stripped or perhaps a lowering window stop is missing.. I have to physically push the window up 1/4"-3/8" then it will go up on its own. I will investigate this further later.. I will probably just change the whole window motor assembly since I have one laying around.
 

Attachments

  • 20230302_220134.jpg
    20230302_220134.jpg
    226.3 KB · Views: 6
  • 20230302_222019.jpg
    20230302_222019.jpg
    173.9 KB · Views: 5

ttocs

Post Whore
Joined
Oct 9, 2009
Messages
32,393
Reaction score
5,560
Location
Evansville Indiana
when I put my glass back on I missed one of the slider tracks that it goes up/down in. Since I got that fixed now I have noticed it is still really slow and I think that is because I replaced the rubber trim on the top and it needs to be trimmed a bit at the front because it is too tight where it is by the mirror.
 
OP
OP
Snorky

Snorky

Active Member
Joined
Feb 10, 2022
Messages
810
Reaction score
671
when I put my glass back on I missed one of the slider tracks that it goes up/down in. Since I got that fixed now I have noticed it is still really slow and I think that is because I replaced the rubber trim on the top and it needs to be trimmed a bit at the front because it is too tight where it is by the mirror.
Ithats a good point. I will pull the assembly and inspect it / test it in the back seat of the car. The window trim up top is a little seasoned.. so i dont think it would be that although it is super slow to rise(battery is probably drained due to lack of use). You bring up some good points to check though thank you :)

also good news, I heard back from the Balancing shop, ROTATING ASSEMBLY ALLEGEDLY FINISHED!!! They just need to box it and send it to me
 

d.garza18

Active Member
Joined
Jun 23, 2017
Messages
686
Reaction score
145
Location
TEXAS
the old ucas and lowers look like st performance. How was the ride with them in?
 
OP
OP
Snorky

Snorky

Active Member
Joined
Feb 10, 2022
Messages
810
Reaction score
671
the old ucas and lowers look like st performance. How was the ride with them
It was alright, wasnt harsh and I wouldn't exactly take them seriously for autoX.. i swapped them for stock uppers with oem Bushings and Maximum Motorsports HD lowers which I really liked in the past. The car has stock springs and koni srt struts on it though so that may have masked any imperfections of the SR control arms. I wonder if those struts would ride well with eibach pros or H&R SS springs.. probably the wrong spring rate and length for the drops though.
 

d.garza18

Active Member
Joined
Jun 23, 2017
Messages
686
Reaction score
145
Location
TEXAS
Gotcha, I run the konis on my car and love them. I’ve thought about swapping those budget arms and some springs in
 
OP
OP
Snorky

Snorky

Active Member
Joined
Feb 10, 2022
Messages
810
Reaction score
671
Got to slay the dragon again last night. The window bracket gluing was a great success! Reinstalled the window. I need a serious alignment session with this glass. Lol the battery is dead as a door nail though. So that will have to wait as well as the quarter window track testing.20230307_235643.jpg

Following that I buttoned up the rear end. Yayyy. Shame it's too cold to paint. Will have to pull the rear out agsin in the summer for power washing/rust converter/paint. 20230307_235712.jpg

Picked up a stovk sway bar with brackets locally, bought some new Poly bushings and end links for $110 and in it went.

20230307_235743.jpg

Lastly I took the wing off.. look at that ass

20230307_235829.jpg20230307_235842.jpg
 

Musturd

Post Whore
Joined
Feb 12, 2011
Messages
10,427
Reaction score
2,141
I’ve always like the wingless look on sn95’s . The stifflers fit system is so nice .
 

Latest posts

Forum statistics

Threads
77,440
Messages
1,502,160
Members
14,920
Latest member
marktuck99

Members online

Top