Forbidden Fruit, 6.8L PI 2v v10 build

OP
OP
Snorky

Snorky

Well-Known Member
Joined
Feb 10, 2022
Messages
1,435
Reaction score
1,323
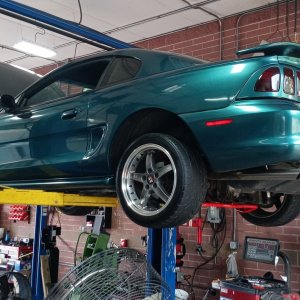
Minor update on some smaller things that I've been messing with. Still need to get the green car back together before I can continue the v10 progress. Sometimes it sucks attempting to be responsible LOL. Anyway... I gave up trying to remove rods from 30 year old visors since every time being extra careful the 30 year old 3plastics would snap off. Ughhh so I bit the bullit and ordered new visors from LMR and picked up some floor mats. Never been a floor matt guy before. But they are quite nice!!20241206_202221.jpg
20241211_184211.jpg
20241211_184230.jpg20241215_143649.jpg

No pictures of the visors install yet. It has been snowing. Now it has been raining and the snow all melted. Need to recall how the convertible visor rods attach again. Been almost 2 years lol

Well.. I picked up my headlight buckets for the retrofits i have been wanting to make and they had water spots.. so I grabbed some water spot remover and failed to read the fine print. Basically I sprayed it on and it melted the mirror finish right off. YES! WINNING!!!! Batting a thousand. Better record than the green car at least.
20241211_224049.jpg
So I did what any normal person would do.20241223_165251.jpg
Satin black baby yow!@@@

The beat up lensesMessenger_creation_3027F641-500B-4261-B6FC-B40D5AC1396A.jpg
Into works paintbooth I went Messenger_creation_E52CCBFF-9613-499C-901B-4C2394C3377A.jpg

Satin black buckets with the chrome shroud and some ebay black clear corners and the freshly cleared lense "mocked up" 20241224_144134.jpg

Waiting on some fancy h1 bulbs retainers for the mini projectors. Then I can test out the bulbs and shutters. Clock the projectors correctly. Then tighten everything up, roll out the butyl rubber and bake them back together. We will see what happens. I'm not super stoked on the black headlights since I wanted an oem chrome look, but maybe I'll try again in a while.
 

Musturd

Post Whore
Joined
Feb 12, 2011
Messages
11,233
Reaction score
3,700
Those turned out awesome . Some retrofits are definitely on my short list of items for this year .
 
OP
OP
Snorky

Snorky

Well-Known Member
Joined
Feb 10, 2022
Messages
1,435
Reaction score
1,323
Thanks guys! You are making me feel better about my botched project recovery lol. Felt pretty inspired so I got to work on some other odd ball items I've been meaning to do.

Sprayed the 2 vents in the white part of the dash to match and then the gauge cluster bezel trim. This one I am not sure how it will look. It will either look great matching the full white cockpit look of the passenger side or it will look really odd since no other mustangs is color matched there other than black and charcoal mustangs.

On a side note, the ac vents were a complete pain in the ass to paint.
20241230_163207.jpg
 

07GtS197

Well-Known Member
Joined
Mar 16, 2015
Messages
4,047
Reaction score
2,945
Location
Fort Myers, Fl
If anything, it’ll be unique which I think is cool. I know what you’re saying though. My white 02 had parchment interior and had charcoal door cups and instrument cluster bezel. I’ve seen some with color matched door cups and cluster bezel and was torn about it.
 
OP
OP
Snorky

Snorky

Well-Known Member
Joined
Feb 10, 2022
Messages
1,435
Reaction score
1,323
If anything, it’ll be unique which I think is cool. I know what you’re saying though. My white 02 had parchment interior and had charcoal door cups and instrument cluster bezel. I’ve seen some with color matched door cups and cluster bezel and was torn about it.
I've always found color match door cups look good sometimes. But then when people go nuts and do the radio bezel. This that another thing. Then it's like woh.. way too much. So I get exactly what you're saying
 

07GtS197

Well-Known Member
Joined
Mar 16, 2015
Messages
4,047
Reaction score
2,945
Location
Fort Myers, Fl
I've always found color match door cups look good sometimes. But then when people go nuts and do the radio bezel. This that another thing. Then it's like woh.. way too much. So I get exactly what you're saying
I always thought the exterior color matched radio bezel was tacky. It’s a cool idea but it just doesn’t go with the rest of the interior imo.
 

ttocs

Forum's #1 poster
Joined
Oct 9, 2009
Messages
37,665
Reaction score
7,777
Location
Evansville Indiana
I thought about painting mine to match but in the end also decided against it. Instead I painted the dash a gloss black and then put a color matched stripe down the middle.

1000005783.jpg

I can't find a pic of the dash on my new pc, here is the overhead console I installed my air ride controller in and painted it to match to give an idea.
 
OP
OP
Snorky

Snorky

Well-Known Member
Joined
Feb 10, 2022
Messages
1,435
Reaction score
1,323
I always thought the exterior color matched radio bezel was tacky. It’s a cool idea but it just doesn’t go with the rest of the interior imo.
my thoughts exactly on the radio bezel. Usually they don't even tape the bottomboff correctly to have the pebble finish of the outside of the shifter bezel to match the dash do the lines of the color match are off.

Door cups color matched look good if done right and it's only the door cups. Ie like a 10th anniversary cobra. Just the door cups in the body matched red.
 
OP
OP
Snorky

Snorky

Well-Known Member
Joined
Feb 10, 2022
Messages
1,435
Reaction score
1,323
I thought about painting mine to match but in the end also decided against it. Instead I painted the dash a gloss black and then put a color matched stripe down the middle.

View attachment 39970

I can't find a pic of the dash on my new pc, here is the overhead console I installed my air ride controller in and painted it to match to give an idea.
That looks slick. Gloss black looks good.

My gauge bezel is just dash/door matched. So it's pretty subtle.
 

lwarrior1016

Mr. Secondary Timing Chain
Staff member
Staff
Joined
Sep 22, 2014
Messages
9,306
Reaction score
5,722
Location
South Mississippi
That looks slick. Gloss black looks good.

My gauge bezel is just dash/door matched. So it's pretty subtle.
The gauge bezel matched with the passenger airbag is definitely good. I did mine (my dash is black/grey) and it worked out awesome. I think you’ll be happy matching the white.
 
OP
OP
Snorky

Snorky

Well-Known Member
Joined
Feb 10, 2022
Messages
1,435
Reaction score
1,323
Well popped them in. The eehite vents make it look 100x better. The cluster looks pretty good as well. I didn't out thr black headlight knob in yet but here it is 20241231_093410.jpg
20241231_093402.jpg20241231_093348.jpg20241231_093426.jpg

Ohhh yeah I am very happy with it, the more i look at it the more I like it. Now the question in the back of my head exists is. Are white fave reverse glow gages too much?
Now one of that sweet sweet ass this morning

20241231_072505.jpg
 
OP
OP
Snorky

Snorky

Well-Known Member
Joined
Feb 10, 2022
Messages
1,435
Reaction score
1,323
I have a few fastener questions for thr convertiblr A pillar interior trim.20241231_170101.jpg for these pieces here

What goes here? Is it a screw or a push pin holding thr plastic to the metal bracket?20241231_170109.jpg


For the visor retaining screws on a convertible, what kind of screw goes here? Is it a sheet metal screw or a machine screw? 20241231_170119.jpg

For this last little loop here. Sheet metal screw like the other two screws holding the metal bracket to the A pillar.?20241231_170126.jpg


Trying to install my visors and I can't seem to find the long lost screws in my bag of miscellaneous mistang hardware.
 
OP
OP
Snorky

Snorky

Well-Known Member
Joined
Feb 10, 2022
Messages
1,435
Reaction score
1,323
Went to Lowesand picked up some #8 x3/8
and #8x5/8 cap head sheet metal screws and that did the trick for 2 of the 3 screws I needed. Buttoned the trim back up and installed my visors :) yayyyy!!!20250101_161556.jpg20250101_162216.jpg

Then I swapped the tail light bulbs with some auxito LEDs. Now subsequently somehow my srquentials magically work again. Double win :) ground some more of the backside of the headlights housings and ground some clearances on the shrouds. Some of the chrome flaked off the shroud.. bummer. Not winning with the chrome finishes lately. I may just throw them together anyway. Not super happy with how the lenses came out. To me they kind of look a little yellow. So I may just slap them together and run them and try making another set next summer out of the lights that are currently on the car. The expensive part of the purchase is over with. The HID kit, harness/ballasts. The projectors that I am using are like $25. So financially it's worth the gamble.

20250101_171337.jpg
 
OP
OP
Snorky

Snorky

Well-Known Member
Joined
Feb 10, 2022
Messages
1,435
Reaction score
1,323
Here are a few pictures of the patchy chrome shroud 20250102_093146.jpg20250102_093156.jpg20250102_093135.jpg20250102_093218.jpg

I honestly dont think many people will even notice it. So I will just run it since I feel like black shrouds will look too anemic. I'll give it a go and .are another set later if it bugs me that badly.

Performed a smoke test looking for vacuum leaks and tapped the iac with a small hammer incase it is seized up. When I come rolling up to a stop and press in the clutch it wants to die at times. 50/50 shot really. But if I blip the throttle(even ever so lightly) it wont die. Hmmm... any thoughts?

Anyway. Pulled the battery and drivers headlight plug. Which is missing half its retaining tab. Hooked up the hid ballasts and relay Harness/grounded it to the chassis. Tossed the battery back in and set the lights on blocks to test out the beam pattern and to see if the bi-xenon solenoid works.20250102_162741.jpg

And wouldn't you know it.. they are clocked decently well too! :)20250102_163225.jpg

Had to test it against a giant piece of cardboard support by pump Jack's instead of that perfect fence in the background due to this gorgeous lawn ornament..20250102_163404.jpg

Then removed the Harness and cha get it back.. while I was at it I tossed in auxito led corner lights as well. Ridiculously bright like thr tail lights. When I plugged the headlight back in the other half of the retaining tab snapped off... ugh.. and a piece of the header panel came off too when I pulled the corner light to swap the bulb. I am pretty sure the previous owner and 30 year old plastic was the reason this car has next to no retainer clips on any of the electrical fasteners.20250102_165413.jpg

Anyway.. picked up some rubber clamps at harbor frieght and when I get another day t9 tinker I will seal up the lights and install them. Until then I need to find ew headlight adjusters.. the star pieces are snapped off of both the set I am modifying g as well as the set on the car. Do they come on new headlights? Last time I looked for those little adjusters I am pretty sure they wanted like $14 each. Which is mad, mad like a dog. Any suggestions would be appreciated
 

Forum statistics

Threads
78,556
Messages
1,536,167
Members
16,201
Latest member
jgib8795

Members online

Top