You are using an out of date browser. It may not display this or other websites correctly.
You should upgrade or use an alternative browser.
You should upgrade or use an alternative browser.
Venom 's Build Thread
- Thread starter venom
- Start date

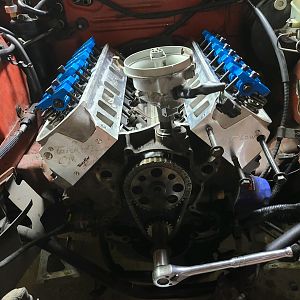
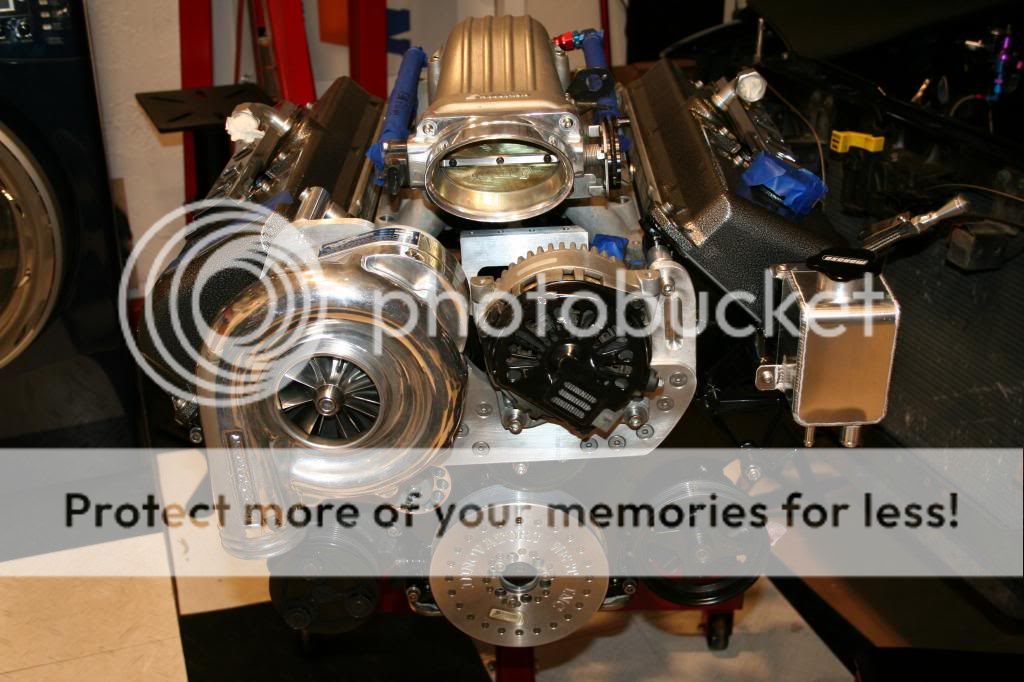
I know many have gone to an 8 rib setup like myself. What my builder Raul from RACE and I have discovered is that the stock procharger's bracket tends to flex when trying to run an 8 rib. We knew a new mounting system had to be made as well as a new place for the alternator. Here is what he has made so far. The intake pipe will now come from drivers side instead of the old setup that was on passenger side. There is zero movement with this bracket. Some more work will be done to the square upper bracket. I would like everyone one to know that Raul does this from scratch with no cnc machine. Nothing from the old system was retained. He has VW bug and here you can see how creative and talented he is. Notice the belt system and carb setup, he even made the pullies.


Was able to get a few things done like mocking up the power steering. Might get a billet reservoir unit as stock plastic looks out of place and its very visible. I had to cut the stock bracket. I might paint it black to make bracket disappear.


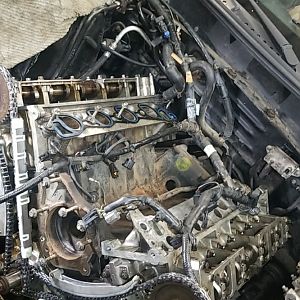
Here are where the coil packs are going to be located since I have dead space under intake. I mocked up it with a piece of cardboard. I wish I could take credit for this but I saw a Saleen with the same intake and this setup. Notice the MMR coolant fittings. I need to put on the fuel rails to see how much room I have for coolant lines.


Here are the new ID 1300 injectors. Suppose to be the best thing since sliced bread. Purple might seem a bit weird but it will fit right in with my Magnafuel FPR which is the same finish. Beware of fake ID injectors. Only buy from authorized vendors. IDs have serial #s and the ID logo is etched in and not a sticker.

Here are where the coil packs are going to be located since I have dead space under intake. I mocked up it with a piece of cardboard. I wish I could take credit for this but I saw a Saleen with the same intake and this setup. Notice the MMR coolant fittings. I need to put on the fuel rails to see how much room I have for coolant lines.
Here are the new ID 1300 injectors. Suppose to be the best thing since sliced bread. Purple might seem a bit weird but it will fit right in with my Magnafuel FPR which is the same finish. Beware of fake ID injectors. Only buy from authorized vendors. IDs have serial #s and the ID logo is etched in and not a sticker.
Re-coated Bassani headers. Went with Remflex gaskets along with Nord Lock washers.


The old ones were leaking for a few months before I tore everything down. Remflex are thicker they recommend 20 ft lbs tq.

These are the only washers you should be using when you don't want bolts not to work themselves loose. These are the stainless steel version.

There is a youtube video that describes how these washers will not allow themselves to work loose.

Headers installed.


Here is the PS bracket that I cut and painted black to make it disappear. I will be getting an aluminum PS tank as stock tank is an eyesore at this point.


The old ones were leaking for a few months before I tore everything down. Remflex are thicker they recommend 20 ft lbs tq.
These are the only washers you should be using when you don't want bolts not to work themselves loose. These are the stainless steel version.
There is a youtube video that describes how these washers will not allow themselves to work loose.
Headers installed.
Here is the PS bracket that I cut and painted black to make it disappear. I will be getting an aluminum PS tank as stock tank is an eyesore at this point.
the.greg
Well-Known Member
This is pretty fantastic! Keep up the good work.
Went with the FR oil Housing delete as I don't want to be deal with o-rings going bad with the stock cooler. Going to go with a relocation and a cooler. Haven't decided which one yet but this part is needed since I want to go with AN lines. If you want this make sure you get the part # that has a "-C". One important note, the water inlet is 2" compared to stock 1.5. You will need to stretch out the hose or but a hose the reduces to the size. I might just weld a 2in water outlet to the radiator.

This is the power steering pump reservoir that replaced the stocker. Inside it has a baffle so its not just an empty can. I am not sure if the stock location will be its final place as I have yet to see about clearance with the intake piping. PS R may have to go on the driver side fender, along with the bracket.
This is the power steering pump reservoir that replaced the stocker. Inside it has a baffle so its not just an empty can. I am not sure if the stock location will be its final place as I have yet to see about clearance with the intake piping. PS R may have to go on the driver side fender, along with the bracket.


mineralgreygt
Member
Pretty incredible build man, very awesome
Thanks to all for words of encouragement. If anyone has questions please feel free ask on this post or PM.
I went to work on the IC pipes. This is a mock up so it may or may not change. I purchased this portable saw from Nothern tool. It was half price and has a small foot print compared to a table version. I have seen some convert this to a table version but after using it it is really not necessary unless you are using it daily. The best way to cut is to secure your piece on 2 2x4s as you need some clearance for the guide on the saw. Make sure to tape the pipe to be cut so that you have a guide. When using the saw you need to look straight down at it and angle the blade straight where you can barely make out the thickness of the blade this means that the blade is straight. Don't rev up the blade to full blast, go at medium speed and let the weight of the tool cut the piece. When you get to the bottom of the pipe you may have to apply a little bit of pressure to finish cut. Like any other tool its good to practice with scrap pieces.

Front intercooler mounted. I used the center of radiator and two bottom tabs to secure it in place. I used the stock 3 core PC unit as installing a bigger unit that is going to be blocked by the bumper support does not make sense IMO. This vertical IC has a lower pressure drop than horizontal mount ones. I mounted it to where none of the core will be blocked by bumper support, the end tanks don't matter. I also did not want to block the grill area with the IC as I live in Florida and with the AC running you need some unobstructed air flow to condenser and radiator. If this IC blows the end tanks as some have reported I will get the same style but from Treadstone. I know many cut the bumper support or put a bar in its place but I don't think its safe enough to do so on a street car. One small bump in a parking lot and you wish you had not. With E85 since it burns cooler heat will not be as much as an issue like reg gas.

I a made 1 single pipe therefore there is less of a chance of a pipe blowing off. Only issue with this that the bends are not as tight but is more secure than using a bunch of hoses. How does rust get in there lol. May grind it down and touch it up.

Here is the other side. Home depot sells a duct tape that does not leave glue residue plus is real strong.

top view

The bypass valve will be mounted on this pipe. I am also going to make my own power pipe out of 45d 4" pipe.

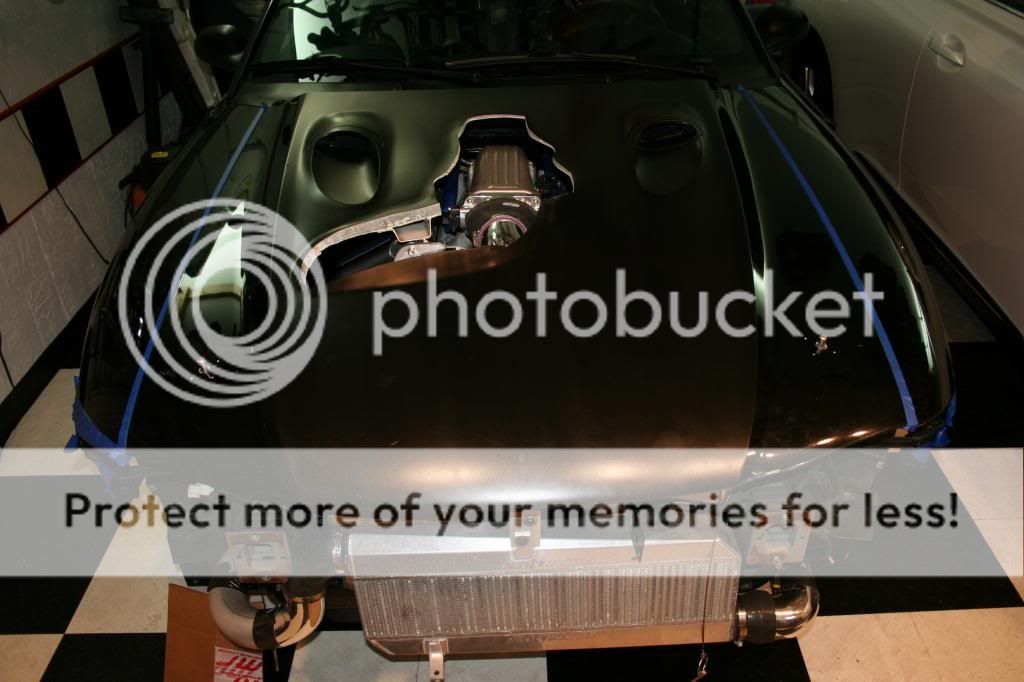
Here is how it looks so far. Will it clear the hood? Not planning on it but instead will have to fiberglass a bump out or some other hood in any case the setup has lowered the clearance needed and added space for a filter in fender well.

The following pics shows the before and after of how I tackled the clearance issue with all these thick radiators. I removed the brackets from the condenser and radiator. I left the rubber isolators on the condenser as well the air dam in-between the condenser and radiator. I cut in half the tubes that hold the radiator on the bottom. This allows the radiator to slip under the radiator core support. The radiator is now in the stock position. The radiator pushes against the rubber isolators of the condenser and keeps condenser in place without either touching. If I did not wish to have AC the radiator would disappear inside the core support as there is enough space in there without the condenser. All I need to do now is weld a couple of brackets for radiator. After extensive research I have yet to find anyone to tackle the issue with lack of clearance due to these Fluidyne radiators. Hopefully this will help someone.
Before

After, may not seem like much but it is. You can't tell from the angle of this photo but I have reduced the radiator width by half. I don't plan on this causing any issues as our high point is not even the radiator, its the crossover tube, lowering radiator 1/2 in will have no effects.

I went to work on the IC pipes. This is a mock up so it may or may not change. I purchased this portable saw from Nothern tool. It was half price and has a small foot print compared to a table version. I have seen some convert this to a table version but after using it it is really not necessary unless you are using it daily. The best way to cut is to secure your piece on 2 2x4s as you need some clearance for the guide on the saw. Make sure to tape the pipe to be cut so that you have a guide. When using the saw you need to look straight down at it and angle the blade straight where you can barely make out the thickness of the blade this means that the blade is straight. Don't rev up the blade to full blast, go at medium speed and let the weight of the tool cut the piece. When you get to the bottom of the pipe you may have to apply a little bit of pressure to finish cut. Like any other tool its good to practice with scrap pieces.
Front intercooler mounted. I used the center of radiator and two bottom tabs to secure it in place. I used the stock 3 core PC unit as installing a bigger unit that is going to be blocked by the bumper support does not make sense IMO. This vertical IC has a lower pressure drop than horizontal mount ones. I mounted it to where none of the core will be blocked by bumper support, the end tanks don't matter. I also did not want to block the grill area with the IC as I live in Florida and with the AC running you need some unobstructed air flow to condenser and radiator. If this IC blows the end tanks as some have reported I will get the same style but from Treadstone. I know many cut the bumper support or put a bar in its place but I don't think its safe enough to do so on a street car. One small bump in a parking lot and you wish you had not. With E85 since it burns cooler heat will not be as much as an issue like reg gas.
I a made 1 single pipe therefore there is less of a chance of a pipe blowing off. Only issue with this that the bends are not as tight but is more secure than using a bunch of hoses. How does rust get in there lol. May grind it down and touch it up.
Here is the other side. Home depot sells a duct tape that does not leave glue residue plus is real strong.
top view
The bypass valve will be mounted on this pipe. I am also going to make my own power pipe out of 45d 4" pipe.
Here is how it looks so far. Will it clear the hood? Not planning on it but instead will have to fiberglass a bump out or some other hood in any case the setup has lowered the clearance needed and added space for a filter in fender well.
The following pics shows the before and after of how I tackled the clearance issue with all these thick radiators. I removed the brackets from the condenser and radiator. I left the rubber isolators on the condenser as well the air dam in-between the condenser and radiator. I cut in half the tubes that hold the radiator on the bottom. This allows the radiator to slip under the radiator core support. The radiator is now in the stock position. The radiator pushes against the rubber isolators of the condenser and keeps condenser in place without either touching. If I did not wish to have AC the radiator would disappear inside the core support as there is enough space in there without the condenser. All I need to do now is weld a couple of brackets for radiator. After extensive research I have yet to find anyone to tackle the issue with lack of clearance due to these Fluidyne radiators. Hopefully this will help someone.
Before
After, may not seem like much but it is. You can't tell from the angle of this photo but I have reduced the radiator width by half. I don't plan on this causing any issues as our high point is not even the radiator, its the crossover tube, lowering radiator 1/2 in will have no effects.
Great idea to put the coil pax in the valley!
I wish it were mine but its from a 1998 Saleen. He has the same intake but has to rock a huge cowl hood as he has the dreaded spacer to clear alternator.
The hood clears everything !!!!!!!!!!!!!!!!!!!!!!! This a big deal for me as you can see. Now I need to decide on a hood. See this thread if you can help decide http://www.sn95forums.com/showthrea...-choice-please-chime-in&p=1280312#post1280312


My attempt to polish a turd. The white layer on the bottom is the factory thickness.

My attempt to polish a turd. The white layer on the bottom is the factory thickness.
Got some more fittings that to keep me going. I got all push loc for water lines as they are soft and easy to assemble as long as you preheat them in boiling water for 3 min or so. I also have the remote oil filter block. There is not many choices out there for the Ford thread pattern of 22mm x 1.5. Moroso has one but it uses -8an which seems a little small. I also wanted extra ports to prime the motor and for more options as far as sensor location. Perma cool is having a great sale on these almost 50%. I got the thermostat just in case I want to run a cooler later on.
I got these storage cases at HF with 40%off, pretty sweet deal. Yes HF sells some crappy stuff but there are some things that are good.


Since Ford Thread pattern is very limited on options I got this which I am able to attach 820-s to 3.4"-16 thread.

Before everybody goes crazy on the smaller ID of the above fitting notice how the opening is bigger than the -10an.

This HF caliper is really good, accurate and a steal since it always has a discount with coupon.

I got these storage cases at HF with 40%off, pretty sweet deal. Yes HF sells some crappy stuff but there are some things that are good.
Since Ford Thread pattern is very limited on options I got this which I am able to attach 820-s to 3.4"-16 thread.
Before everybody goes crazy on the smaller ID of the above fitting notice how the opening is bigger than the -10an.
This HF caliper is really good, accurate and a steal since it always has a discount with coupon.

the.greg
Well-Known Member
This is incredible work, keep it up!
Back to mocking up. Once I have the thermostat housing I can start making the lines.
Coil pack bracket. Did not spend too much time on it as it will not be seen and just needs to work. You can also see the -12 lines on the heads.

3 pipes all welded up after final mock they will be powder coated as I don't like the idea of polishing pipes until I die. You will also see some cast aluminum ends on all the pipes. This is to insure that these pipes will not blow off and lip is bigger and stronger than if you make it with beader. Plus no way for the pipe to get crushed or get out of round. The only additional step I have to do is port the cast aluminum ends so air has a smooth flow. Very easy since cast parts are at the ends only.

Procharger red race valve mounted.

Procharger valve mounted.

2 -16 an fittings. I will have to go with a 120d up top as the two 90d will not clear but things may change to a straight depending on how lines are run.
One of the reasons I went with so many separate pieces was to have options.

Each y block is -16 an.

Coil pack bracket. Did not spend too much time on it as it will not be seen and just needs to work. You can also see the -12 lines on the heads.
3 pipes all welded up after final mock they will be powder coated as I don't like the idea of polishing pipes until I die. You will also see some cast aluminum ends on all the pipes. This is to insure that these pipes will not blow off and lip is bigger and stronger than if you make it with beader. Plus no way for the pipe to get crushed or get out of round. The only additional step I have to do is port the cast aluminum ends so air has a smooth flow. Very easy since cast parts are at the ends only.
Procharger red race valve mounted.
Procharger valve mounted.
2 -16 an fittings. I will have to go with a 120d up top as the two 90d will not clear but things may change to a straight depending on how lines are run.
One of the reasons I went with so many separate pieces was to have options.
Each y block is -16 an.
Similar threads
- Replies
- 23
- Views
- 3K
- Replies
- 12
- Views
- 2K