Wrecked & Rusted 2002 GT Rebuild

MyLittlePony

Active Member
Joined
Apr 2, 2009
Messages
831
Reaction score
428
Location
Dallas
Easy, just don't drive it on salty roads LOL

yep. That’s the answer. I’ve driven my car through 7 states. Even a few weird ass days in snow, or what we call “snow.” ...no salt. It was registered during its first year as a rental in Denver, but who rents a rear wheel drive convertible in such an environment?!? Car was auctioned right when the appropriate weather popped out, when people would actually want that rental upgrade.
 

Boostr1

Active Member
Joined
Apr 17, 2020
Messages
923
Reaction score
643
Location
North Jersey
Nothing a wire wheel, primer, and undercoating can fix. Ive been fortunate with my 98 the surface rust is minimal, some parts do have rust on them but that are replaceable if needed.
 
OP
OP
kyholm

kyholm

New Member
Joined
Feb 5, 2020
Messages
30
Reaction score
54
Location
Canadanada
Hey everyone, sorry about the big gap in posting here, has been a busy summer of not wanting to work on my car lol. Here is a video getting up to speed on additional frame straightening and below that are some more photos of what's going on.


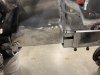
So after I brought it back down off the frame bench I gave the corroded areas a quick sandblast to clean them up and see what I'm working with (not much, lol)

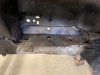
Here is the outward side of the drivers side rail, obvious perforation, also, don't mind the black stuff, it's just some etch
IMG_0860.JPEG
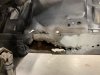
Here is the underside of the same rail, yikes eh? IMG_0862.JPEG
And a view of the inside of that rail and bottom of the strut tower. Amazing the K-member even managed to stay in this thing... IMG_0867.JPEG
This is the inside of the passenger side rail, much the same IMG_0870.JPEG


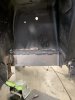
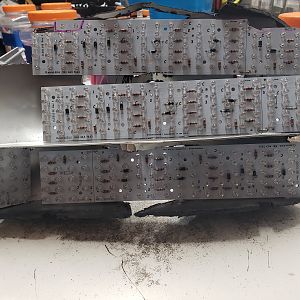
Now here is a real dilemma I've put myself into in the next two images. These are taken laying on the floor under the car looking up at the rails. What has happened is, the rails were so weak due to the rust that they did not pull in a linear, predictable way, and actually kinda "zagged" over, as is obvious in the photos, so some how I have to get that section lined back up reasonably straight with the firewall side of things before welding in new metal. Oh well, this is a war of attrition!! IMG_0880.JPEG

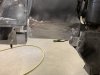
Same same, but this passenger side rail, now part of this is optics, and part is because the bottom of the rail is kinda.. "out of square" and leaned over due to it being so weakIMG_0881.JPEG

And that is it! You're all caught up on my past 6 months, well I mean, anything interesting and worth noting anyways...

Hope you're making more progress than me and stay safe everyone!

Kyle
 

Attachments

  • IMG_0861.JPEG
    IMG_0861.JPEG
    241.1 KB · Views: 9
  • IMG_0866.JPEG
    IMG_0866.JPEG
    261.2 KB · Views: 9
  • IMG_0868.JPEG
    IMG_0868.JPEG
    248.6 KB · Views: 10

totalchaos

Member
Joined
Nov 8, 2014
Messages
111
Reaction score
39
And this why we don't buy cars from out east. I'm in Alberta, not saying we don't have issues out here , just cars from mostly Ontario and east are bad for rust. I also work in a body shop, and those rails are going to give you grief. Interested in how you plan to get the straight again.
 
OP
OP
kyholm

kyholm

New Member
Joined
Feb 5, 2020
Messages
30
Reaction score
54
Location
Canadanada
And this why we don't buy cars from out east. I'm in Alberta, not saying we don't have issues out here , just cars from mostly Ontario and east are bad for rust. I also work in a body shop, and those rails are going to give you grief. Interested in how you plan to get the straight again.

In hindsight, I should have had a better look at the rails, but the car was a steal so I guess it is what it is, haha. A real “pay now or pay later” situation.

The rails are technically “straight” as far as a structural is concerned, it’s just the bottom of the square has rolled and gone out of round, don’t know if that makes sense. Basically it was so weak from corrosion in the strut tower area it moved like mashed potatoes rather than metal. I think I just need to give it a little push with a portapower. We’ll see! If not, I’m going to just put a complete square tube rail in it.
 

totalchaos

Member
Joined
Nov 8, 2014
Messages
111
Reaction score
39
It makes sense. I would do a round tube rail. Think I would fixed the rust then did my pull.
 
OP
OP
kyholm

kyholm

New Member
Joined
Feb 5, 2020
Messages
30
Reaction score
54
Location
Canadanada
Well, another week has gone by and I've made some headway. Turns out the bottom of the rail had just kinda...gone out of square from the pulls and a BFH was all that was needed to sort that out. I know some of you like photos and other will watch videos, so here is a bit of both for this weeks update. I really do appreciate anyone who takes time out of their day to watch the videos or check out this thread!


Here is the topside of the rail with the cap off
IMG_0923.JPEG IMG_0924.JPEG

Cap that was removed and set aside for patterning IMG_0925.JPEG

Rail section cut out drivers side IMG_0926.JPEG IMG_0927.JPEG

Passenger side rail cut out IMG_0928.JPEG

Drivers side IMG_0929.JPEG

It's nice to have a lot of the cancer removed now. I've started making patters from the sections I've removed which I will cover in my next update!

Thanks for stopping by and checking out the update.

Cheers!
 

MyLittlePony

Active Member
Joined
Apr 2, 2009
Messages
831
Reaction score
428
Location
Dallas
Holy shit that’s disgusting! Bothered me when people called these things “rustangs.” I could never understand it! My car has spent 25 years in Texas. Only saw snow/ice maybe a few miles of its life, but we use sand, not salt, and I don’t think I even drove it once they were finally treated (usually melts before trucks arrive and bridges get top priority)

You are doing a good thing. This car belonged in the crusher, but you saved it. It owes you now.
 
OP
OP
kyholm

kyholm

New Member
Joined
Feb 5, 2020
Messages
30
Reaction score
54
Location
Canadanada
Holy shit that’s disgusting! Bothered me when people called these things “rustangs.” I could never understand it! My car has spent 25 years in Texas. Only saw snow/ice maybe a few miles of its life, but we use sand, not salt, and I don’t think I even drove it once they were finally treated (usually melts before trucks arrive and bridges get top priority)

You are doing a good thing. This car belonged in the crusher, but you saved it. It owes you now.

Pretty much all of these 3rd gen platform cars from the rustbelt and up are like this to some degree.:mad: Every foxbody or SN95 in Canada has this rust that I've ever seen. (Well, except the ones from out west, where they don't get bad winters or use salt)

Appreciate the appreciation! (hopefully the car does too, haha)
 
OP
OP
kyholm

kyholm

New Member
Joined
Feb 5, 2020
Messages
30
Reaction score
54
Location
Canadanada
Another few weeks have blew by and some marginal progress has been made, along with another distraction being purchased. More on that later.

At this point we're on the downhill slide with all the cancer gone, it's time to start putting metal BACK IN. Here is the part 2 video on the frame rail/strut tower rust for those of you that enjoy watching the videos, photos to follow below.


Good patters are critical to making a good repair panel. I like to use file folders for their rigidity and abundance in my shop.

IMG_0945.JPEG

A good butt match with a sleeve behind will make this an easy section to weld in. IMG_0947.JPEG

All ready to become a real boy! IMG_0948.JPEG

Here are the strut towers with new metal all welded in
IMG_0959.JPEG

Other side strut tower patch tacked in place, notice the tight butt fit. IMG_0960.JPEG

Here we are with a the rail section temporarily set in place
IMG_1025.JPEG

All ready to get set in place with the laser measuring system and welded up. Finally got my aftermarket rad support as well, have only been waiting 5 weeks for it, damn you Keystone...
IMG_1030.JPEG
 

Attachments

  • IMG_0964.JPEG
    IMG_0964.JPEG
    206.2 KB · Views: 8
  • IMG_0967.JPEG
    IMG_0967.JPEG
    245.3 KB · Views: 6
  • IMG_0968.JPEG
    IMG_0968.JPEG
    229.1 KB · Views: 6
OP
OP
kyholm

kyholm

New Member
Joined
Feb 5, 2020
Messages
30
Reaction score
54
Location
Canadanada
IN OTHER NEWS....

I've got myself into a whole new mess after a a deal I could not pass up landed in my lap for my highschool dream car, a notchback fox body. Here we go again...

IMG_0984.jpg

Here's a video of me trying to scare my girlfriend in the new project car

Big plans for this one, but let's get this new edge wrapped up first...
 
OP
OP
kyholm

kyholm

New Member
Joined
Feb 5, 2020
Messages
30
Reaction score
54
Location
Canadanada
Well here we are, another month closer to being clear of 2020 and I've managed to drag my ass along and get the front end of this thing painted.

As per usual, some photos and a more in depth video:


Here is everything prepped up. Some short strand fibreglass over the plug welds to pretty them up and fill any pinholes, a scuff all over with a red scotchbrite and lots of tinfoil.
1.jpg

2 coats of Limco epoxy primer, I kinda like this colour to be honest
2.jpg


And what you've all been waiting for:
3.jpg

Not too shabby if I do say so! Since shooting it I've trailered it back to my home garage so I can start putting it all back together. Have been too busy shovelling snow to get anything done though...
 

Musturd

Post Whore
Joined
Feb 12, 2011
Messages
10,496
Reaction score
2,260
Thankyou!


Thankyou, and yes I agree. Fox's are becoming desirable and hard to come by here in Canada. I see regular listings for what I'm going to call "B" condition cars with lots of miles going for over $20,000!o_O


Oh yea I’m in bc they pull a premium here I sold my supercharged one a few years back for far too little
 
OP
OP
kyholm

kyholm

New Member
Joined
Feb 5, 2020
Messages
30
Reaction score
54
Location
Canadanada
Well folks, it's been a few years, but I'm back at it on the ol' New Edge! With the project being frozen in time, it's been tough remembering where I left off with many things (along with where the heck all these nuts and bolts go, lol) The first thing I did was get the motor accessories bolted back on and put the headers on as I knew that would be very difficult once the motor was back in the car. After I dropped the mill on to the K-member, I slid it back under the car

IMG_8228.JPG

At this point I was ready to clear out all the crap I had stored underneath and drop the body back down on to the k-member and get things bolted up. I didn't remember it being such a bugger when I was pulling it, but after some shuffling, it dropped back into it's home.

IMG_8269.JPG

Of course, the day after I got the everything bolted up, and great deal on a tubular k-member and a-arms came up on marketplace, so the OE k-member is coming back out again! lol.

I didn't take many pictures while working, as I always have the camera rolling. If you're into that sort of thing, here is a more in-depth update on what's going on with the old 'stang:


Thats all I've got so far, but I've done a bunch more since and will post some more updates once I get the videos edited.

Cheers!

Kyle
 

Latest posts

Forum statistics

Threads
77,517
Messages
1,504,138
Members
14,984
Latest member
senior001

Members online

Top