Saw you post it on Instagram, congrats on having it back running like a top!I'm really hoping it stays together this time!
You are using an out of date browser. It may not display this or other websites correctly.
You should upgrade or use an alternative browser.
You should upgrade or use an alternative browser.
White's '95 GT "Unicorn"
- Thread starter white95
- Start date
OP
OP
New AC accumulator to replace the new AC accumulator 

OP
OP
A little sound check fun after work:
ttocs
Post Whore
sounds good man.
Sweet music!!!
OP
OP
Thanks guys
92wastheyear
New Member
- Joined
- Jul 19, 2021
- Messages
- 76
- Reaction score
- 62
That is really an odd place to put it
OP
OP
That is really an odd place to put it
It’s 2021, nothing is odd anymore.
92wastheyear
New Member
- Joined
- Jul 19, 2021
- Messages
- 76
- Reaction score
- 62
I amIt’s 2021, nothing is odd anymore.
OP
OP
I am
You’ll fit in just fine.
Venompower
Active Member
What did you use for the control pack? Because I'm kicking around forging my short block, and then thought maybe a coyote swap would be a better option... then I saw the FRPP control pack is like $1,800.
OP
OP
What did you use for the control pack? Because I'm kicking around forging my short block, and then thought maybe a coyote swap would be a better option... then I saw the FRPP control pack is like $1,800.
I am using a Holley HP EFI setup with their TiVCT/cam controller. It’s much pricier than the FRPP stuff and the main reason I’m using was I already had it from my previous engine. Just needed to buy the Coyote specific wiring and module. It started right up on the base tune and I’m using a remote tuner. You can expect to pay about $3k to replicate my setup.
OP
OP
Put the Unicorn on jack stand the fuel tank and investigated the cause of the leak.


Just as I had suspected, it came from the fuel hanger not being properly secured. The Pro-M hanger came with a “three winged” retainer and the stock tank uses a “four winged” retainer.

Quantum Fuel Systems 340 LPH in Pro-M hanger

Properly secured like Ford intended:

Drained the tank after that was completed which started the new fuel level gauge install. The debris was already in the buxket

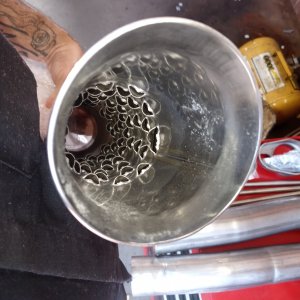
Let’s take a moment to look at this kinky mess

All done!! Everything is tight and secured.

Just as I had suspected, it came from the fuel hanger not being properly secured. The Pro-M hanger came with a “three winged” retainer and the stock tank uses a “four winged” retainer.
Quantum Fuel Systems 340 LPH in Pro-M hanger
Properly secured like Ford intended:
Drained the tank after that was completed which started the new fuel level gauge install. The debris was already in the buxket
Let’s take a moment to look at this kinky mess
All done!! Everything is tight and secured.
DKblue98GT
Well-Known Member
- Joined
- Dec 19, 2009
- Messages
- 1,406
- Reaction score
- 333
There is a lot going on back there!
joemomma
Well-Known Member
- Joined
- Dec 9, 2020
- Messages
- 1,259
- Reaction score
- 767
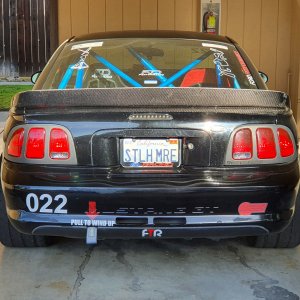
What tail pipes are those? They look like LX?
OP
OP
What tail pipes are those? They look like LX?
Good eye!! Those are 2.5” Flowmaster Foxbody LX tailpipes.
OP
OP

Wiring!!! Fuel level gauge installed and partially calibrated. I didn’t take pictures of the process but this was how it went:
Setting the Existing Sender Type
1. The brown and black wires are used to set the sender type. The gauge ships pre-programmed to read GM 0-90 ohm senders.
If using a 0-90 ohm GM sender, separately insulate the ends of the brown and black wires with electrical tape, and coil them up
under the dash.
2. If any other sender type is required, connect a Radio Shack 275-1556 or equivalent momentary button to the black and brown
wires (see illustration above), or alternately touch the stripped ends of the black and brown wires to simulate pushing the button. 3. Press and hold the button, and apply power to the gauge. After 10 seconds, the display will momentarily display a number with a
dash on either side indicating the gauge is in sender select mode.
4. Allow the display to move to the appropriate number per the sender select chart (see next page), and release the push button.
The display can be incremented to the next position by momentarily pressing the button.
5. Remove power from the gauge to store the new sender type by turning off the ignition switch.
6. Re-apply power to the gauge, and confirm that it reads the proper fuel level. If the proper fuel level is not read, return to step 3
and repeat the sender select process. If the proper fuel level is still not indicated, perform a Custom Sender Calibration.
7. Remove power from the gauge by turning off the ignition switch.
8. Remove the momentary button if it was used, and tape the ends of the brown and black wires so they will not touch.
9. Coil the wires up under the dash.

The gauge is reading 10% after introducing 3.001 gallons (dammit) in the tank. I won’t be satisfied with the calibration until I see what it reads full.

Wideband installation next followed by wiring in the T56 Magnum harness and adding additional grounds to the electrical system.
OP
OP
Wheeled it over to the Shell station and filled it up. The new gauge read 100% at full


Man, it really sucks driving this thing in the rain with no AC!! Need to adjust the clutch and put the front bumper back on.

Man, it really sucks driving this thing in the rain with no AC!! Need to adjust the clutch and put the front bumper back on.
OP
OP
Swapped out the incorrect steering wheel hub for the proper part! Big thanks to @vtchopperdude for doing his home work and sharing the knowledge with the rest of us.
Just look at that gap!! The bolt had, AT BEST, 2 threads in the column!

The new hub has a larger diameter and fit so good I was able to remove the trim spacer.

The new Grip Royal steering wheel feels SO good!! Now.. I just need an alcantara shift boot and e-brake boot. Hmm.


Just look at that gap!! The bolt had, AT BEST, 2 threads in the column!
The new hub has a larger diameter and fit so good I was able to remove the trim spacer.
The new Grip Royal steering wheel feels SO good!! Now.. I just need an alcantara shift boot and e-brake boot. Hmm.
OP
OP
Today I’ve decided to tackle another project that’s been on the back burner for a while. I’m finally installing the carbon fiber fenders. This is stressful.

After some fine tuning these will look amazing.

After some fine tuning these will look amazing.
Similar threads
- Replies
- 57
- Views
- 5K
- Replies
- 26
- Views
- 1K